Finance
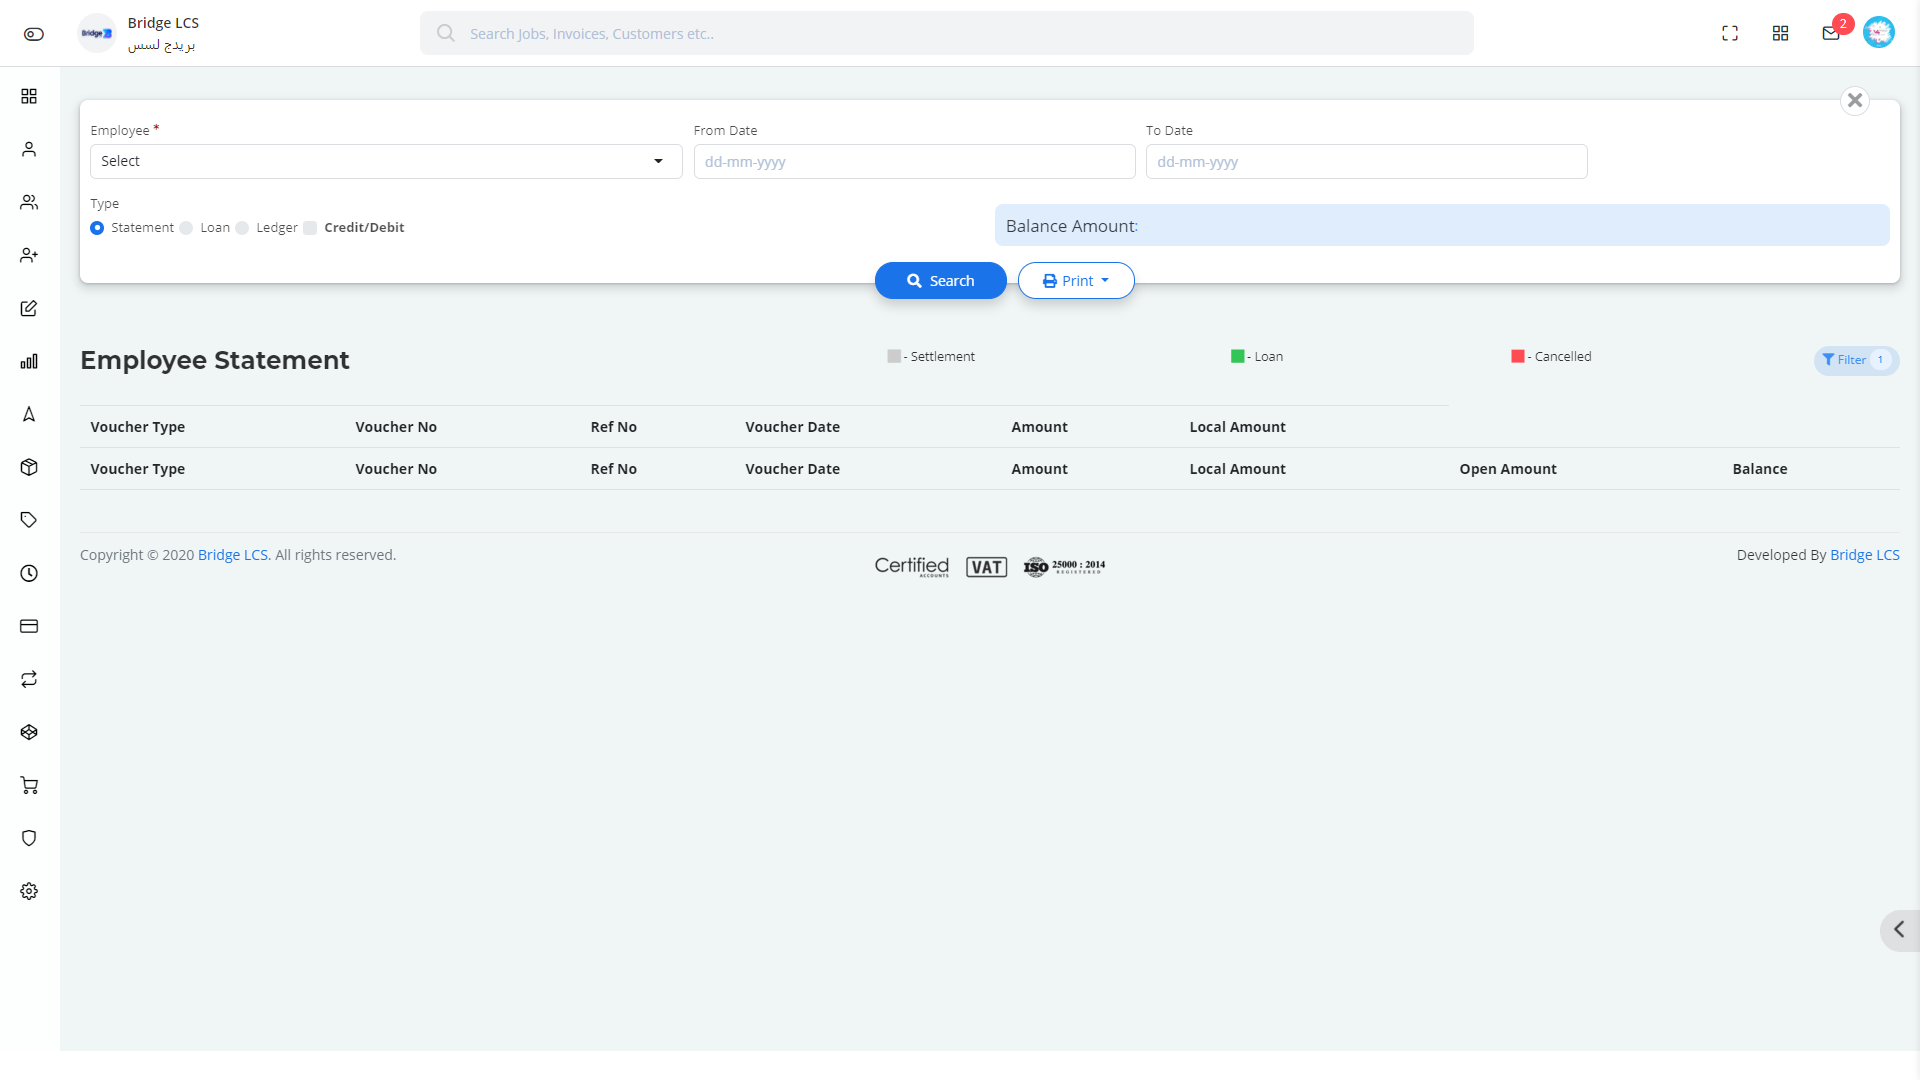
Finance Module is one of the important modules where all the financial transactions are captured.
- Accounts
- Balance Analysis
- Income Statement
- Vouchers
- General Ledger
- General Invoice
- Bulk Income
- Banking
- Closing
Account
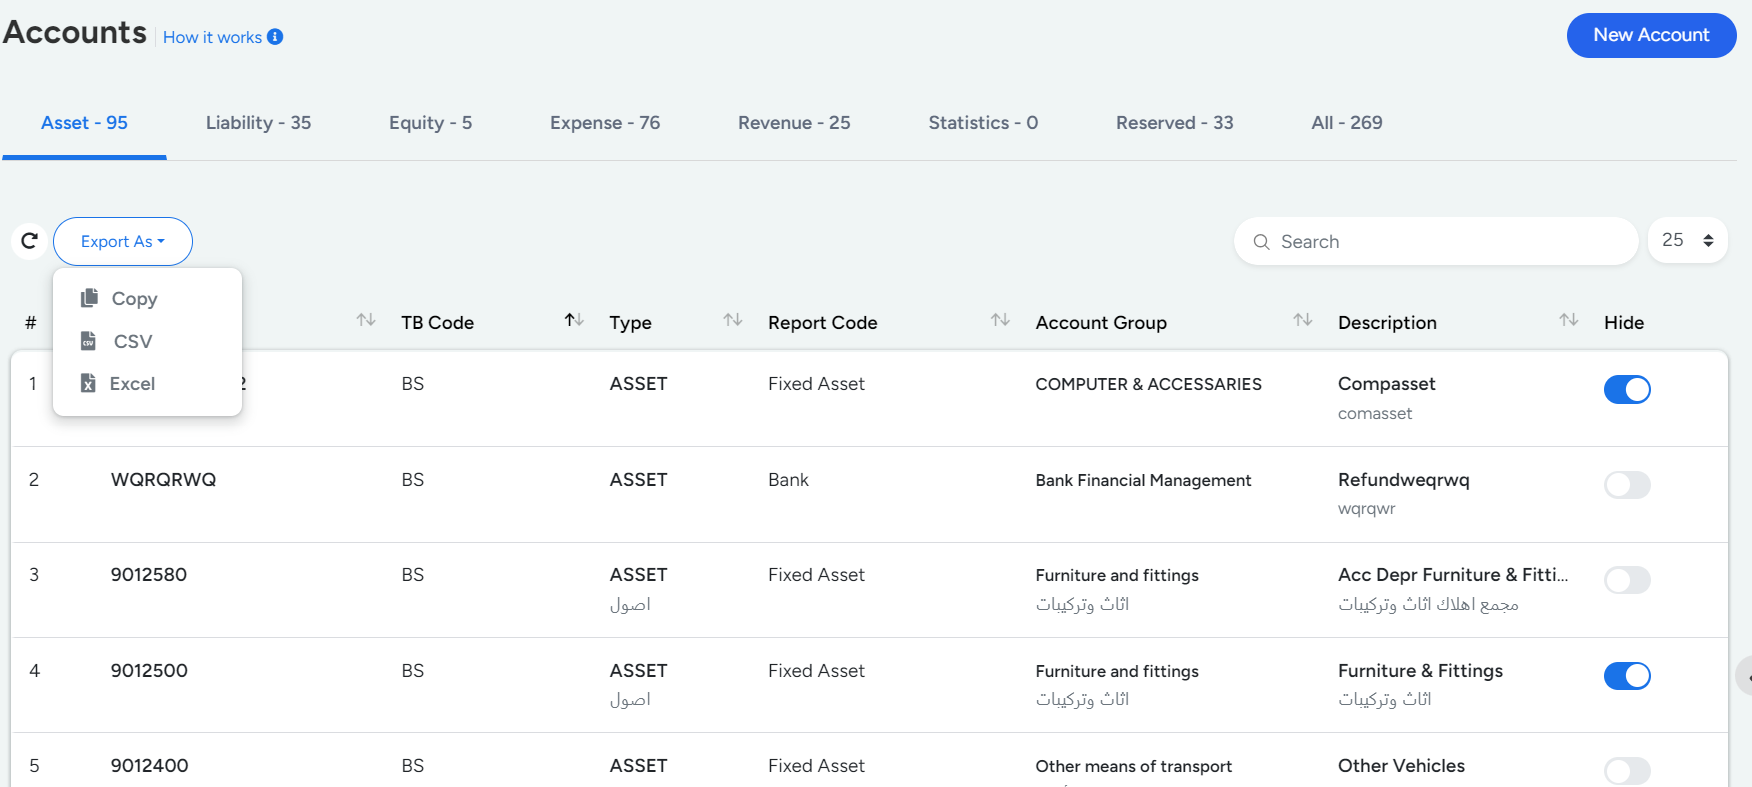
Account has multiple segments which includes,
- Asset
- Liability
- Equity
- Expense
- Revenue
- Statistics
- Reversed
- All
How to Create New Account
- Step 1
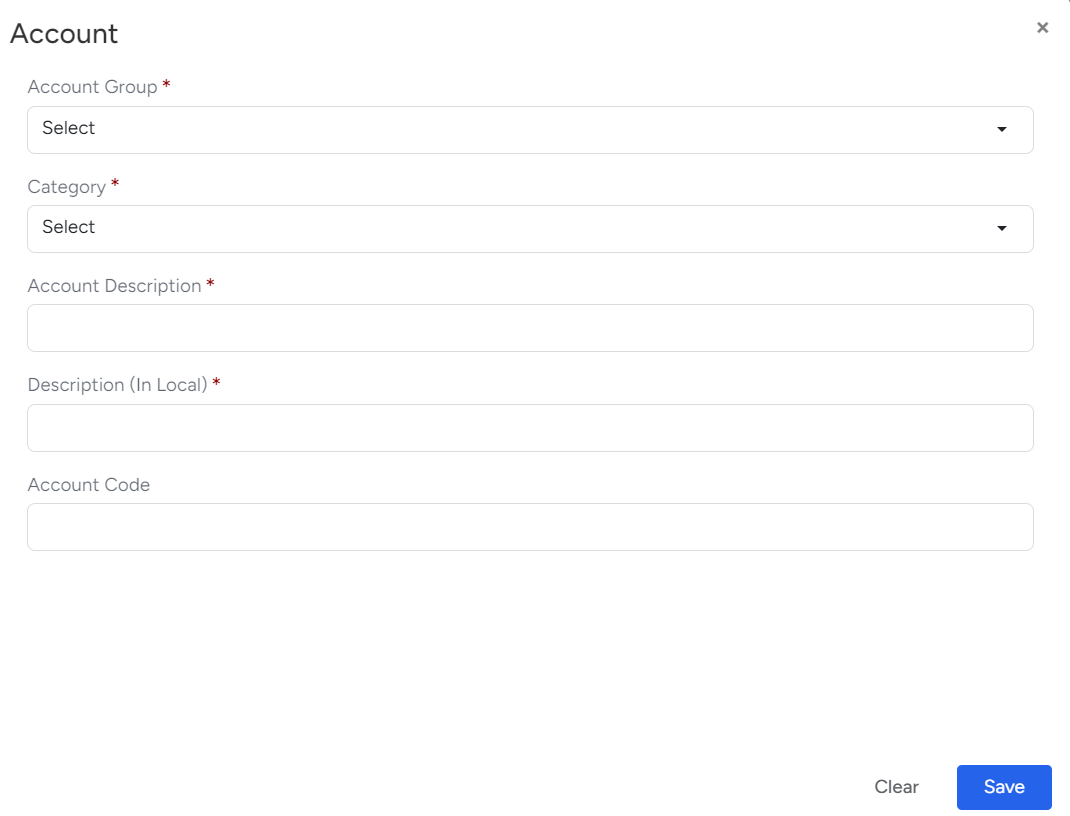
- Go to Finance --> Accounts --> New Account. A popup window will appear where you must include the following details,
- Step 2
- Select the type of Trial Balance from the dropdown. Trial Balance --> Profit and Loss / Balance Sheet.
- Step 3
- Select the Account Type based on the following,
- Case 1
- If you have selected Profit and Loss(PL) as your Trial Balance (TB) Type , then you will have to select either Revenue or Expense as Account Type .
- Case 2
- If you have selected the Balance Sheet(BS) as your Trial Balance (TB) Type , then you will have to select Asset or Liability or Equity as Account Type
- Step 4
- Select appropriate Report Code based on the following cases,
- Case 1
- If you have selected PL as TB and Revenue as Account Type, then the Report Code options available are Other Income Revenue, MISC Revenue, Operational Revenue and Financial Revenue. Select appropriate code and Proceed.
- Case 2
- If you have selected PL as TB and Expense as Account Type, then the Report Code options available are Operational Expense and Financial Expense. Select appropriate code and Proceed.
- Case 3
- If you have selected BS as TB and Asset as Account Type, then the Report Code options available are Bank, Cash, Current, Fixed Asset. Select appropriate code and Proceed.
- Case 4
- If you have selected BS as TB and Liability as Account Type, then the Report Code options available are Current and Long Term Liability. Select appropriate code and Proceed.
- Case 5
- If you have selected BS as TB and Equity as Account Type, then the Report Code options available are Capital, Equity and Reserve. Select appropriate code and Proceed.
- Step 5
- Select the respective Category and Give significance description
- Asset
- Asset segment has the list of assets maintained by the organisation along with the basic account details like TB(Trial Balance) Type, Report Code and Group.
- Liability
- Liability furnishes the list of liable accounts.
- Equity
- Equity gives you the profit earned / amount left after liability.
- Expenses
- Expenses furnishes the list of payments made against certain services.
- Revenue
- Revenue section gives you the list of accounts with description to know a detailed view.
- All
- This section has a list of accounts from every section.
Actions Performed
- Edit - allows super-admin to edit the description given.
- Delete
Advanced Features
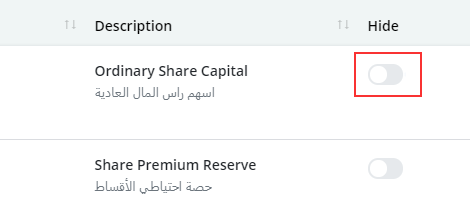
Hide feature is present along with each column. If you enable Hide, then the corresponding account number will not be displayed in the entire account drop downs.
The Video inserted below explains you the working of " Account " to have a better understanding
Project
Project Section is a sub account which projects the generalised account details into a more accurate form.
How to Create Project
- Step 1
- Go to Finance -->Project
- Step 2
- New Project --> Fill the Project Name (*) , Expiry Date and Project Description (*).
- Step 3
- Click Save to capture the changes.
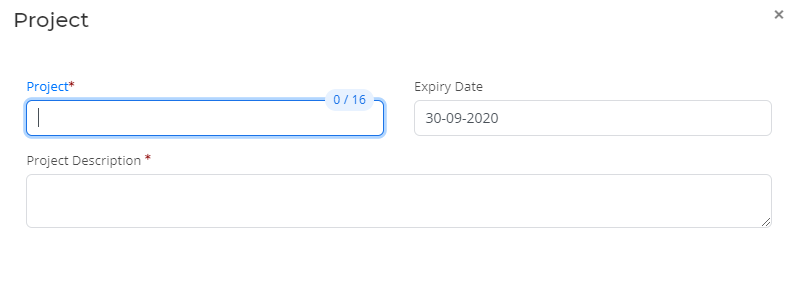
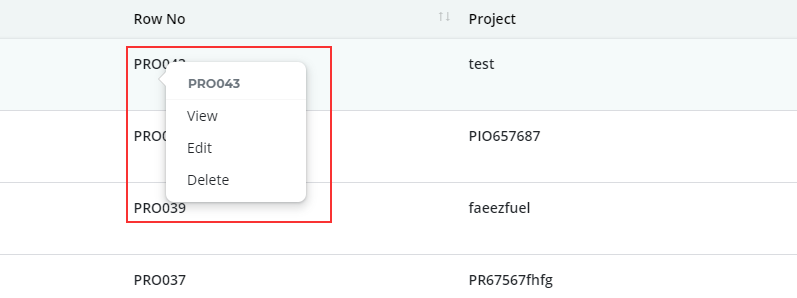
Actions Performed
- View
- Delete
- Edit
Advanced Features
Double Clicking on the Row No allows the user to create a Memo and a reminder can be set for future follow ups.

Double Clicking anywhere on the column except Row no gives you the view of attributes entered.
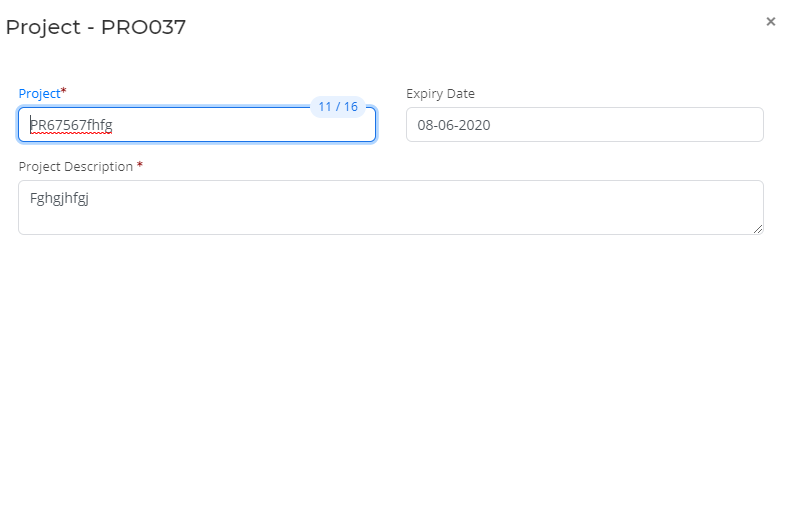
Sorting Can be made Column Wise Alphabetically.
The Video inserted below explains you the working of " Project " to have a better understanding
Opening Balance
Opening balance is one of the important module in BridgeLCS
When the firm is migrating its accounts, the closing balance of the existing firm will become the opening balance in the new firm.
Steps for creation of Opening balance
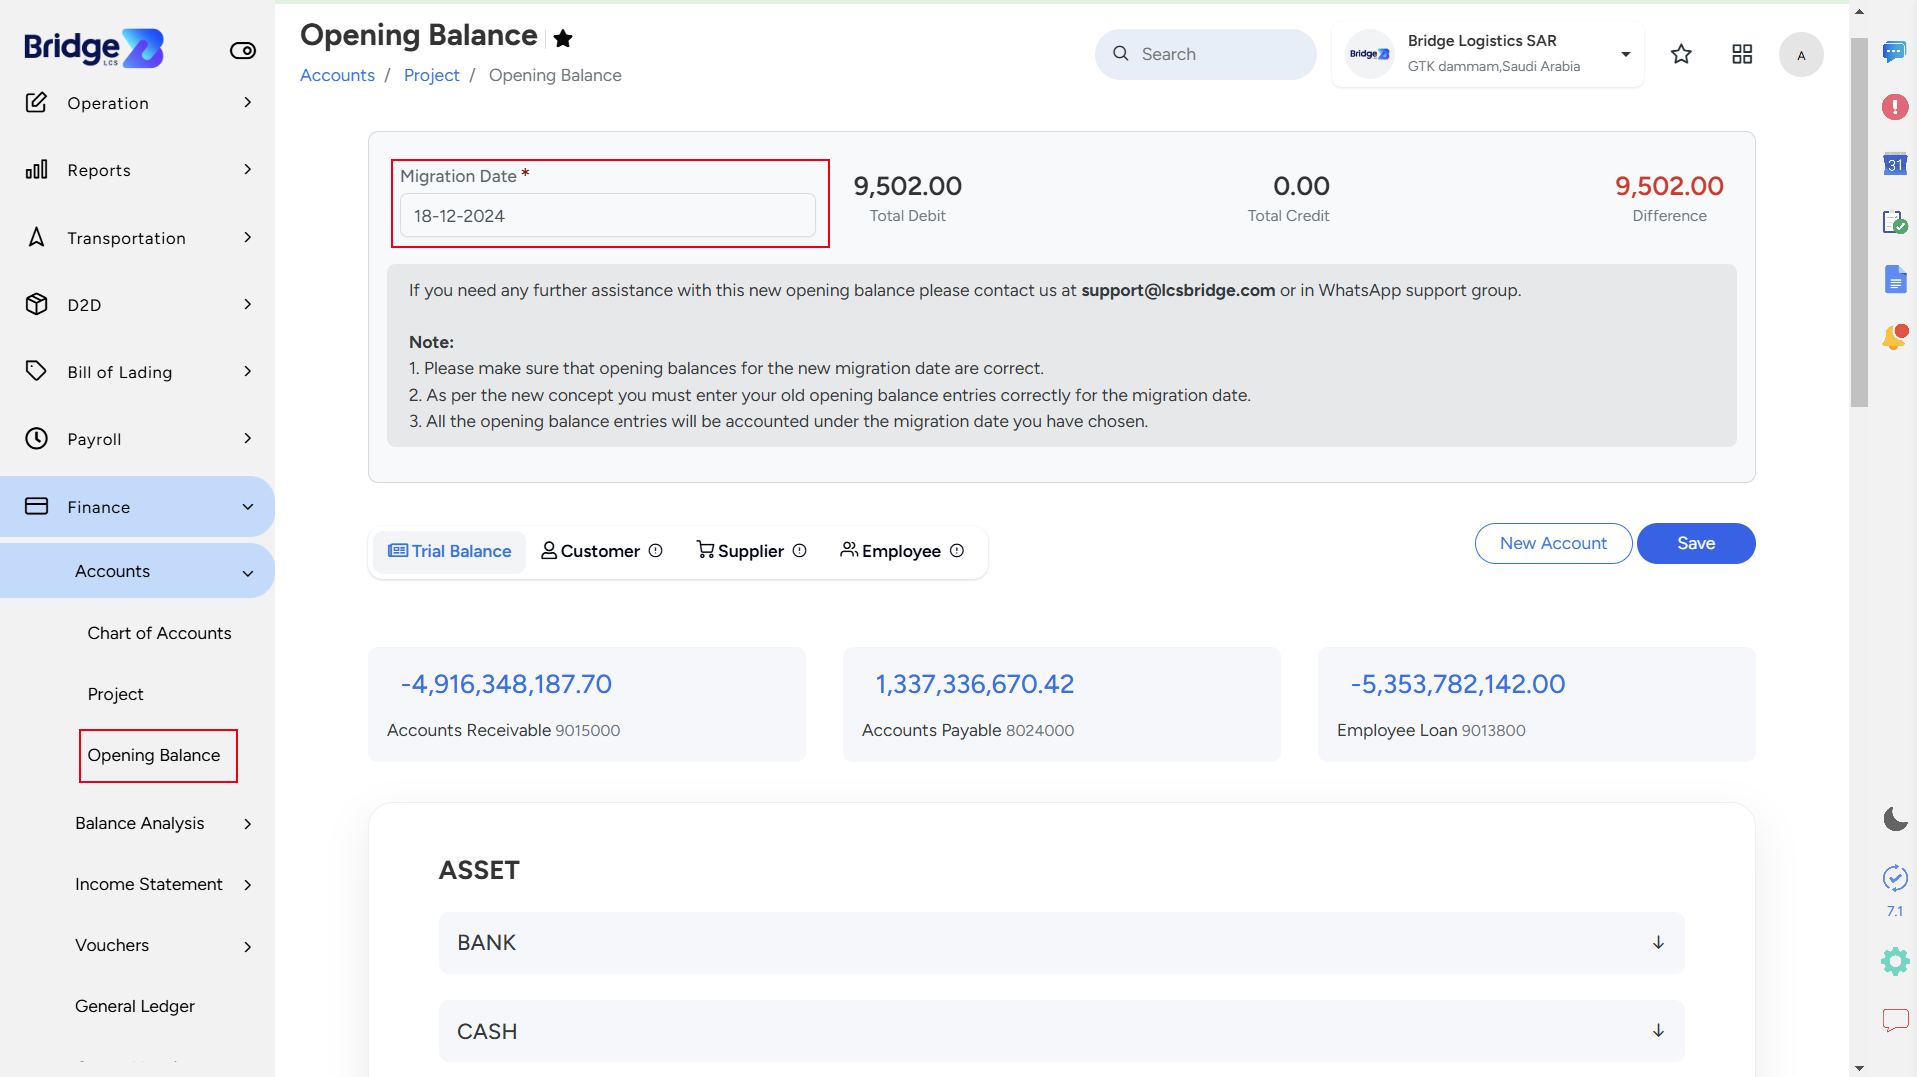
- Step 1: Go to Finance → Accounts → Opening Balance
- Mention the migration date
- Step 2: Entering Opening Balances: Trial Balance, Customer, Supplier, and Employee
- You'll find four sections on display—Trial Balance, Customer, Supplier, and Employee. And enter the opening balances of each account.
- Step 3: Activating Customer and Vendor Tabs
- Enter the available amount in Account receivable and Accounts payable column to enable the Customer and Vendor tab.
- Step 4: Saving option
- Click on the customer tab and Enter the Opening Balance Amount Then save it.
Scenario 1: Adjusting opening balance for customer And supplie
- Step 1: Navigate to the Finance Module
- Go to Vouchers →Collections → New collection
- Step 2: Select a Customer
-
In the Collections section, selecting a customer will display the Final Invoices and Opening Balance below.
To adjust the Opening Balance:- Tick the "OB" checkbox to deduct the amount from the Opening Balance.
- Enter the amount to be paid.
- Step 3: Save or Modify Data
-
Click on Save to finalize the changes.
To modify the entered data, click on the Clear button.
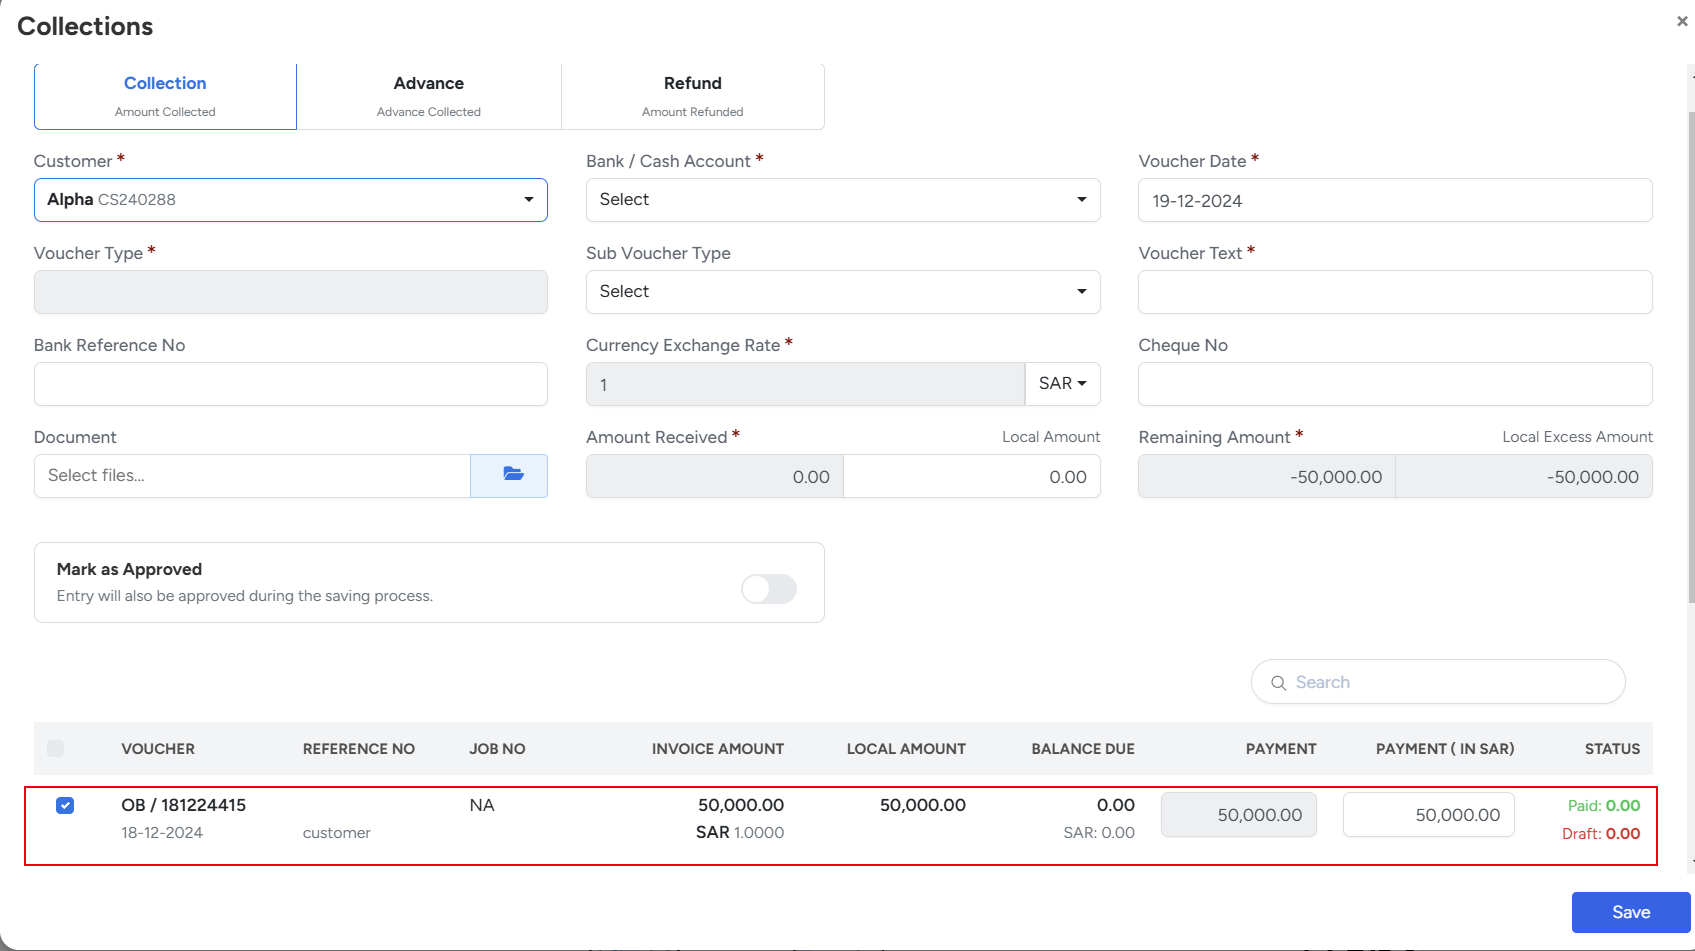
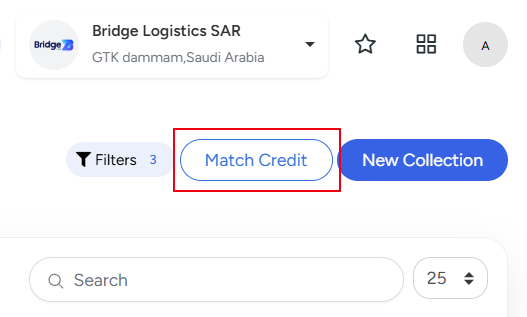
Alternatively, the Match Credit feature allows you to adjust a customer's opening balance using the advance payments made.
Scenario 2: Adjust a customer's opening balance with Match Credit feature
- Step 1: Go to Finance→ Vouchers→ Collections →Match Credits
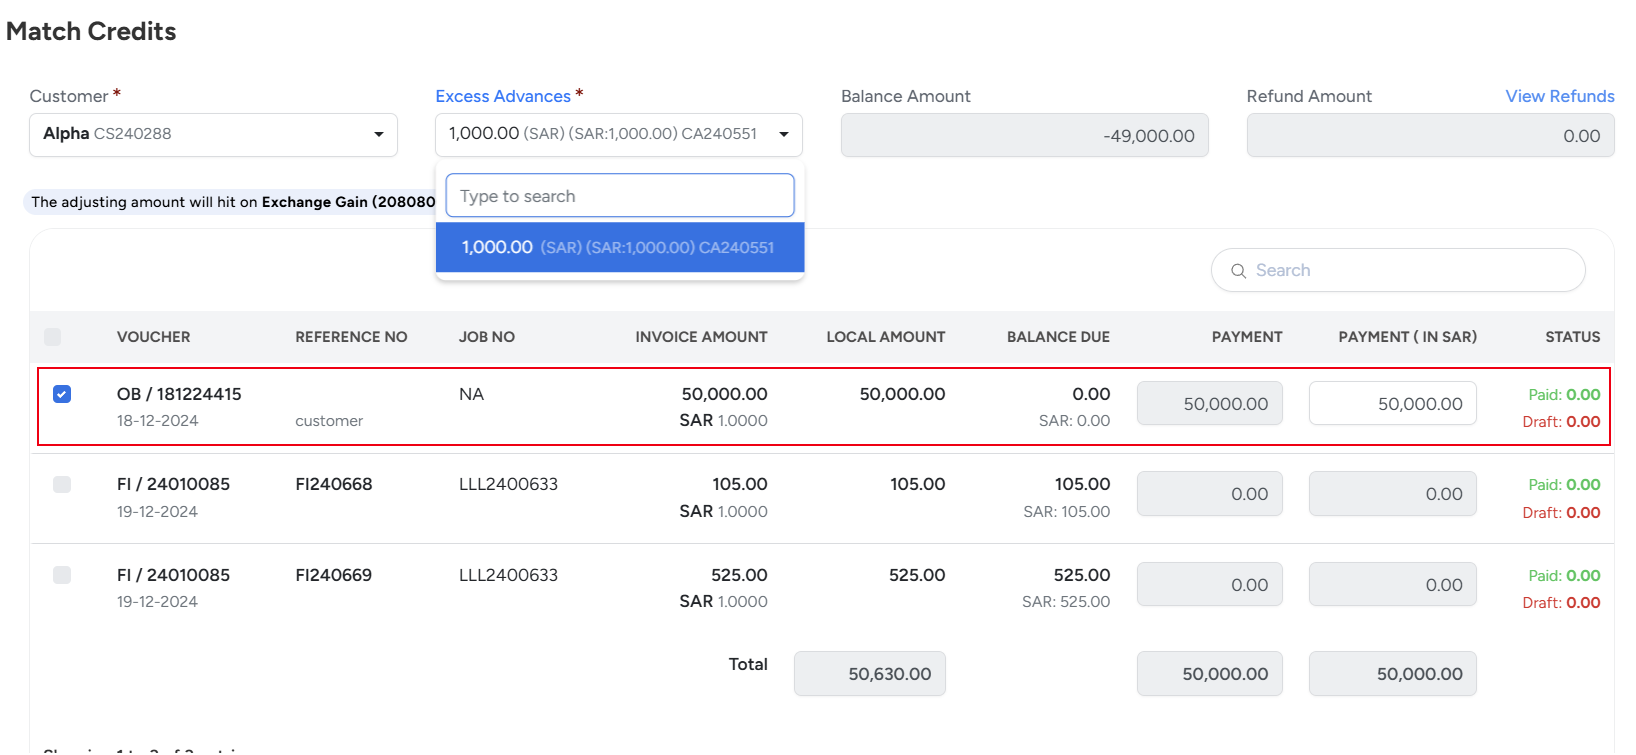
- Step 2: Select Customer
-
- Select the customer and the advance paid.
- The balance advance amount will be displayed on the Balance Amount column
- Also,the refund paid from the respective advance will be displayed on the refund Balance amount column.
- Step 3: Register collections Adjusted From Opening Balance.
- Tick the "OB" checkbox and enter the amount to be adjusted from the opening balance.
- Step 4: Saving option
- Click on Save Button.
Scenario 3: Adjusting opening balance for an Employee
- Step 1: Navigate to the Payroll Module
-
Go to the "Monthly Salary" section.
Search for the desired month and select the employee from the list.
- Step 2: Run Payroll
-
Click on "Run Payroll."
This action will display all the details related to the selected employee.
To take further action, right-click on the specific employee’s record.
From Actions click on edit.
The "Monthly Salary" window will appear. Click on the "Advance Salary" tab.
- Step 3: Adjusting Opening Balance
- Select the "Opening Balance" entry displayed below.
- Tick on the "OB" checkbox.
- Enter the amount to be paid.
- Step 4: Save or Modify Data
-
- Click on "Save" to finalize the changes.
- To modify the entered data, click on the "Clear" button
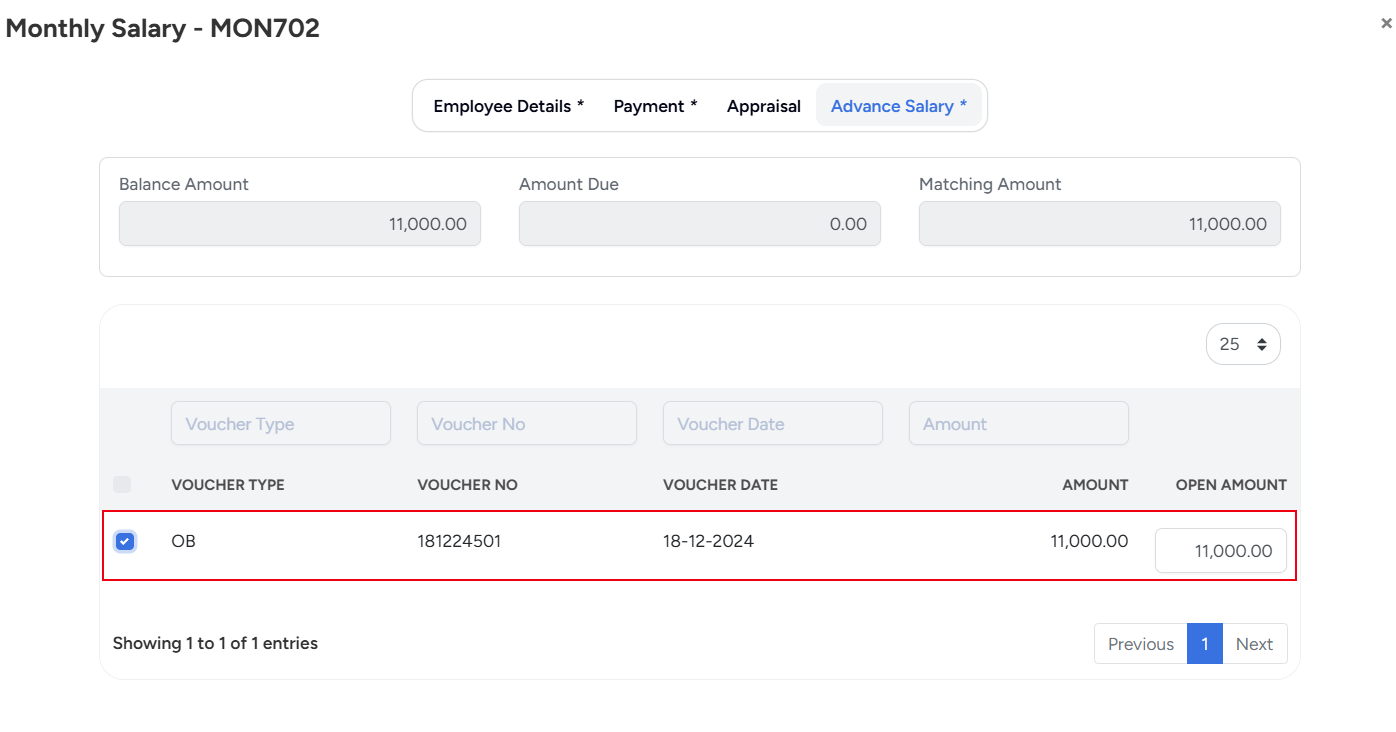
To View Updated Opening Balance
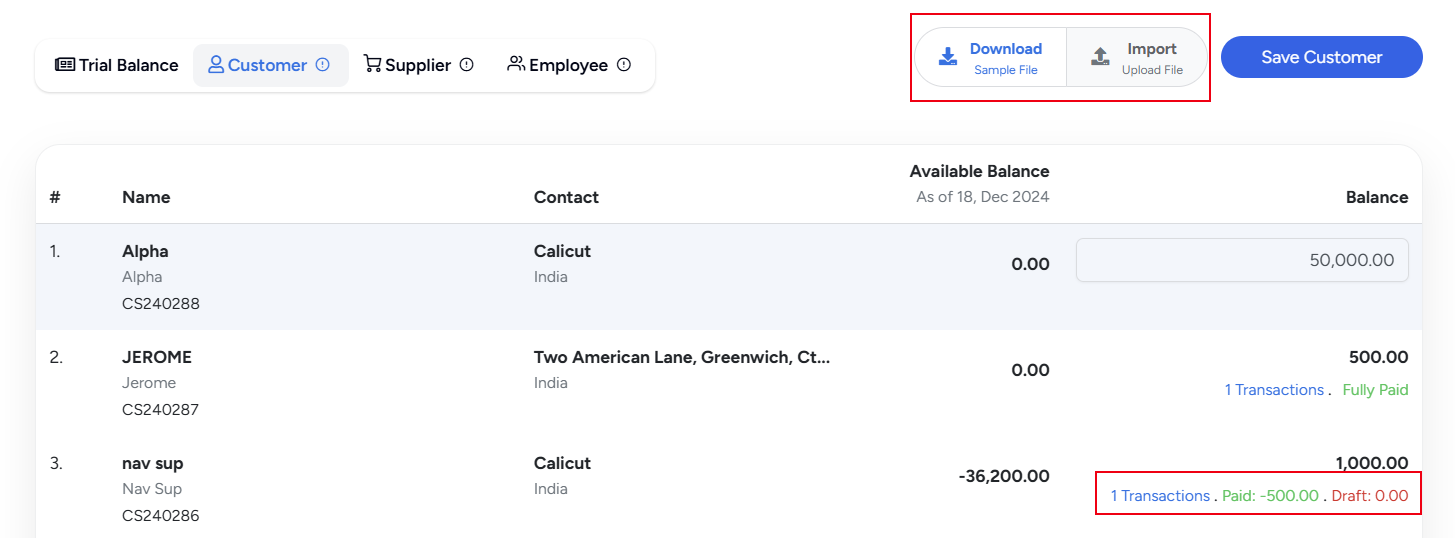
- Navigate to the "Opening Balance" section and select the Customer/Supplier/employee to view the updated information.
- Below the balance, you will see the following categories:
- Transaction
- Paid
- Draft
- Select "Transaction" to view details of the transactions made.
- The Journal window will display the Party Name, Opening Balance, Total Debit, Total Credit, and Net Amount.
- In the section below, you will find the following fields:
- Voucher, Voucher Date, Job/Project, Debit, Credit, Reference, Text, Link/Unlink. Use Unlink to detach vouchers if necessary.
- Approved vouchers will be indicated in green.
- Draft vouchers will be indicated in red.
Print Option: Clicking on an invoice will initiate the printing process.
Adjusting the Opening Balance for a supplier follows the same steps as for a customer.
You have the option to Download the sample file and also import to upload the file
Asset
The Asset module is available only in the Enterprise and Enterprise Plus plans
ASSETS AND DEPRECIATION REPORT:
Assets offer a comprehensive view of a company’s assets, detailing their original cost, accumulated depreciation, and current value to monitor financial worth over time. These reports will reflect in Trial balance such as Capital Work in Progress, Assets, and Depreciation.

Asset Modules Carries the following Sub Modules
- Assets
- Depreciation Report
Steps to create a new asset:
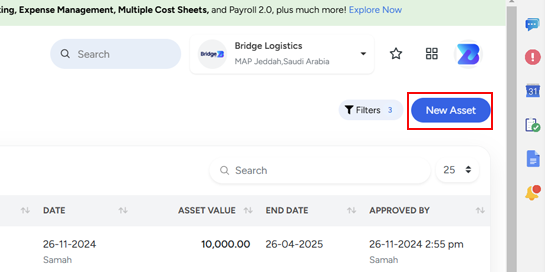
Step 1: Navigate to Finance Module → Assets → Assets → New Asset
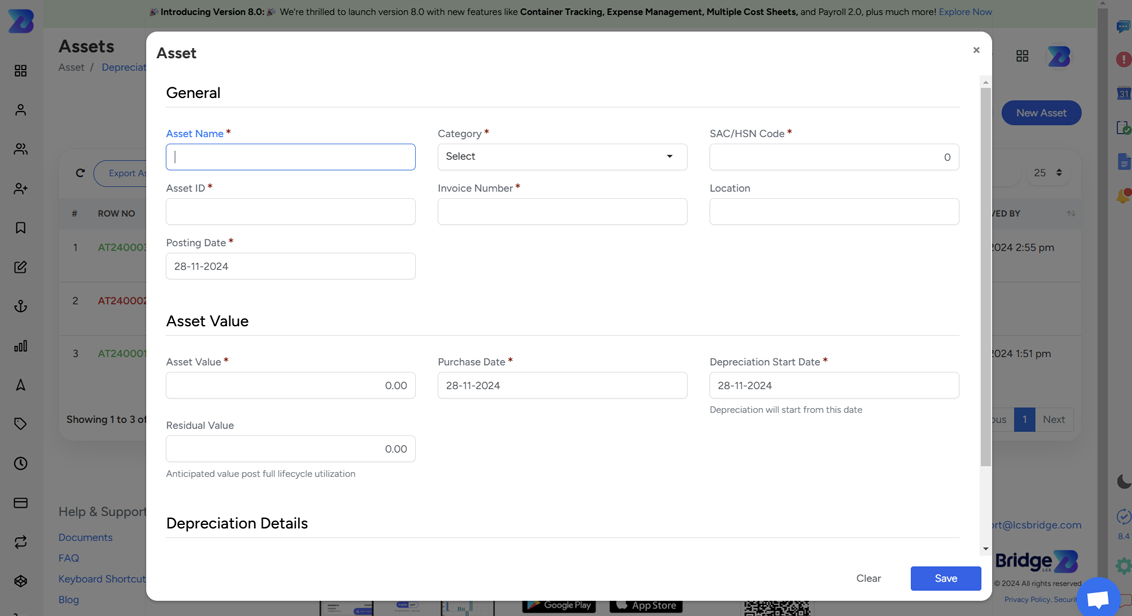
Step 2: Enter the Asset details. Start with the General Section to provide the Item Name, Category,SAC/HSN Code, Asset ID,etc.
Step 3: Asset Value, In this section input the Asset Value, Purchase Date, Available Date, and Residual Value (Anticipated value post full lifecycle utilization)
Step 4: Finally,Depreciation Details, In this section specify the Depreciation Period, Depreciation Count, and End Date.
Step 4: Saving option. Final step is to click on Save.If you want to modify the entered data, click on the Clear button.
Actions performed In Right click
- Approve/Disapprove
- Depreciation Details
- Edit(Only Disapproved Assets can be Edited).
- Delete
- View
Note: The Export As feature allows users to copy the Asset list and to export the list in CSV and Excel.
Depreciation Report
Depreciation Report details the reduction in an asset's value over time, including its original value, accumulated depreciation, and remaining book value.
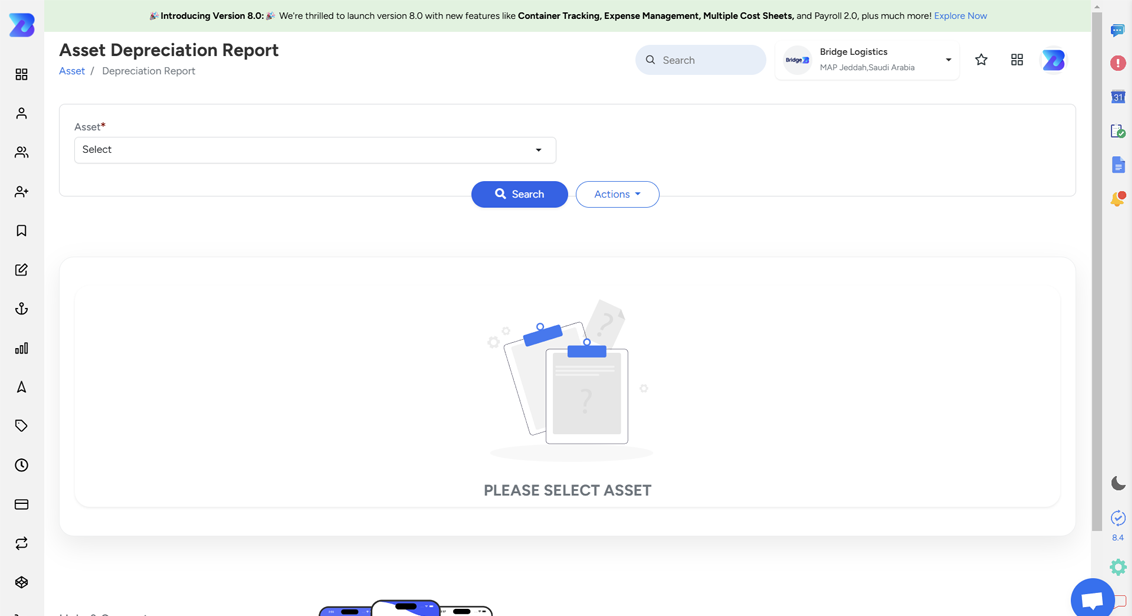
To view Depreciation Report,
>Step 1: Go to the Finance Module → Asset → Depreciation Report.
Step 2: To generate the report. Choose the desired asset from the list. Click on the Search button. The system will display detailed depreciation information for the selected asset.
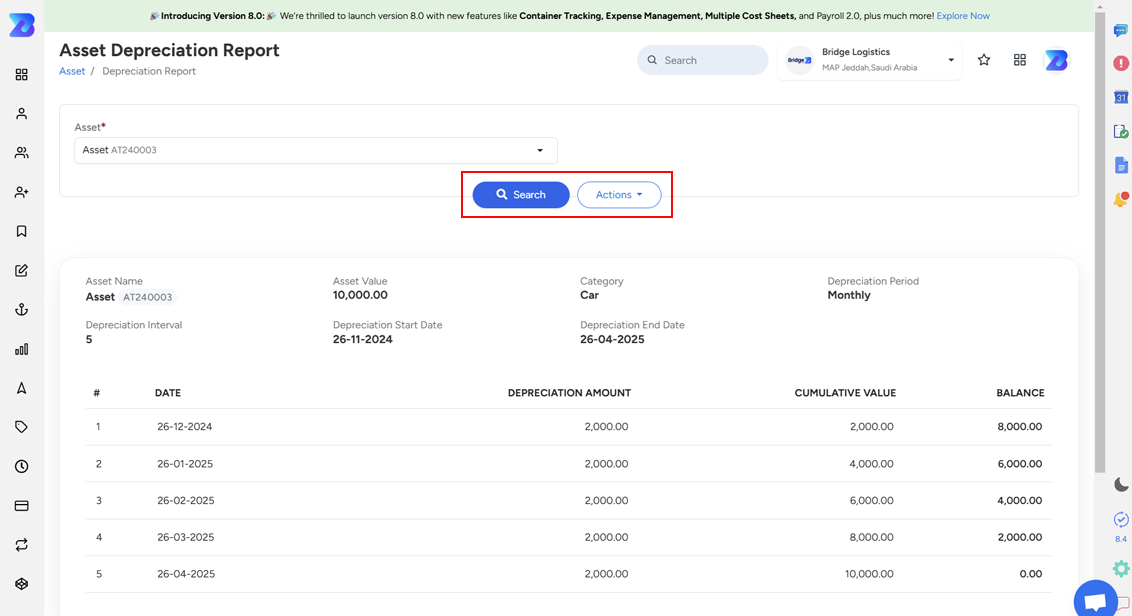
Actions Performed:
Note:
Users are provided with an option to navigate between selected submodules.
To add a module to the favourites list, click on star.
Balance Analysis
Balance Sheet Analysis explores the assets, liability and equity of the company. This section has the following sub sections,
- Trial Balance
- Trial Balance Detailed
- Balance Sheet
- P & L
Trial Balance
Trial Balance offers the record statements of credit and debit .
The data are listed based on the filters applied. Select the period and based on the selected period the data are displayed.
Start Period/Date is displayed on the center of the page.
This has four different sections,
- Assets
- Liabilities
- Revenue
- Expenses
The table has description, credit, debit and account.
The filtered data can be printed with the feature given next to Search.
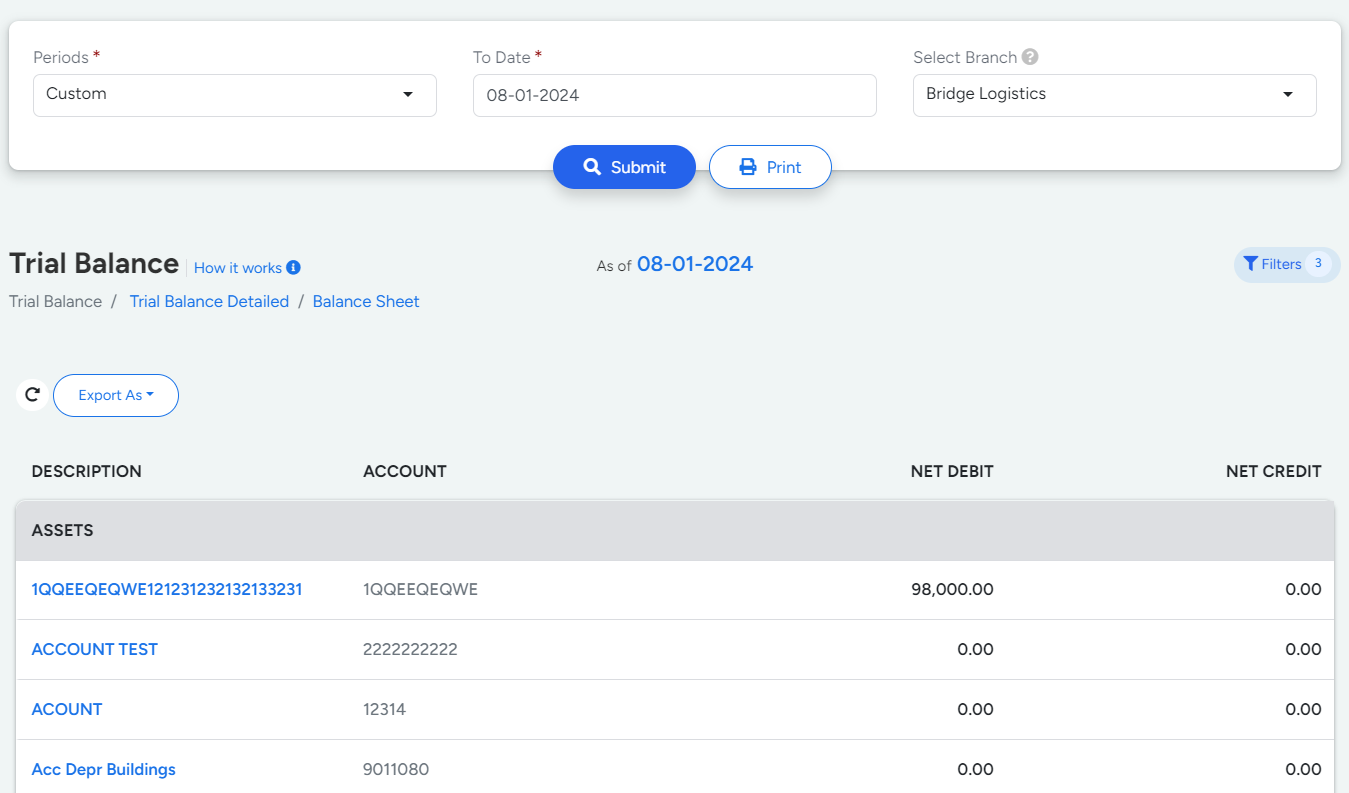
The Video inserted below explains you the working of " Trial Balance " to have a better understanding
Trial Balance Detailed
This section gives you the detailed view of Transactions happening along with the credits and debits from the previous section .
Filters like Start date and End date must be provided to fetch the data.
Period Fetched is Highlighted at the centre of the top section for reference.
Detailed Attributes Included in the section are
- Credit and Debit of Opening Balance
- Credit and Debit of Period Transactions
- Credit and Debit of Closing Balance
The filtered data can be printed with the feature given next to Search.
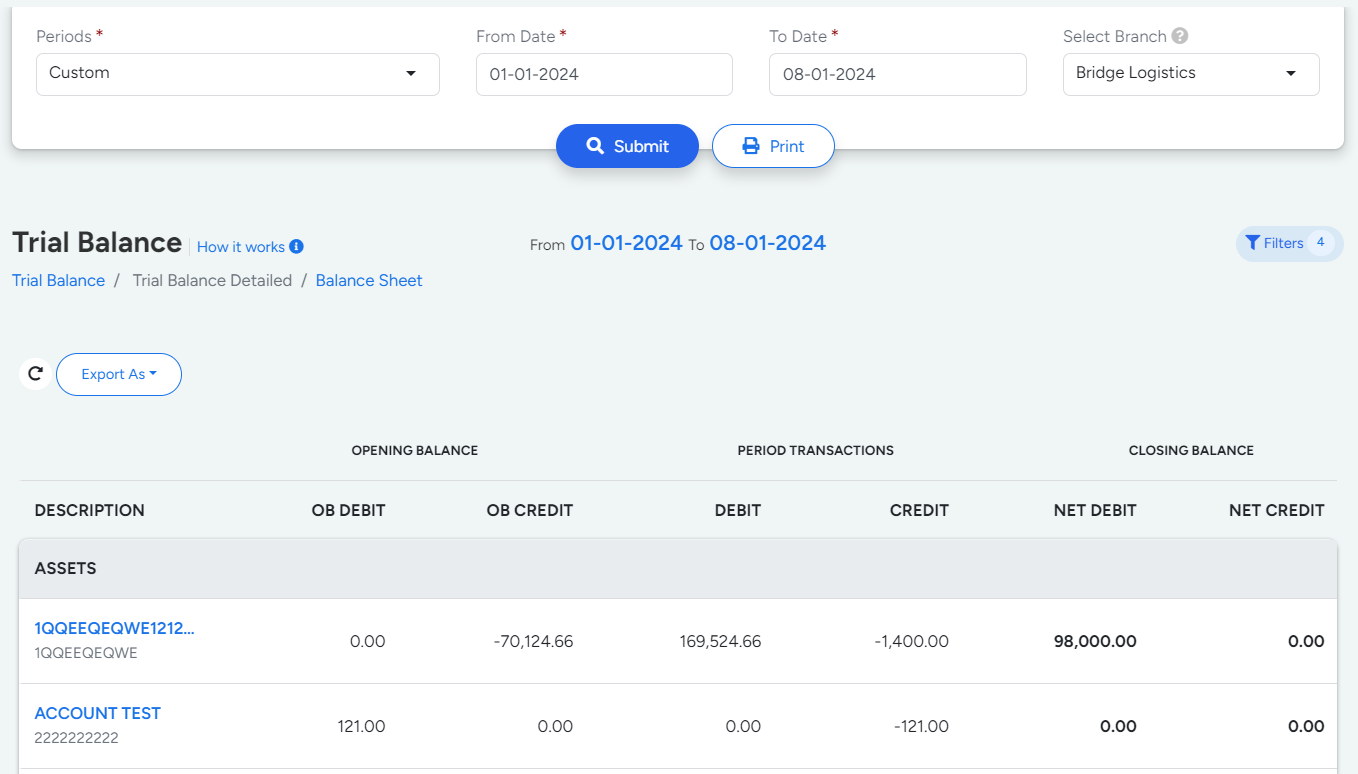
Advanced Features : (applicable to both Trial Balance and Trial Balance Detailed)
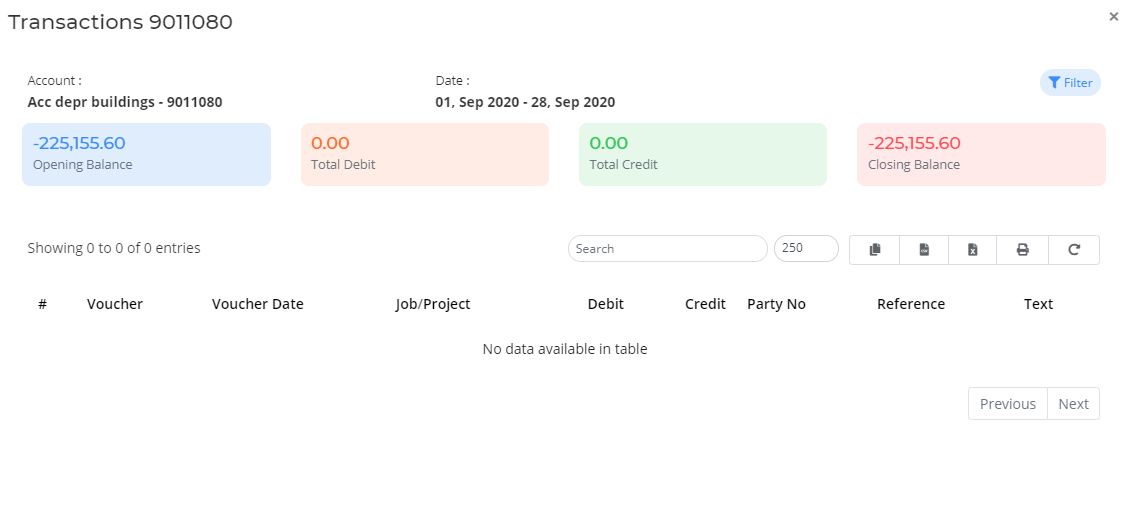
Double Clicking on the description gives you the list of vouchers involved in the particular account along with the total credit, total debit and sum of the same is displayed in the top section.
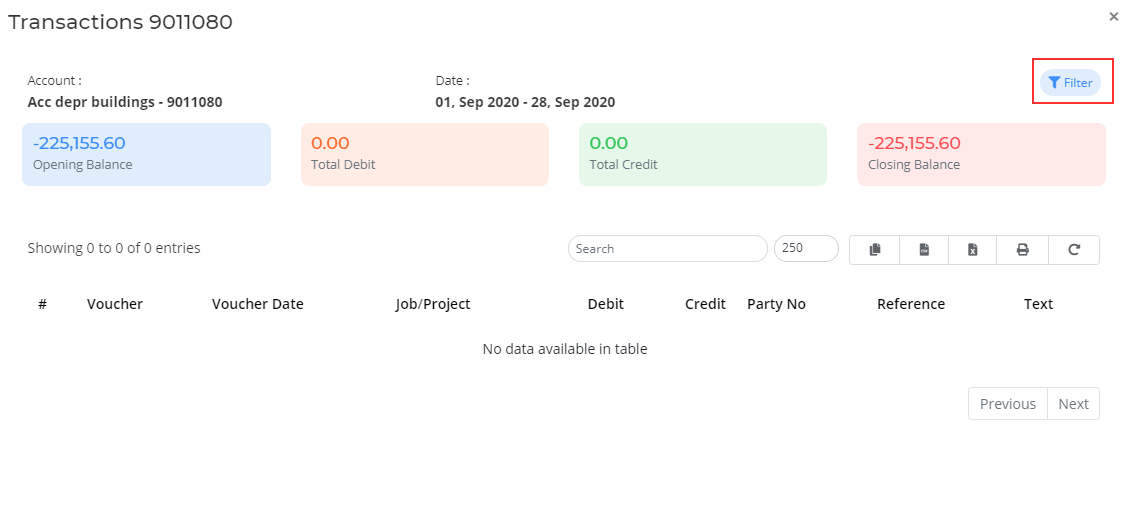
Filter present at the top section can be hidden by clicking on the filter button available at the right corner.
Balance Sheet
Balance Sheet furnishes the financial position of the company.
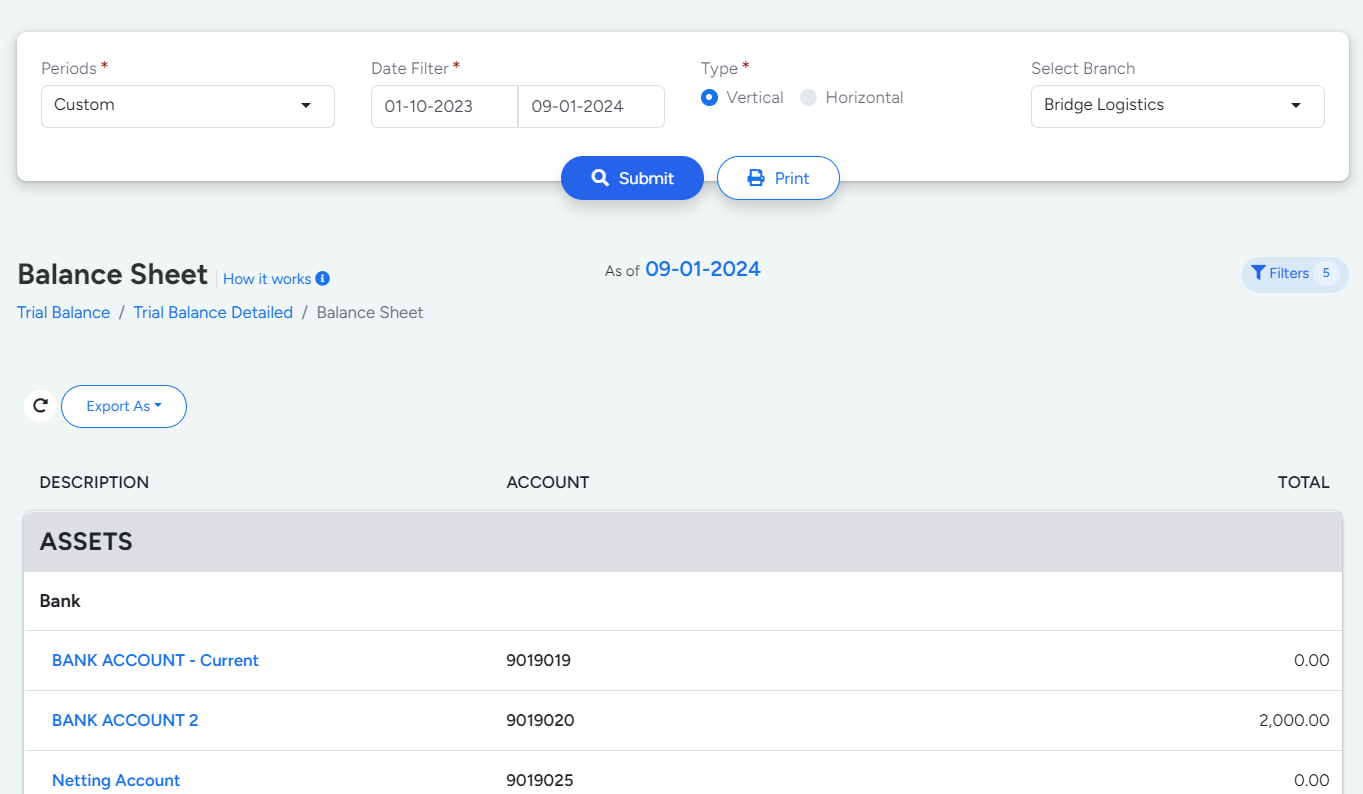
In Order to get the view of the balance sheet the following filters shall be applied,
- Periods
- Start Date
- End Date
- Type of Date
The filters mentioned above are mandatory details that need to be filled to proceed further.
The period Selected is highlighted at the center of the top section.
The segments included in the balance sheet are Asset, Liabilities and equities.
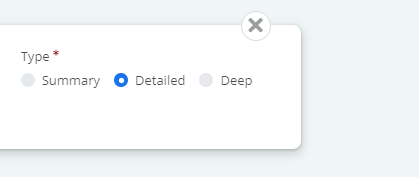
The type of data available are,
- Summary
- Detailed
- Deep
- Summary
- Summary data type gives the overview / outline of Asset, Liabilities and Equities based on the period selected.
- Detailed
- Detailed data type gives the attributes involved in asset, Liabilities and Equities based on the period selected.
- Deep
- Deep data type gives the detailed explanation of the attributes involved in assets, Liabilities and Equities based on the period selected.
The Video inserted below explains you the working of " Balance Sheet " to have a better understanding
Income Statement
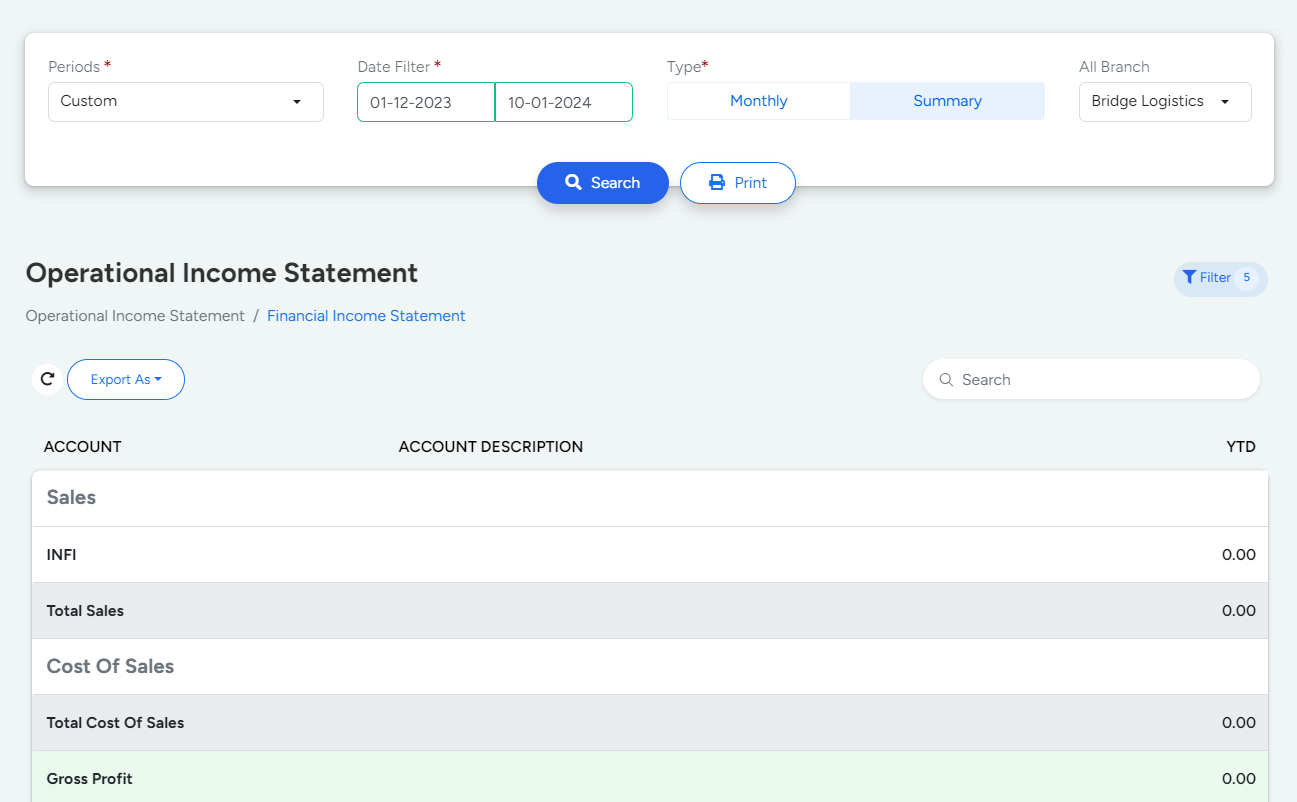
Operational Statement
The report displays the Sales,Cost of Sales,Operating Income,Operating Expense,Other Income,Financial Revenue,Non Operating Expense and Financial Expense for the selected period
When Book Income is allocated to a specific job, you can view the transactions associated with that particular job within this section.
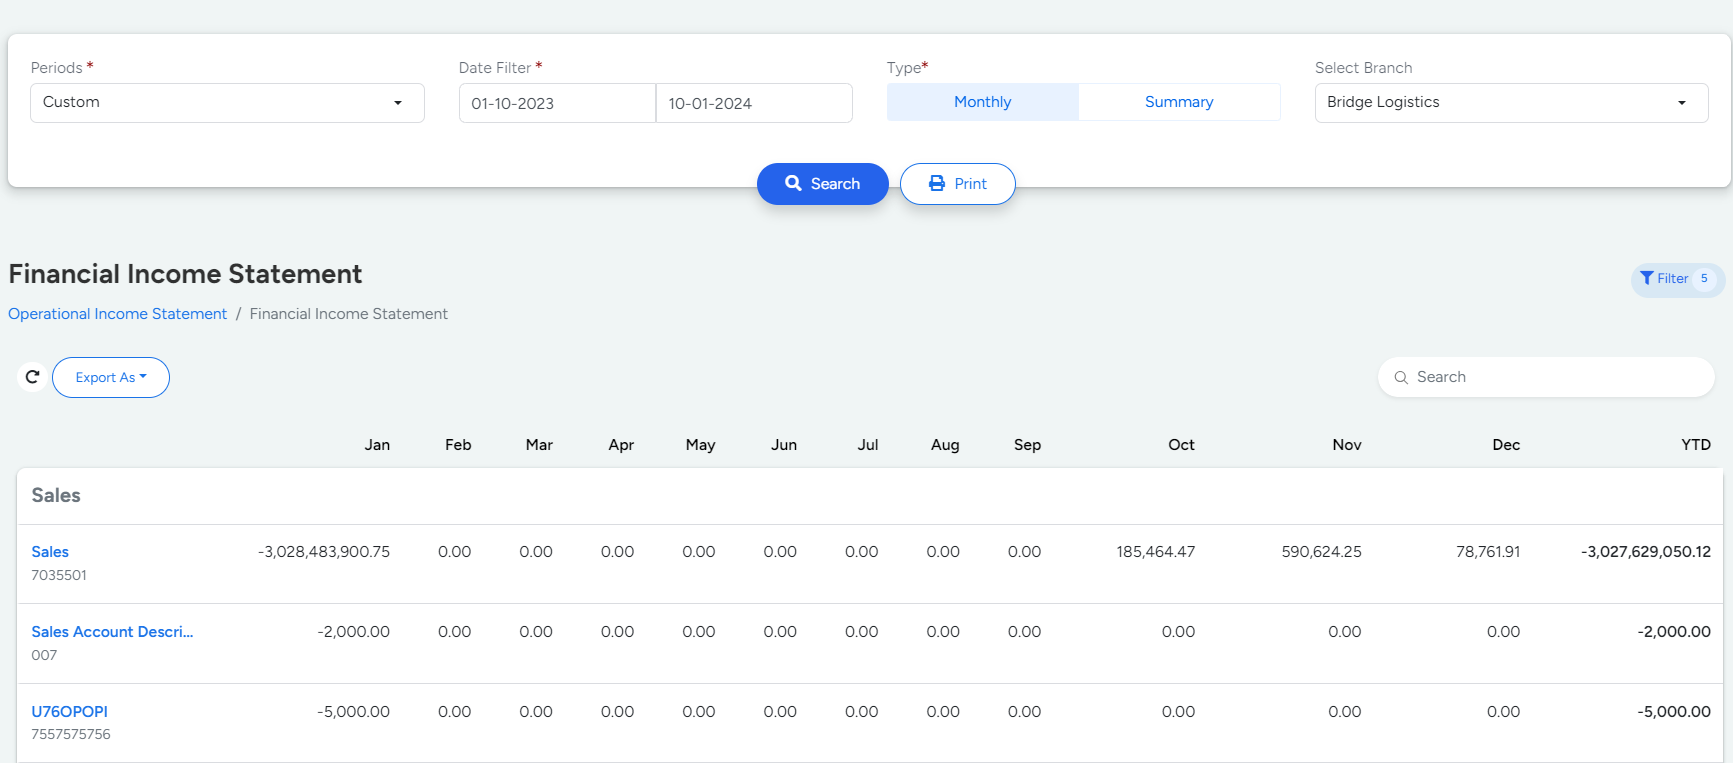
Financial Statement
The report displays the Sales,Cost of Sales,Operating Income,Operating Expense,Other Income,Financial Revenue,Non Operating Expense and Financial Expense for the selected period.
Vouchers
Voucher Section has 5 Sub Segments as given below,
- Payments
- Collections
- Advanced Journal Voucher
- Internal Voucher
- Journal Voucher
- Transfer Voucher
- Expense
Payments
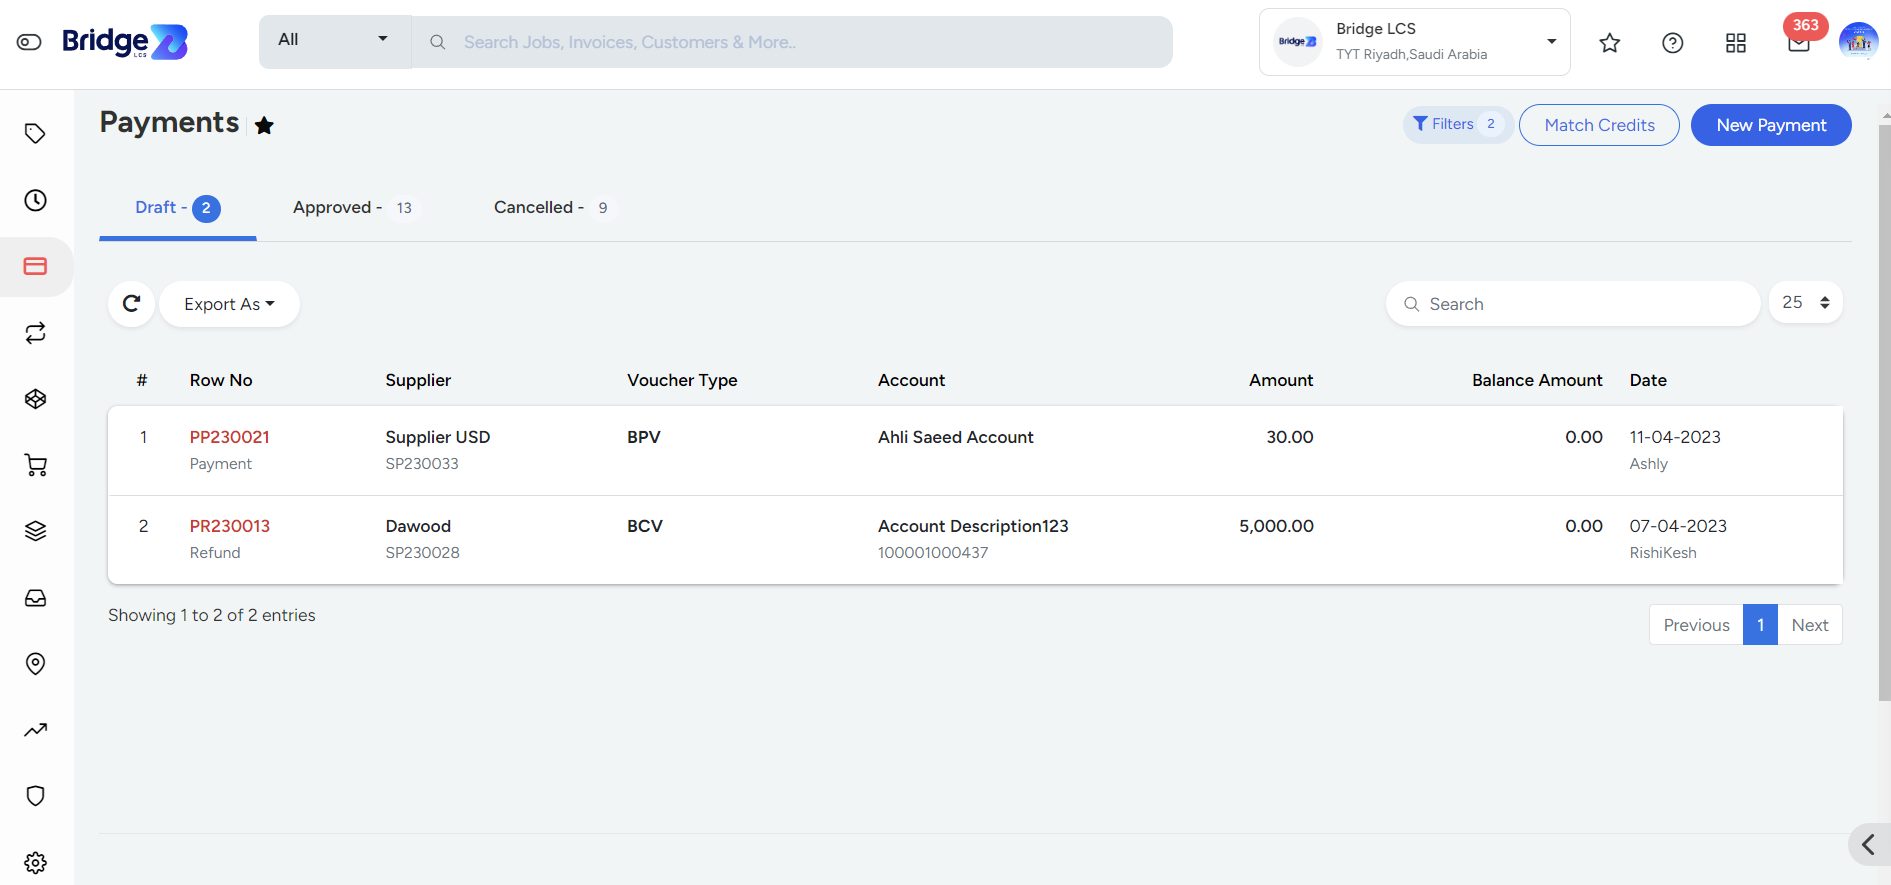
This module serves as a tool for creating and monitoring payments, advances, and refunds made to suppliers.
- The payment list page will show all transactions made to the supplier i.e. payments, advances or refunds in drafted, approved and cancelled status.
- You can filter the payment data by entering the Date Filter, Module,Supplier or Created By Name.
- The Match Credit feature allows to adjust the supplier invoice from the advance paid.
Type 1: Payments
Payment section is used to record the payments made to the supplier with respect to their outstanding Invoice.
Steps to create Payment:
- Step 1
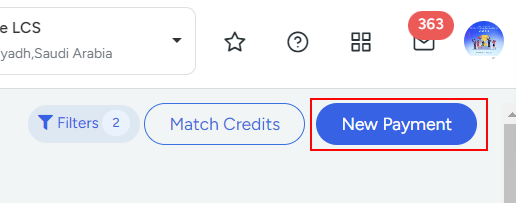
- Go to Finance→ Vouchers→ Payments→ New Payment
Select the Type i.e. Payment
- Step 2: Enter Supplier and Voucher details
-
Select the Supplier, Account Number, Voucher Date,Voucher Text etc.
The currency exchange rate column displays the exchange rate for the currency selected when the supplier was created.
When a supplier is selected from the supplier drop-down, All the invoice related to that particular supplier will be displayed below.

- Step 3: Register the Payment details
-
Enable the checkbox of the respective Supplier Invoice, enter the amount paid and make sure that the Excess Amount is 0.
Green Tile and Red Tile displays the approved and unapproved payments respectively.You can view the details of the payment made, by clicking the amount displayed on Green and Red Tile.

- Step 4: Apply Additional Charges and Saving option
-
Click on Add transaction if additional charges like Bank charges, Input VAT etc needs to be applied
If you want to modify the entered data, click on Clear button.Final step is to click on Save.
Actions performed in Right Click
- Approve/Disapprove
- Edit/Delete (Only Disapproved vouchers can be Edited/Deleted)
- Upload
Type 2: Advance
The advance section is used to create and manage the advance paid to the supplier.
Steps to create Advance
- Step 1
- Go to Finance→ Vouchers→ Payments→ New Payment
Select the Type i.e. Advance

- Step 2: Enter Supplier and Advance Voucher details
Choose the Supplier, Account Number, Voucher Date,Voucher Text etc.
The currency exchange rate column displays the exchange rate for the currency selected when the supplier was created
Enter the Advance amount paid to the Supplier.

- Step 3: Saving option
If you want to modify the entered data, click on Clear button. Final step is to click on Save.
Actions performed in Right click
- Approve/Disapprove
- Edit/Delete (Only Disapproved vouchers can be Edited/Deleted)
- Upload
Type 3: Refund
The Refund section is used to create and manage the Refund received from suppliers with respect to the Advance provided to them.
Steps to create Refund
- Step 1
- Go to Finance→ Vouchers→ Payments→ New Payment
Select the Type i.e. Refund

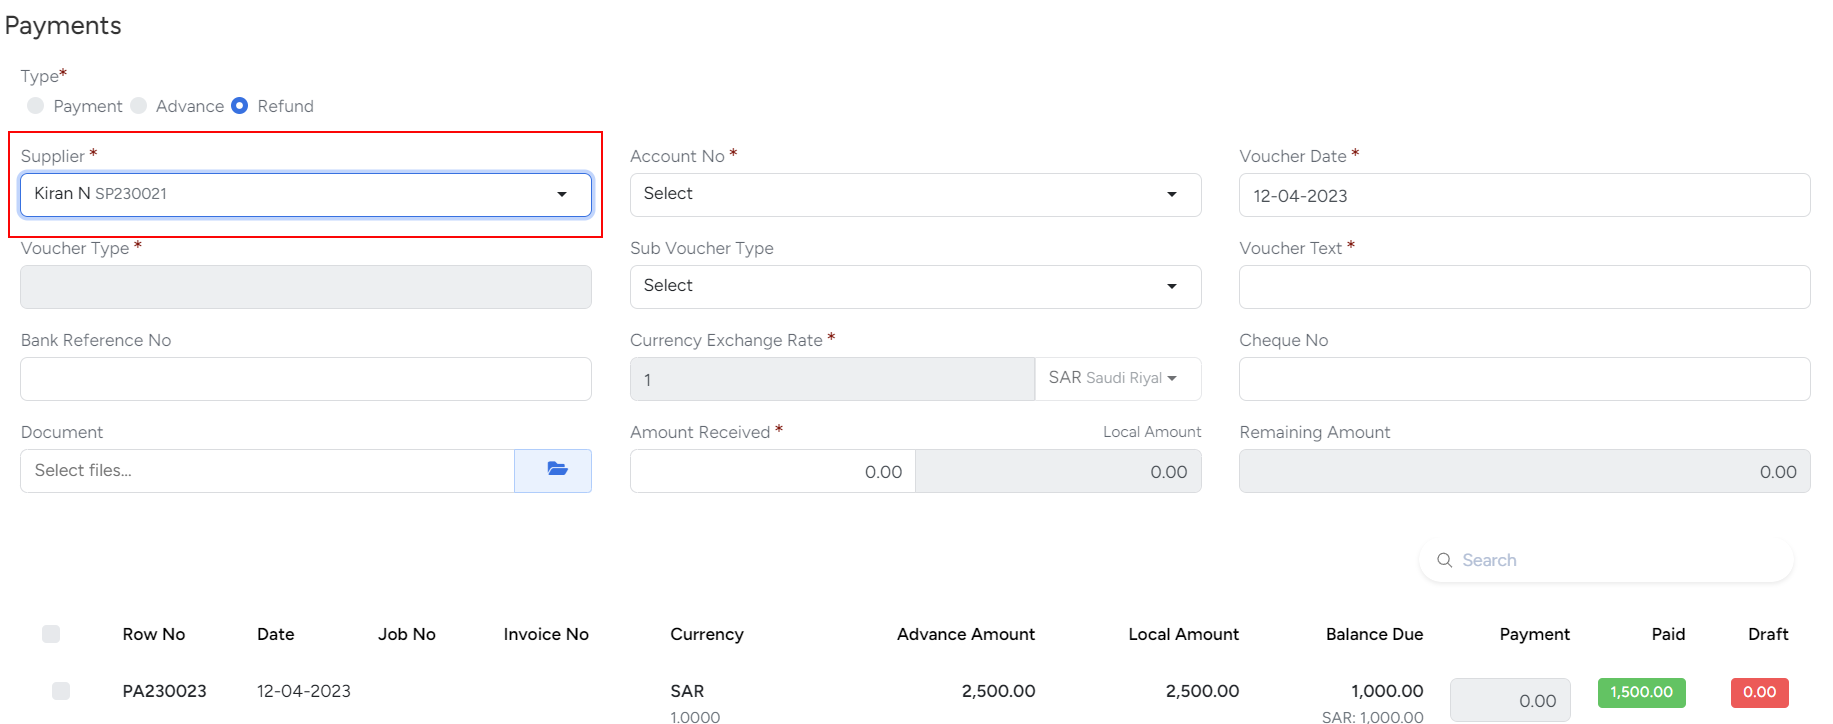
- Step 2: Enter Supplier and Refund Voucher details Choose
the Supplier, Account Number, Voucher Date,Voucher Text etc
The currency exchange rate column displays the exchange rate for the currency selected when the supplier was created.
When a Supplier is selected from the drop-down, all the advances related to that particular Supplier will be displayed below.
- Step 3: Register Refund Amount
Enable the checkbox of the respective advance, enter the refund amount and make sure that the Remaining Amount is 0.
Green Tile and Red Tile displays the approved and unapproved payments from the respective advance.You can view the details of the payment, by clicking the amount displayed on Green and Red Tile.

- Step 4: Saving option
If you want to modify the entered data, click on Clear button. Final step is to click on Save.
Actions performed
- Approve/Disapprove
- Edit/Delete (Only Disapproved vouchers can be Edited/Deleted)
- Upload
NOTE :The Export As feature allows users to copy the payment list and to export the list in CSV and Excel
Coin icon is used to indicate the refund against the corresponding payment advance voucher in the payment list page.
Match Credit
The Match Credit feature allows to adjust the Invoice amount of a Supplier from the advance paid.
Steps to create Match Credit
- Step 1
- Go to Finance → Vouchers → Payments → Match Credits
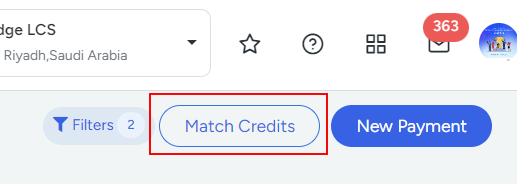
- Step 2: Choose supplier
Select the supplier and the advance paid.
The balance advance amount will be displayed on the Balance Amount column.
Also,the refund collected from the respective advance will be displayed on the refund amount column.
- Step 3: Register Payment Adjusted From Advance
-
Enable the checkbox of the respective Supplier invoice and enter the amount to be adjusted from the advance paid.
Green Tile and Red Tile displays the approved and unapproved payments respectively.You can view the details of the payment made, by clicking the amount displayed on Green and Red Tile.

- Step 4: Saving option
If you want to modify the entered data, click on Clear button. Final step is to click on Save.
NOTE :A dollar icon is used to indicate the matched credit against the corresponding payment advance voucher in the payment list page.
Collections
The collection module is an important tool to efficiently manage their customer payments, advances, and refunds.
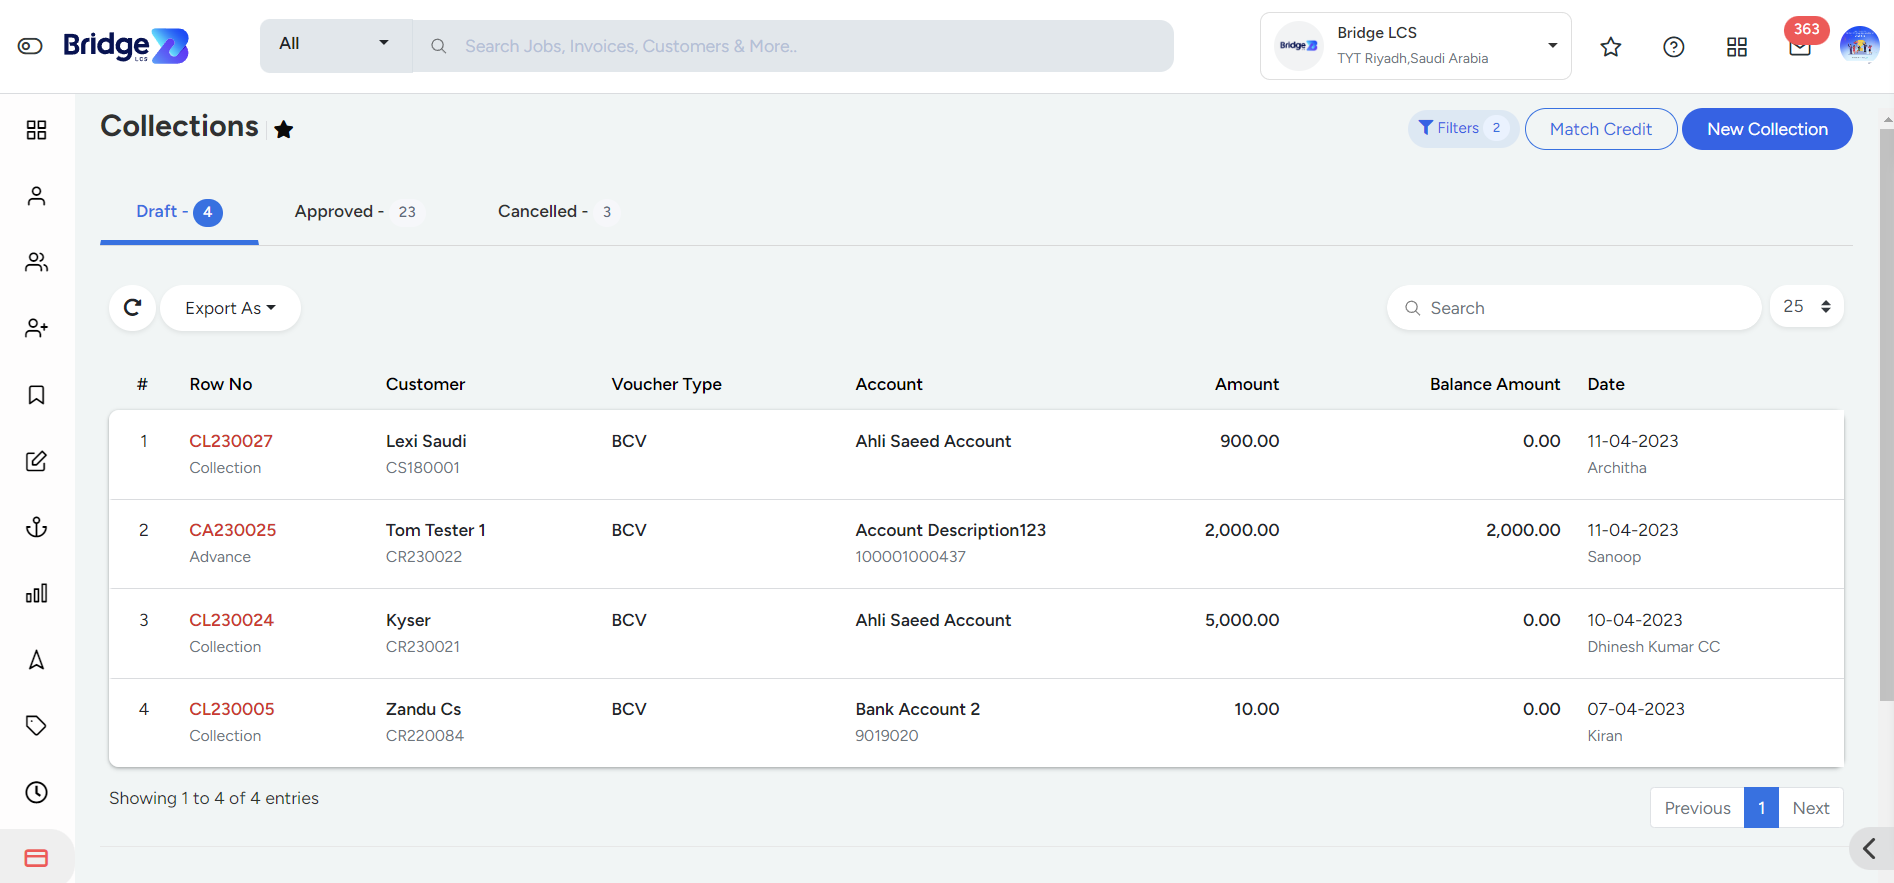
- The collection list page will show all transactions done with the customer i.e. collections, advances or refunds in drafted, approved and cancelled status.
- You can filter the collection data by entering the Date Filter, Module,Customer or Created By Name.
- The Match Credit feature allows to adjust the invoice amount of a customer from the advance paid.
Type:1 Collection
Collection section is used to record the amount received from the customer with respect to their invoices.
Steps to create Collection
- Step 1
- Go to Finance→ Vouchers→ Collections→ New Collection
Select the Type i.e. Collection

- Step 2: Enter Customer Information
Choose the Customer, Account Number, Voucher Date,Voucher Text, Amount received etc.
The currency exchange rate column displays the exchange rate for the currency selected when the customer was created.
When a customer is selected from the drop-down, all the invoices related to that particular customer will be displayed below.

- Step 3: Register Collection Received
-
Enable the checkbox of the respective Invoice, enter the amount received and make sure that the Remaining Amount is 0.
Green Tile and Red Tile displays the approved and unapproved payments respectively.You can view the details of the payment made, by clicking the amount displayed on Green and Red Tile.

- Step 4: Apply Additional Charges and Saving option
Click on “Add transaction” if additional charges like Bank charges, Input VAT etc needs to be applied
If you want to modify the entered data, click on Clear button.Final step is to click on Save.
Actions performed in Right click
- Approve/Disapprove
- Edit/Delete (Only Disapproved vouchers can be Edited/Deleted)
- Upload
Type 2: Advance
The advance section is used to create and manage the advance received from the customer.
Steps to create Advance
- Step 1
Go to Finance → Vouchers → Collections → New Collection Select the Type i.e. Advance

- Step 2: Mention Customer and Advance Amount
Select the Customer, Account Number, Voucher Date,Voucher Text etc.
The currency exchange rate column displays the exchange rate for the currency selected when the customer was created.
Enter the Advance amount received from the customer.

- Step 3: Saving option
If you want to modify the entered data, click on Clear button. Final step is to click on Save.
Actions performed
- Approve/Disapprove
- Edit/Delete(Only Disapproved vouchers can be Edited/Deleted)
- Upload
Type 3: Refund
The Refund section is used to create and manage the Refund paid to the customer with respect to the Advance received from them.
Steps to create Refund
- Step 1
Go to Finance→ Vouchers→ Collection →New Collection Select the Type i.e. Refund

- Step 2: Customer Selection
Choose the Customer, Account Number, Voucher Date,Voucher Text etc
The currency exchange rate column displays the exchange rate for the currency selected when the customer was created.
When a Customer is selected from the drop-down, all the advances related to that particular Customer will be displayed below.

- Step 3: Register Refund Amount
-
Enable the checkbox of the respective advance, enter the refund amount and make sure that the Remaining Amount is 0.
Green Tile and Red Tile displays the approved and unapproved payments from the respective advance.You can view the details of the payment, by clicking the amount displayed on Green and Red Tile.

- Step 4: Saving option
-
If you want to modify the entered data, click on Clear button. Final step is to click on Save.
Actions performed
- Approve/Disapprove
- Edit/Delete(Only Disapproved vouchers can be Edited/Deleted)
- Upload
NOTE: The Export As feature allows users to copy the collection list and to export the list in CSV and Excel
Coin icon is used to indicate the refund against the corresponding collection advance voucher in the collection list page.
Match Credit
The Match Credit feature allows to adjust the invoice amount of a customer from the advance paid.
Steps to create Match Credit
- Step 1
- Go to Finance→ Vouchers→ Collections →Match Credits

- Step 2: Customer Selection
Select the customer and the advance paid.
The balance advance amount will be displayed on the Balance Amount column.
Also,the refund paid from the respective advance will be displayed on the refund amount column.

- Step 3: Register Payment Adjusted From Advance
-
Enable the checkbox of the respective Invoice and enter the amount to be adjusted from the advance paid.
Green Tile and Red Tile displays the approved and unapproved payments respectively.You can view the details of the payment made, by clicking the amount displayed on Green and Red Tile.

- Step 4: Saving option
If you want to modify the entered data, click on Clear button. Final step is to click on Save.
NOTE: A dollar icon is used to indicate the matched credit against the corresponding collection advance voucher in the collection list page.
Advanced Journal Voucher
Advanced Journal Voucher is a record created as a confirmation / receipt between the two companies over the payment made.
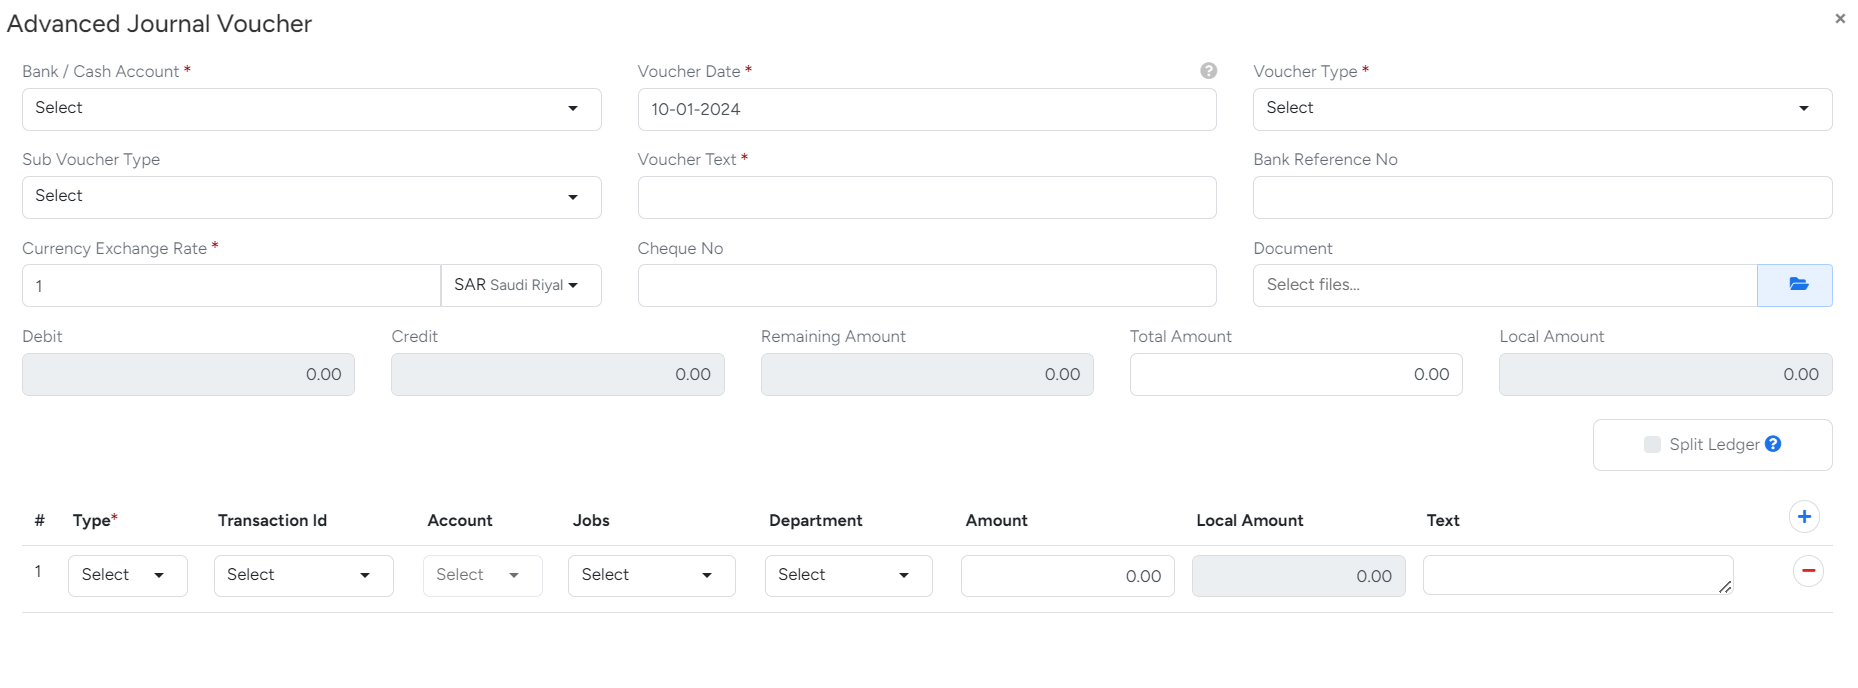
How to Create Advanced Journal Voucher
- Step 1
- Go to Finance --> Voucher --> Advanced Journal Voucher.
- Step 2
- Select an Account No(*) from the list available.
- Step 3
- Select the appropriate Voucher date in which the Voucher is made.
- Step 4
- Select the type of Voucher whether it is Bank Collection Voucher / Bank Payment Voucher.
- Step 5
- Select the Sub Voucher Type and Voucher Text (*) .
- Step 6
- Select the precise Currency Exchange Rate (*) .
- Step 7
- Select the Type(*) of work for which the voucher is made.
- Step 8
- Account will be enabled based on the type selected.
- Step 9
- Click on the Symbol Available in green colour(Matching Icon) next to the Text box to Link Invoice (“ if any Available”) to link the invoice to voucher and Submit
- Step 10
- Click Save to proceed.

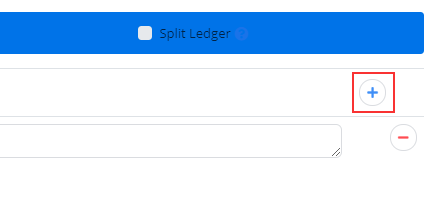
Multiple Entries can be made using "+" available.
This has three Sub Segments
- Draft
- Approved
- Cancelled
Draft
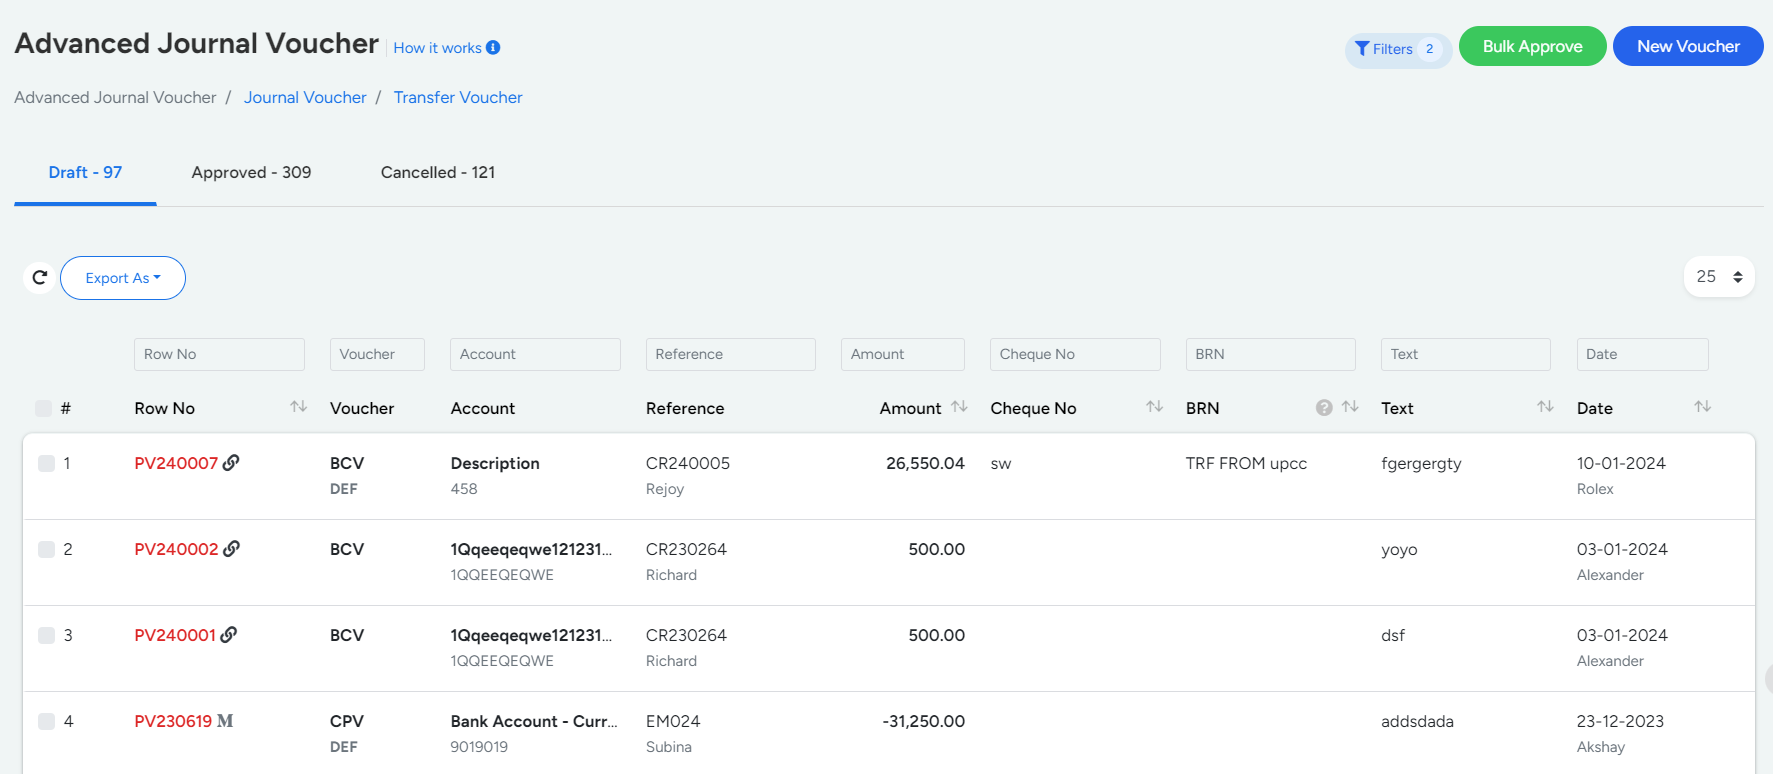
Draft segment has a list of newly created vouchers which are yet to be verified.
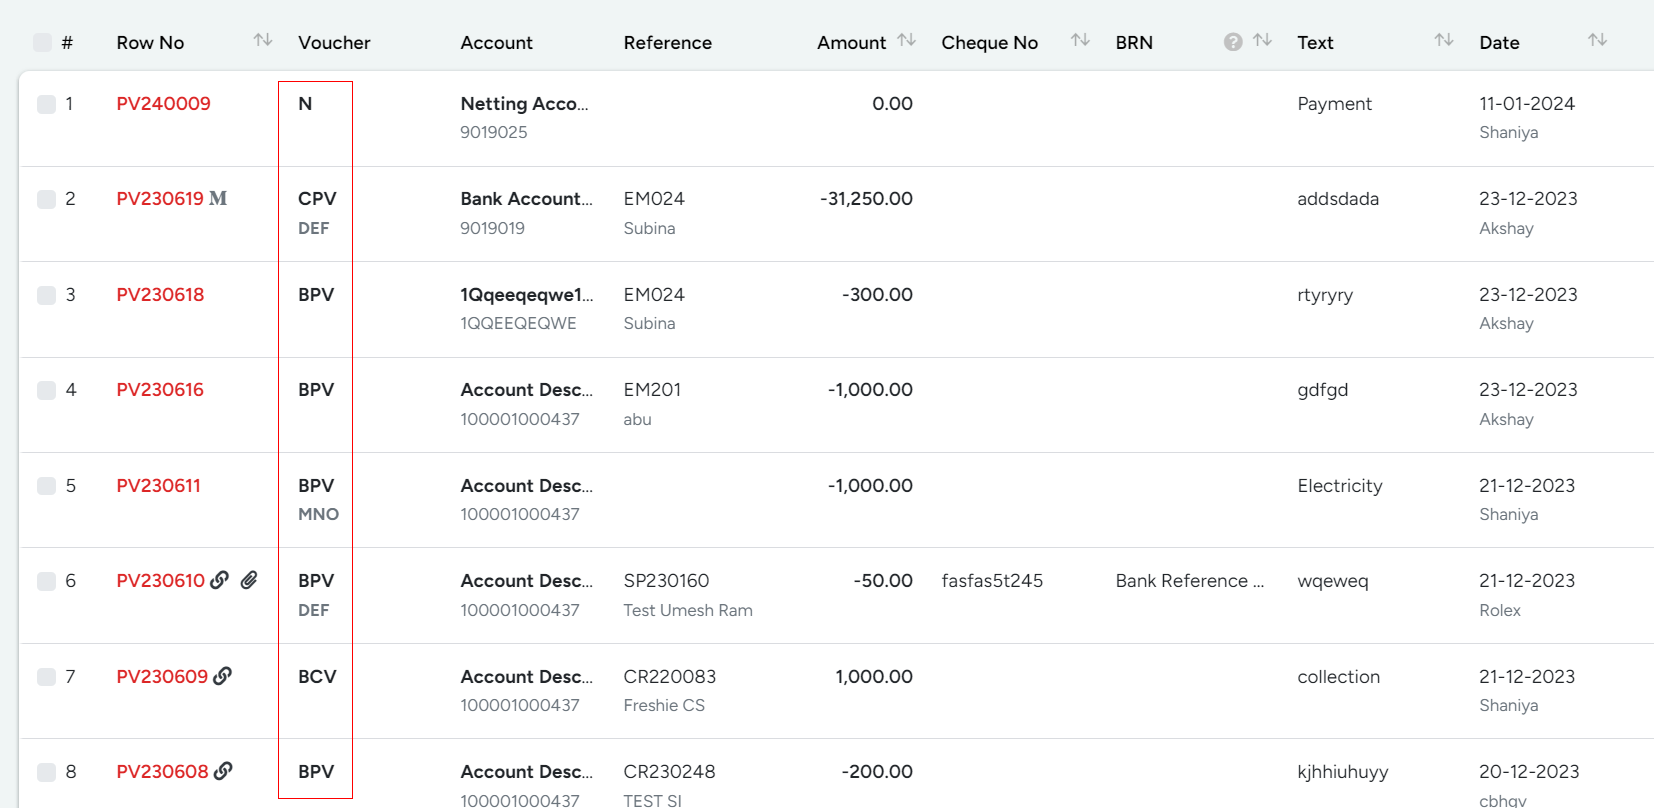
Voucher with Invoice attached is indicated with a link symbol next to row no.
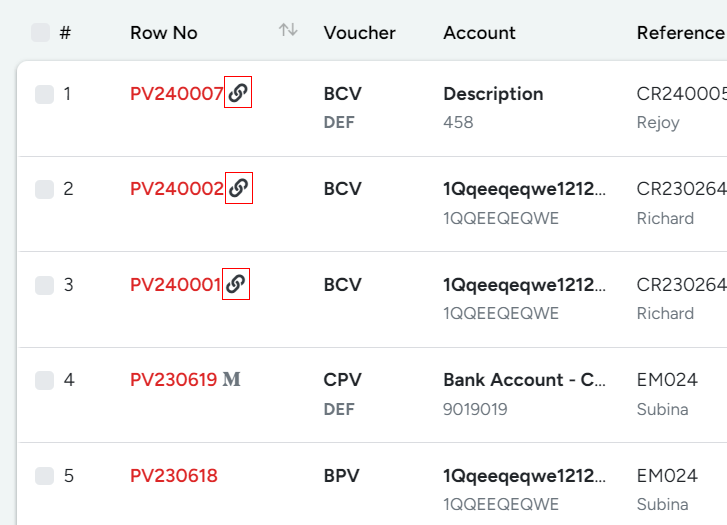
Draft Row No is indicated in Red Colour.
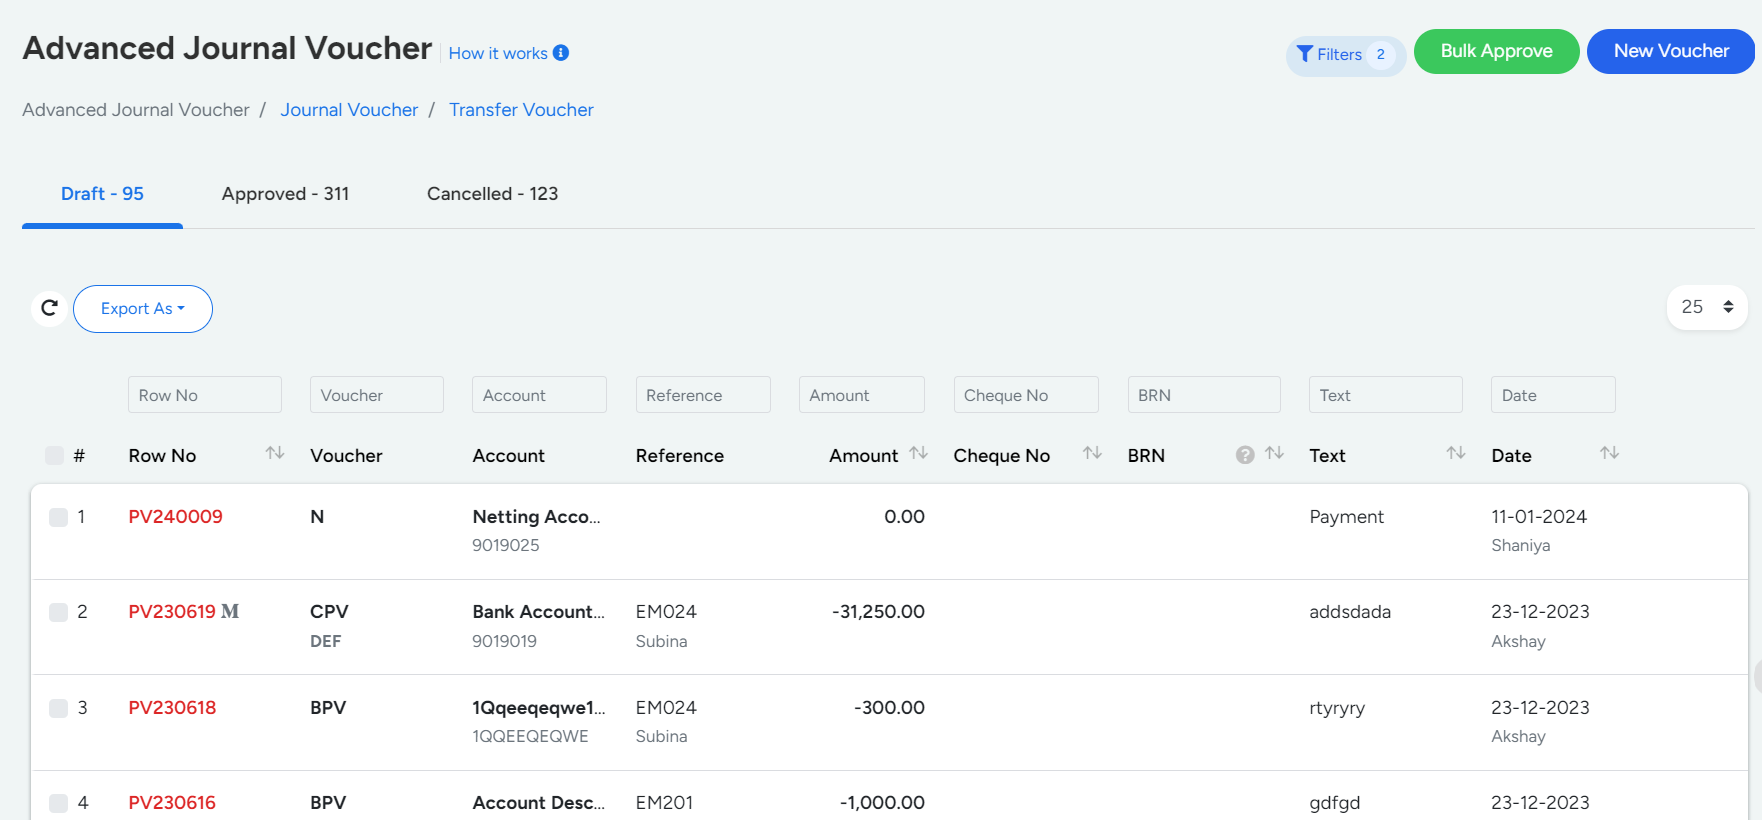
The type of each Voucher is indicated like "N" for Netting Voucher, "BCV" for Bank Collection Voucher and "BPV" for Bank Payment Voucher.
"M" indicates that the Voucher is directly created from Monthly Salary.
Approved
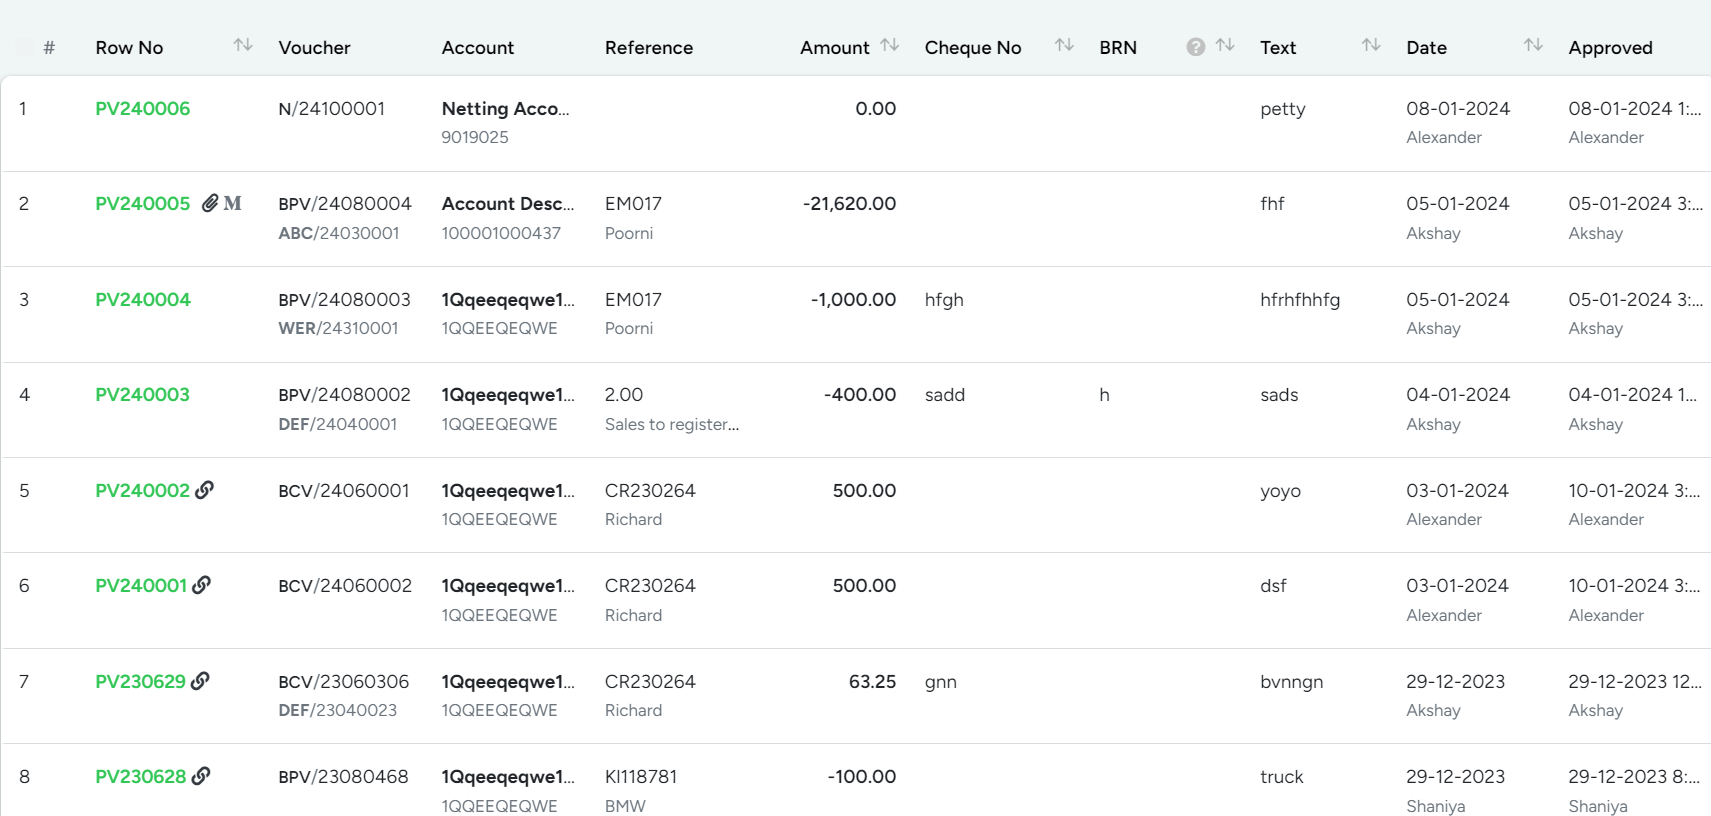
Approved has a list of Approved Vouchers indicated with respective Voucher Type.
The type of each Voucher is indicated like "N" for Netting Voucher, "BCV" for Bank Collection Voucher and "BPV" for Bank Payment Voucher.
"M" indicates that the Voucher is directly created from Monthly Salary.
Cancelled
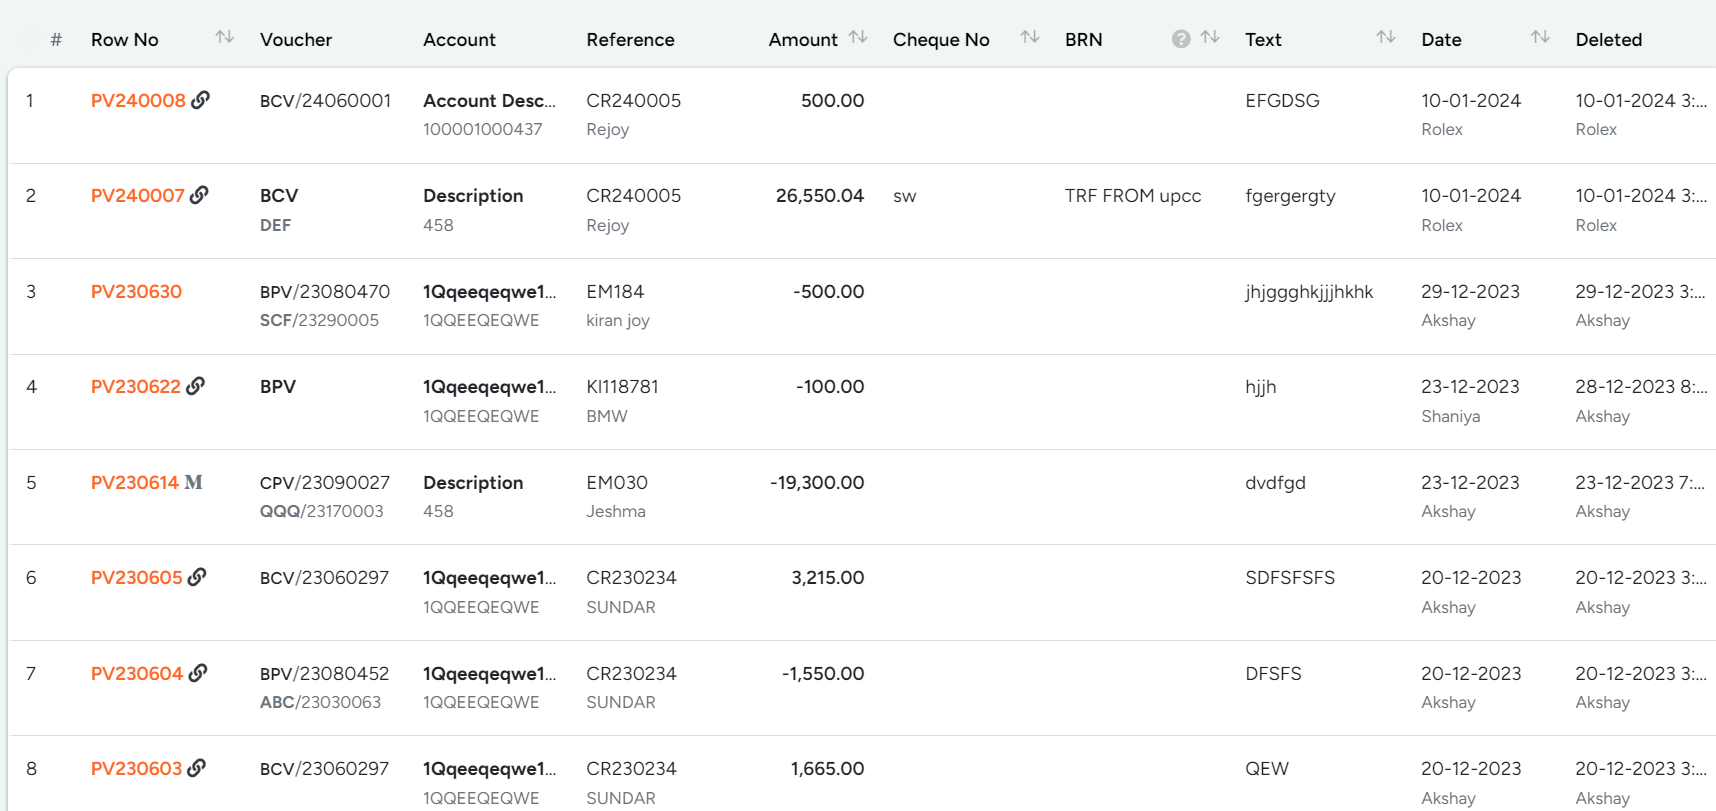
Cancelled has a list of cancelled Payment Vouchers.
Actions Performed
- Approve
- Upload
- Print - Prints the Voucher with Unapproved Watermark
- Print Receipt - Prints the Receipt with Unapproved Watermark
- View
- Edit
- Delete
- Disapprove
Advanced Features
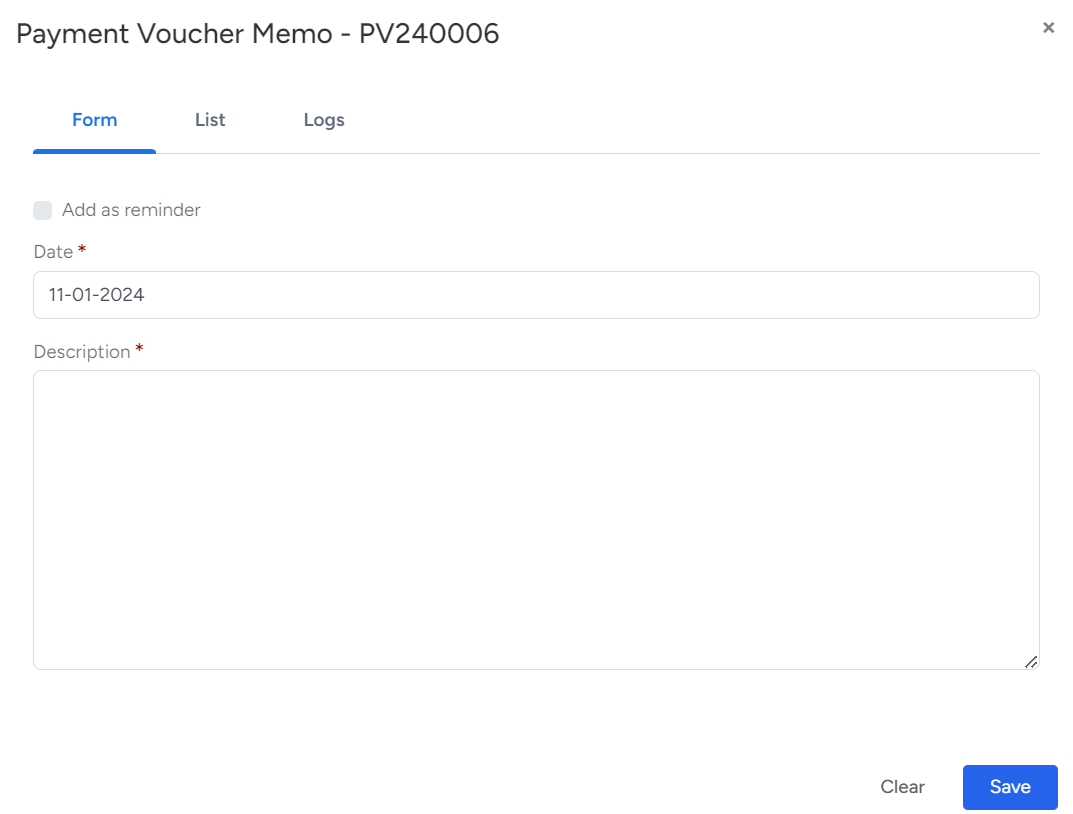
Double Clicking on the Row No allows you to make Memo.
Double Clicking anywhere in the row gives you the view of attributes.
Search can be done based on Column basis.

Flow Chart
The Video inserted below explains you the working of " Payment Voucher " to have a better understanding
Journal Voucher
Journal Vouchers are used to create vouchers for transactions happening inside the company to make adjustments / to capture non operational transactions .
Segments of Journal Vouchers are,
- Draft
- Approved
- Cancelled
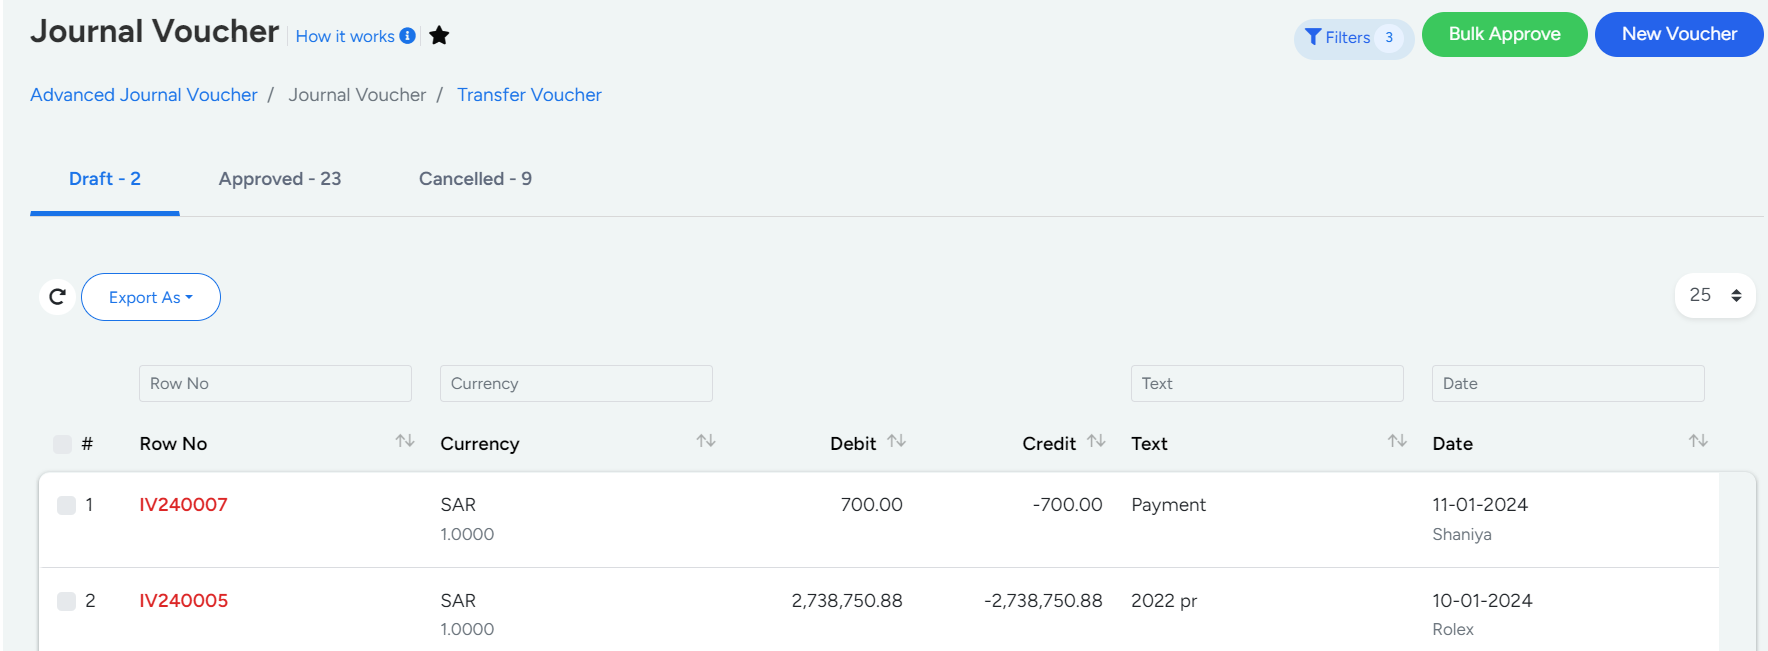
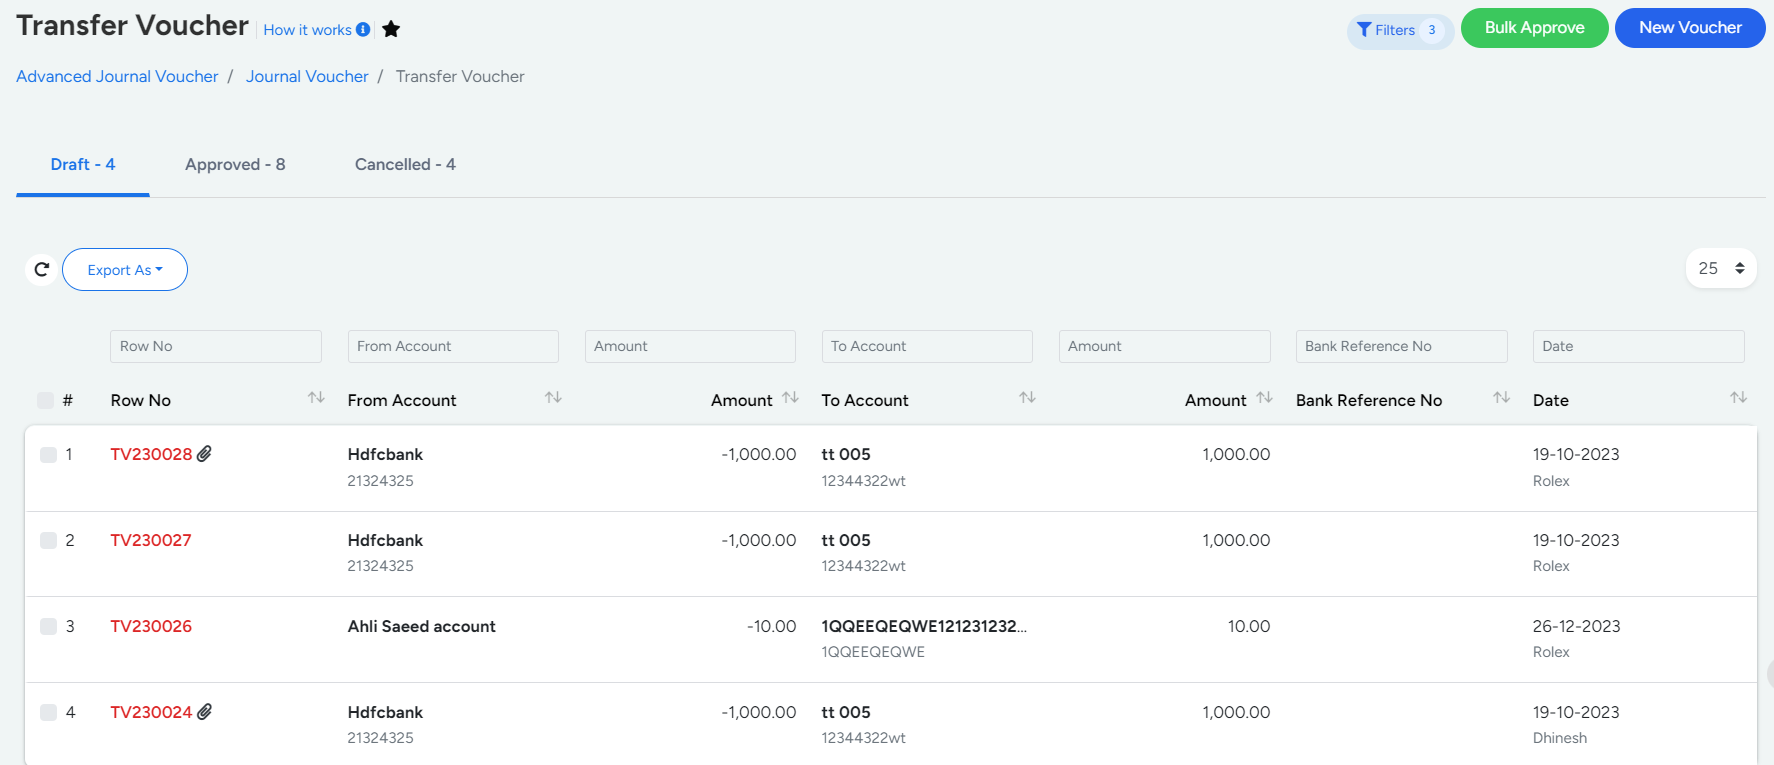
- Draft
-
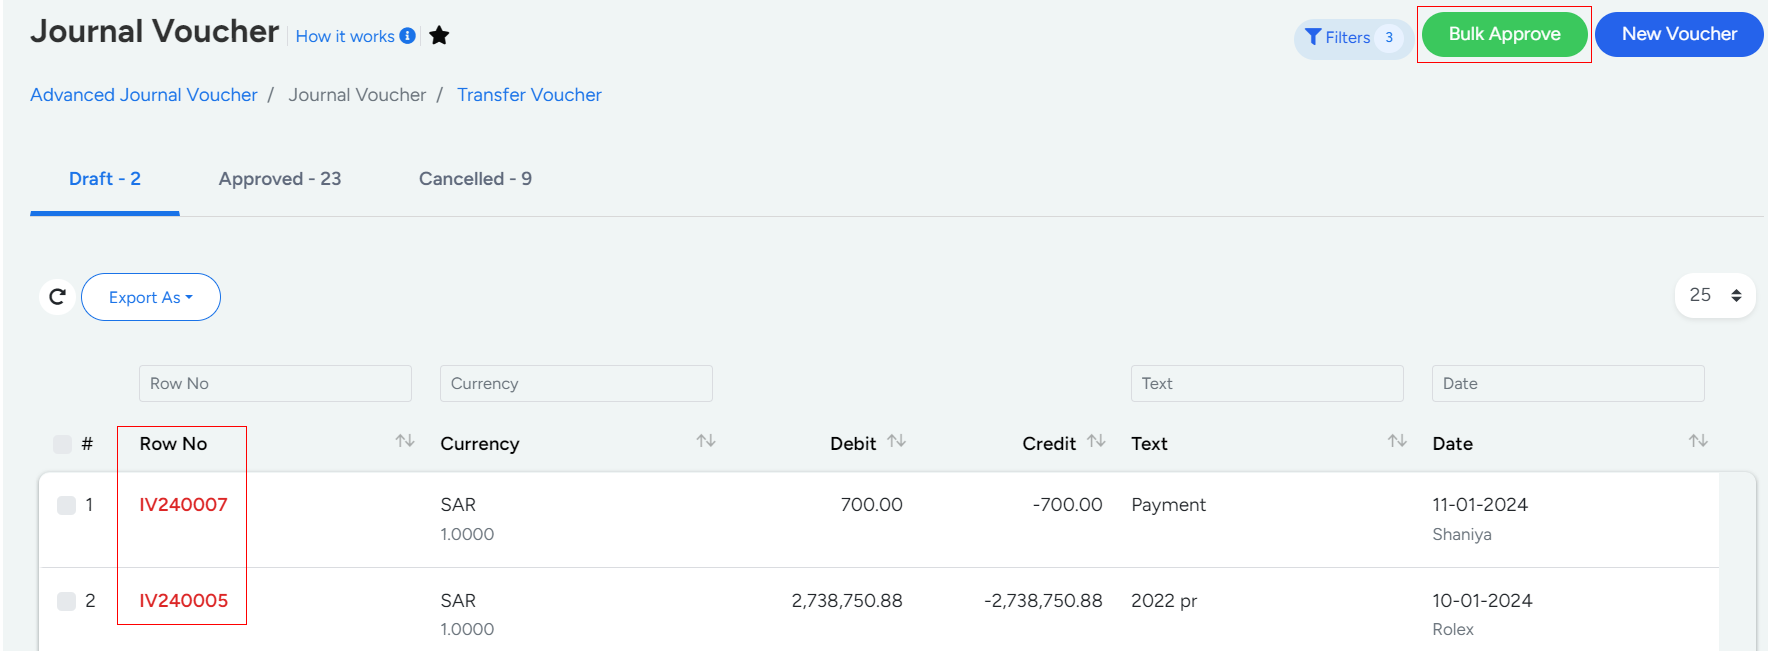
Draft has a list of Vouchers that are newly created for Internal Purposes.
Approval can be done in Bulk by selecting multiple vouchers altogether and Clicking the Bulk Approval Button given in green colour at the right corner of the page.
Row No is indicated in Red Colour.
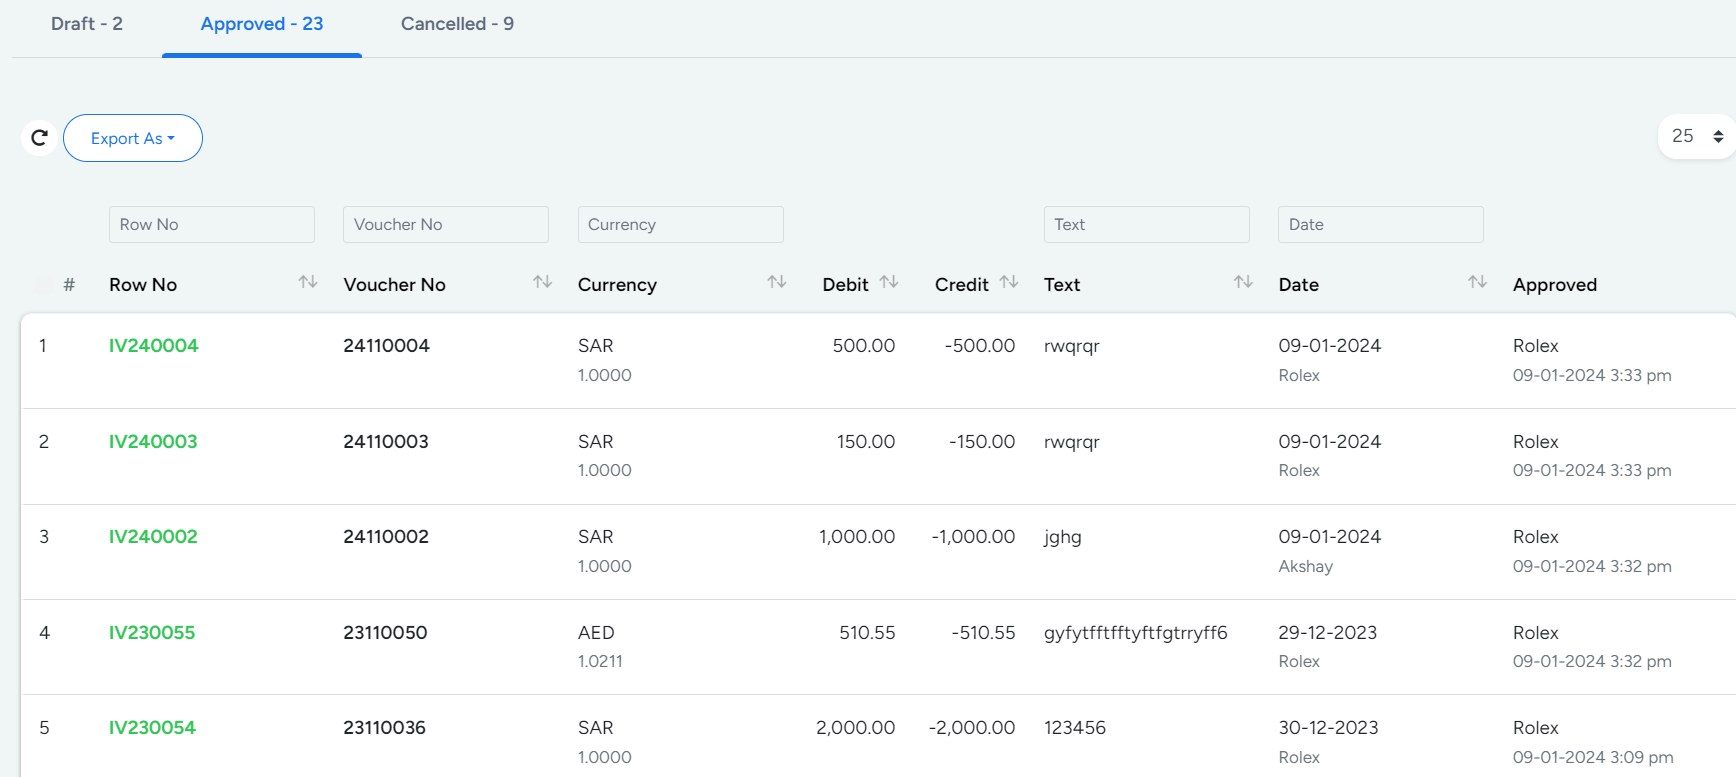
- Approved
- The Approved Segment holds a list of vouchers that has got approval for the data entered which shall proceed to further step.
If the voucher has documents uploaded to it, the same can be indicated by the attachment symbol next to Row No.
Row No is indicated in Green Colour.
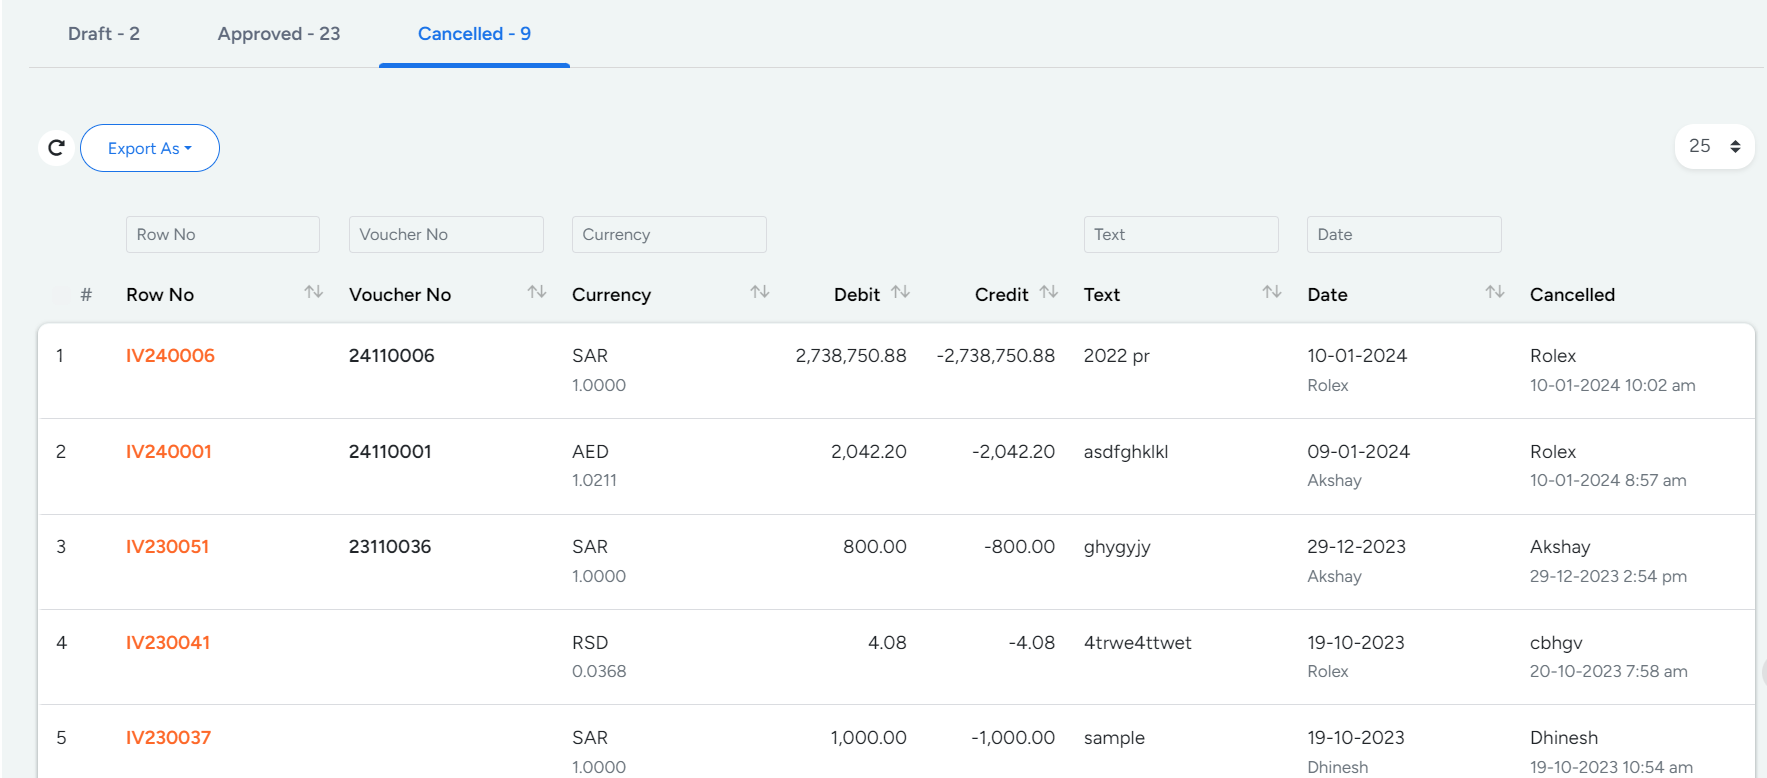
- Cancelled
- Cancelled segment has the vouchers that are deleted from the Approved and Unapproved Segment.
Row No is indicated in Orange Colour.
How to create Journal Voucher
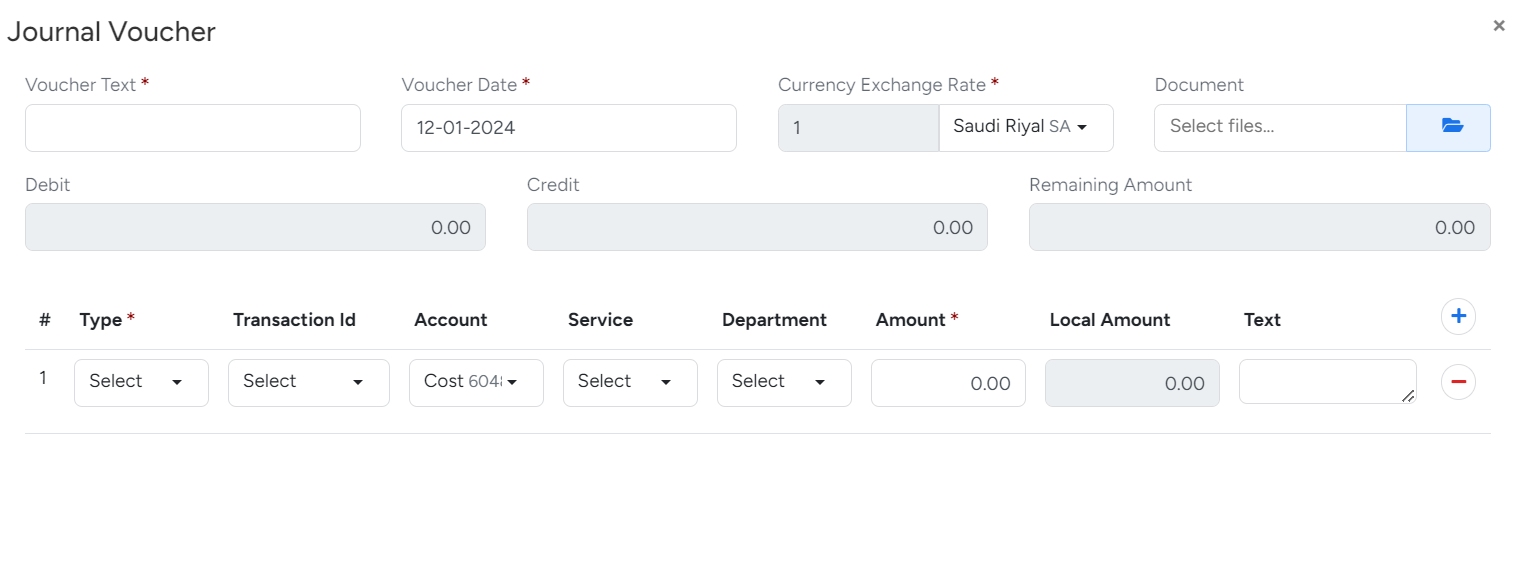
- Step 1
- Go to Finance --> Voucher --> Journal Voucher
- Step 2
- New Voucher --> Voucher Text and Voucher Date
- Step 3
- Select the type of Transaction (Job Posting / Project Posting / Own Account).
- Step 4
- Select the Transaction Id based on Transaction Type Selected.
- Step 5
- Choose the service and enter the corresponding amount to finalise the voucher creation, ensuring that both debit and credit entries are accurately recorded.
- Step 6
- Multiple Entries can be made using "+" if required.
- Step 7
- Click Save to Proceed.
Actions Performed
- Approve
- View
- Edit
- Delete
Flow Chart
Advanced Features
Double Clicking on the Row No allows you to make Memo.
Double Clicking anywhere in the row gives you the view of attributes.
Sorting Can be made Column Wise Alphabetically.
The Video inserted below explains you the working of " Journal Voucher " to have a better understanding
Transfer Voucher
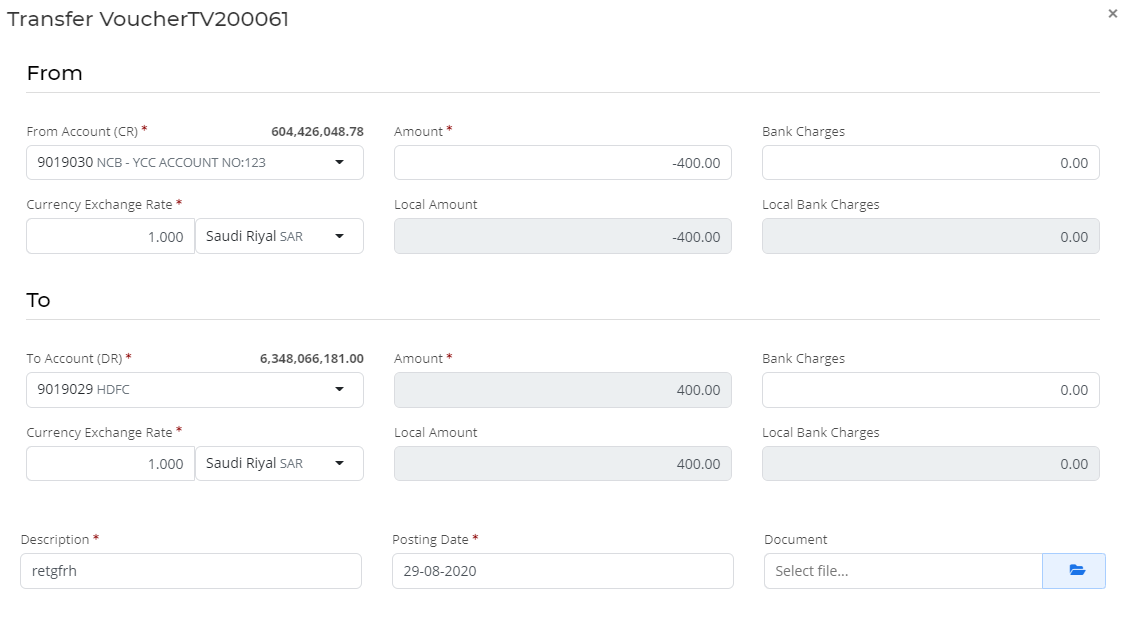
Transfer Voucher allows the user to transfer amounts from bank 1 to bank 2 or from bank to Petty account(Inter- Company Purpose) and Vice versa.
How to create a New Transfer Voucher
- Step 1
- Go to Finance --> Vouchers --> Transfer Vouchers.
- Step 2
- New Voucher --> Fill the details given below,
- From (Account from which the transaction is made) has account no(*) , Amount to be transferred (*) and currency exchange rate.
- TO ( Destination Account) needs to be filled with account no(*) , Amount to be transferred (*),Description (*) and currency exchange rate.
- Add Document if required.
- Step 3
- Click Save to Proceed.
Transfer Voucher has three Sub Segments based on its status. They are,
- Draft
- Approved
- Cancelled
- Draft
- The Draft segment has a list of Vouchers that are yet to be approved by the user.
Approval can be done in Bulk by selecting multiple vouchers altogether and Clicking the Bulk Approval Button given in green colour at the right corner of the page.
- Approved
- The Approved Segment holds a list of vouchers that has got approval for the data entered.
If you want to make changes on the voucher, you need to create a new voucher to make changes as this does not support modification on approved documents.
If the voucher has documents uploaded to it, the same can be indicated by the attachment symbol next to Row No.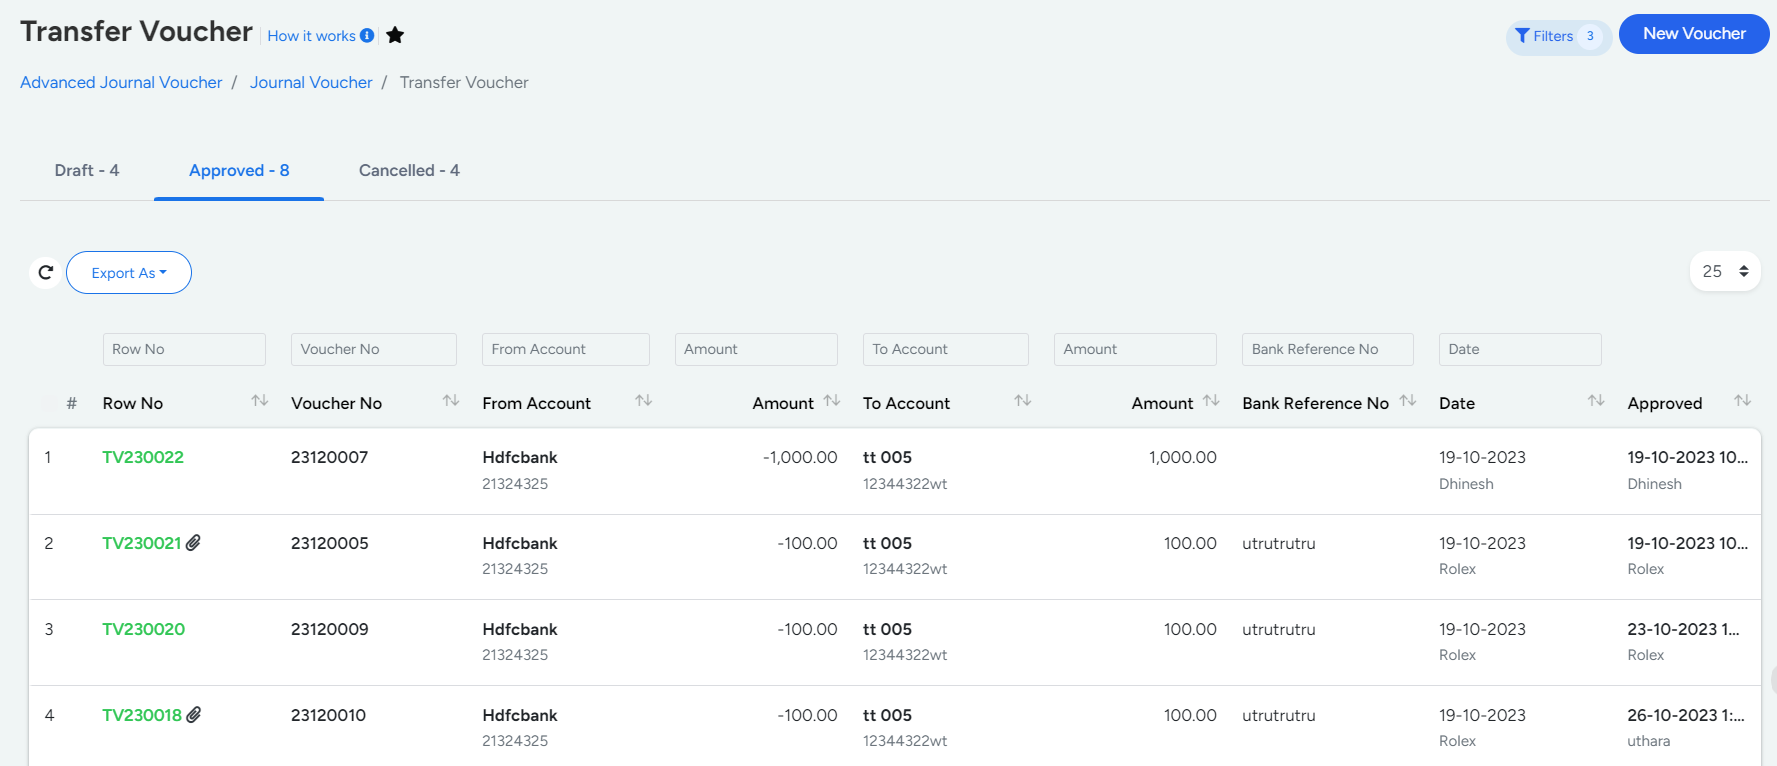
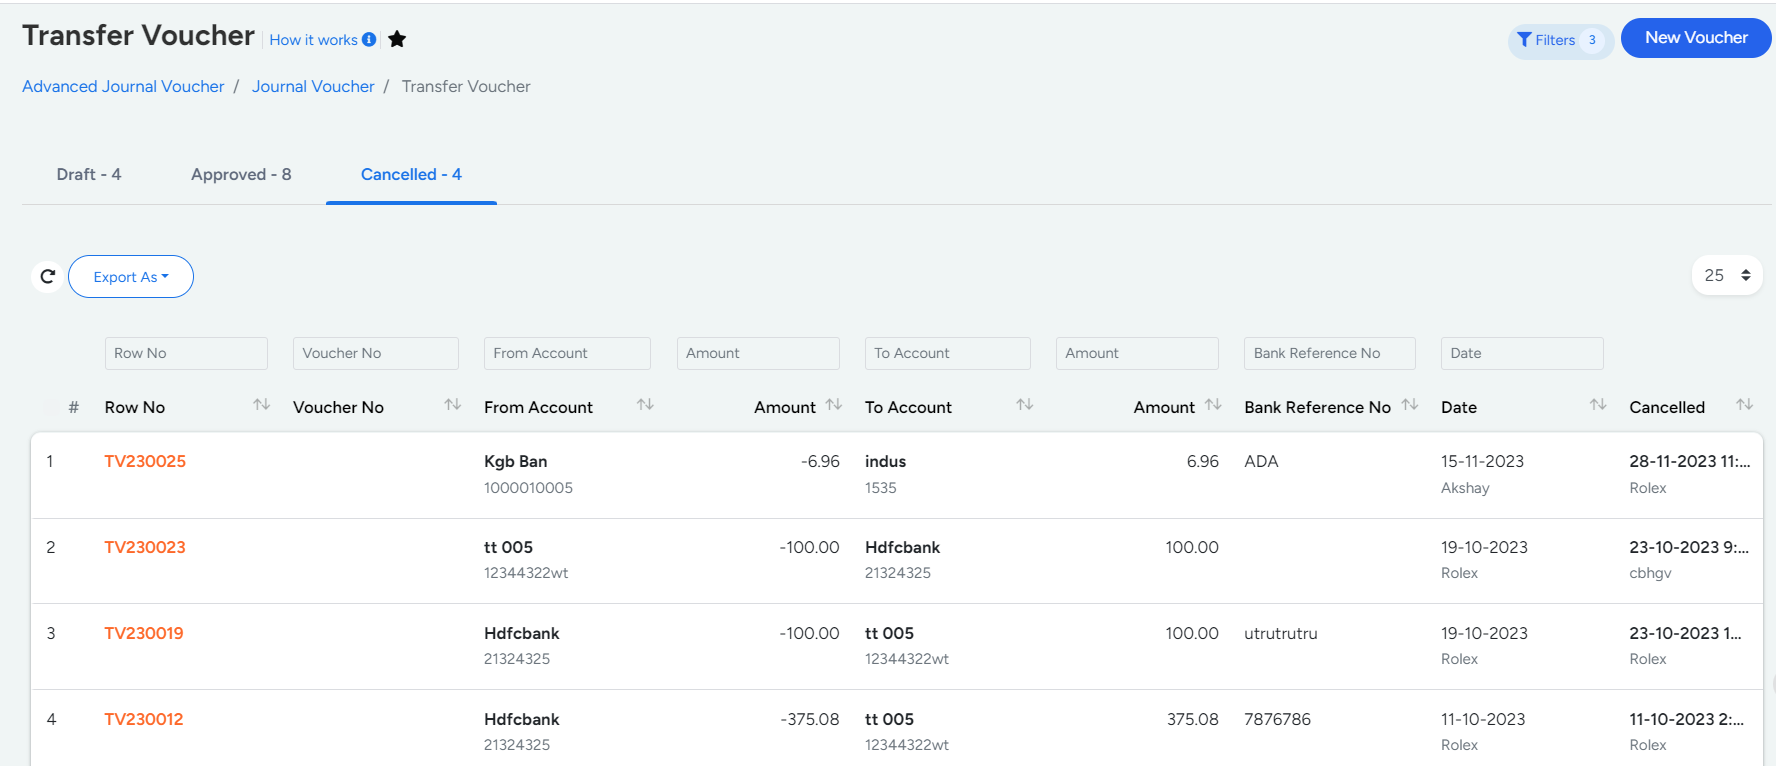
- Cancelled
- Cancelled segment has the vouchers that are deleted from the Approved and Draft Segment.
Flow Chart
Actions Performed
- View
- Delete
- Edit - Applicable only on Unapproved Documents
- Approve - Applicable only on Unapproved Documents
Advanced Features
Double Clicking on the Row No allows the user to create a Memo
Doubling Clicking anywhere on the column except Row no gives you the view of attributes entered.
The Video inserted below explains you the working of " Transfer Voucher " to have a better understanding
Expense
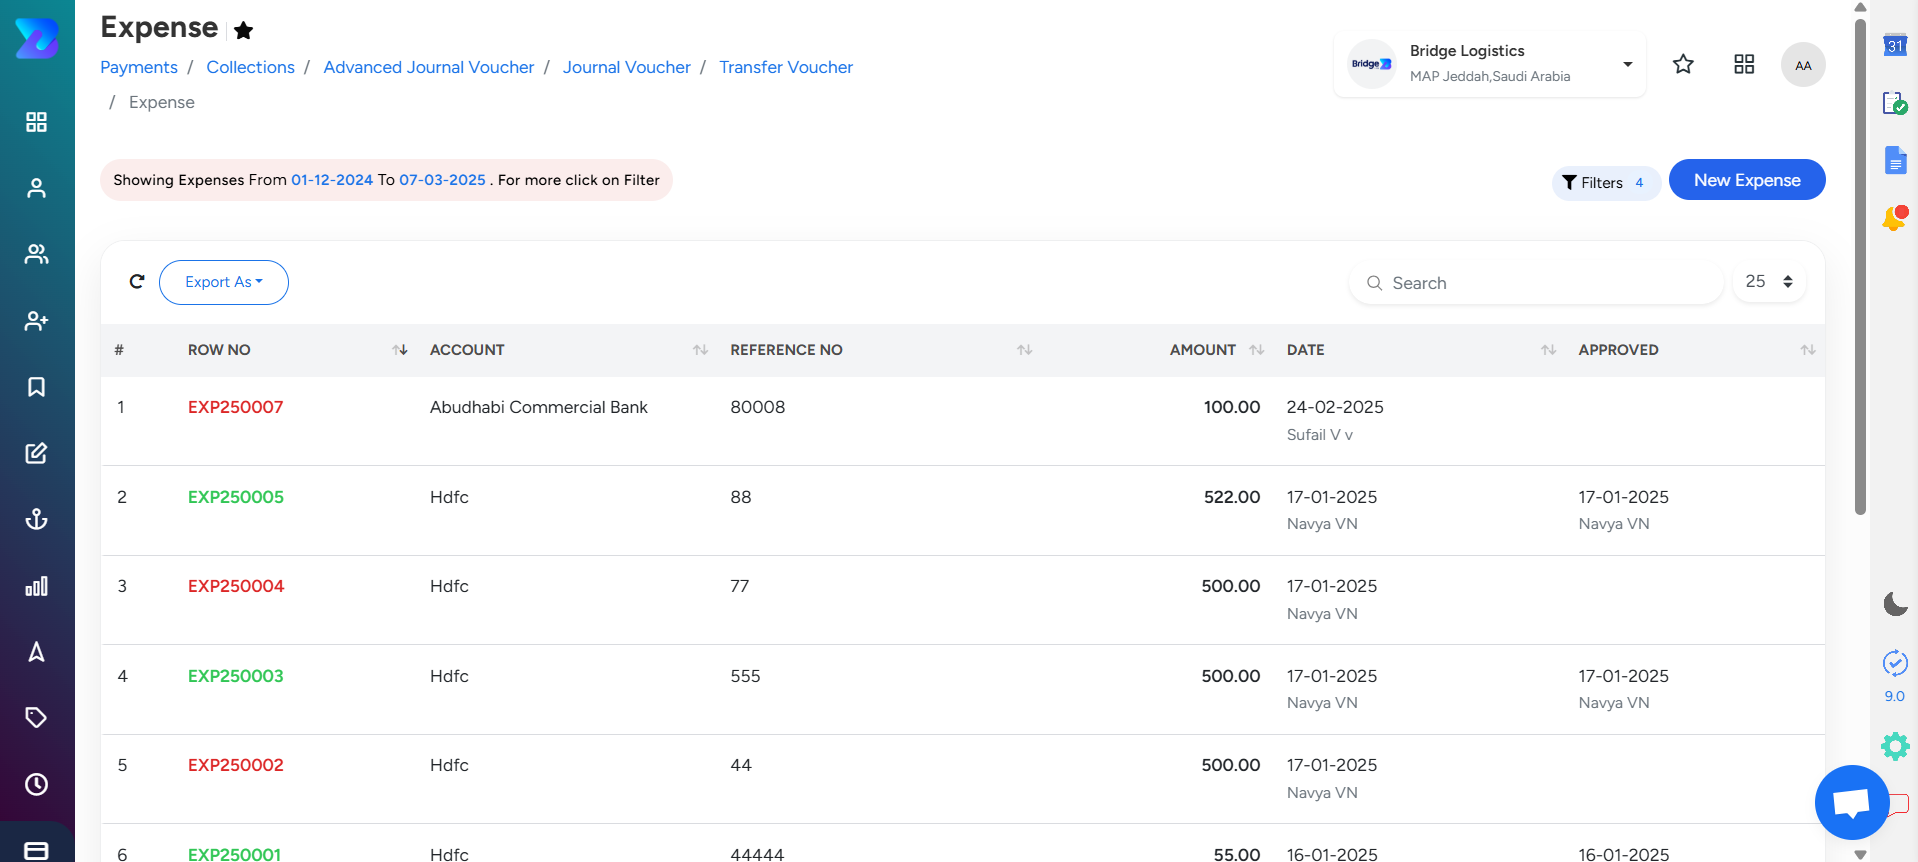
The Expense Module is designed to record general expenses, such as office costs like electricity expense, telephone expense, and petty cash. These entries will be reflected in the trial balance and other financial statements.
To record a new expense
- Step 1
- Navigate to Finance Module → Vouchers → Expense → New expense.

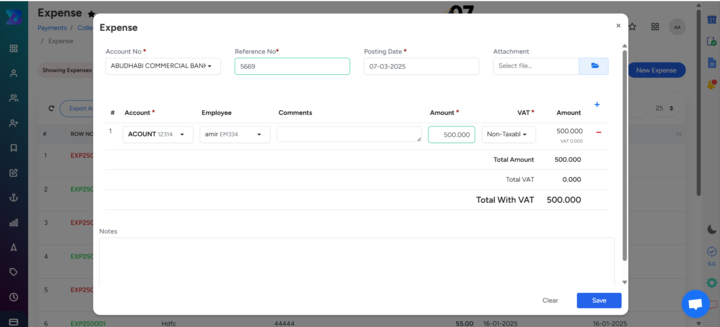
- Step 2
Enter the Account Number, Reference No, Posting Date, Account and other relevant information.
Enter the amount paid and select the vat from the dropdown.
You can also include any notes, which will be displayed at the bottom of the expense voucher when printed.
- Step 3
-
Saving Options
If you wish to modify any entered data, simply click the Clear button.
Finally, click "Save".Once the expense has been recorded, it will appear as a draft in this section
To take further action, simply right-click on the expense voucher to approve, print, or Replicate.
Actions performed
- View
- Edit
- Delete
Note:The Export Dropdown feature allows users to export the document in Excel.
General Ledger
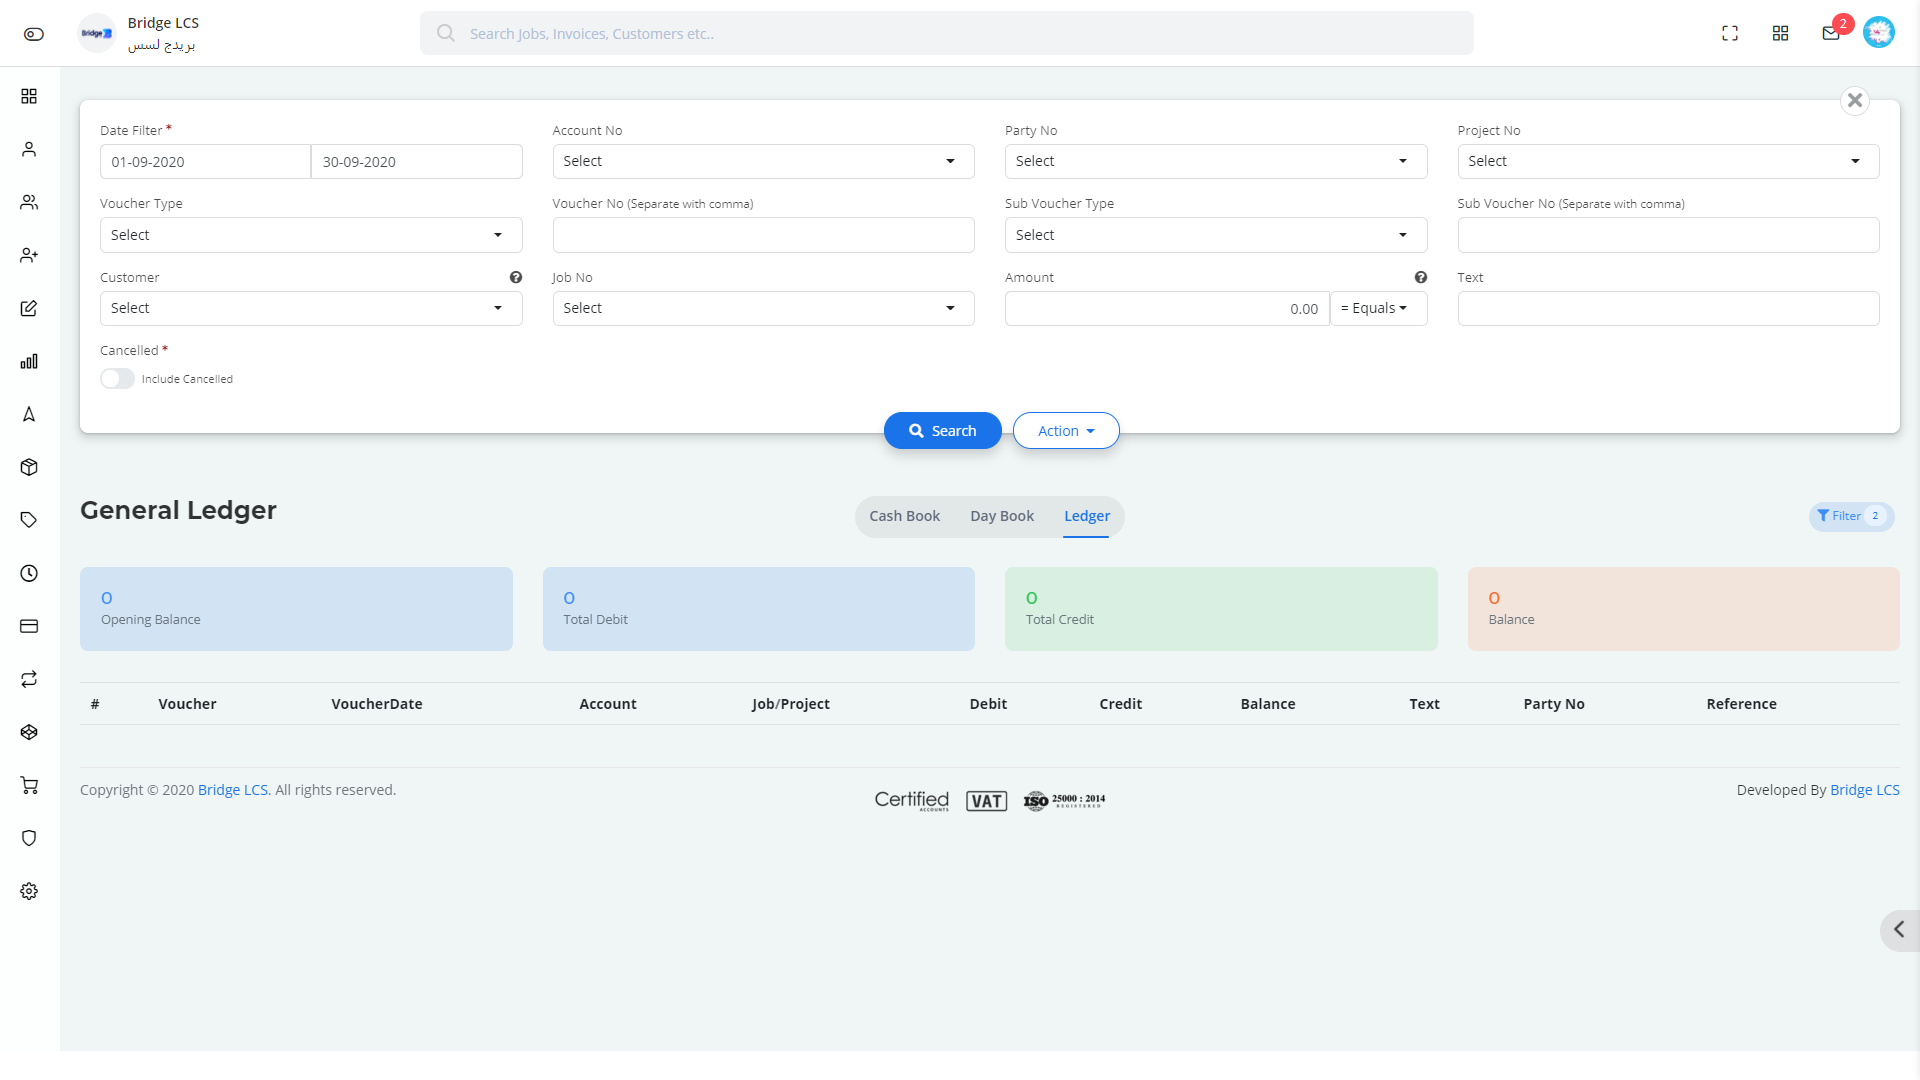
General Ledger furnishes the details of overall transactions that happened .
This includes 3 segments as follows,
- Cash Book
- Day Book
- Ledger
Cash Book
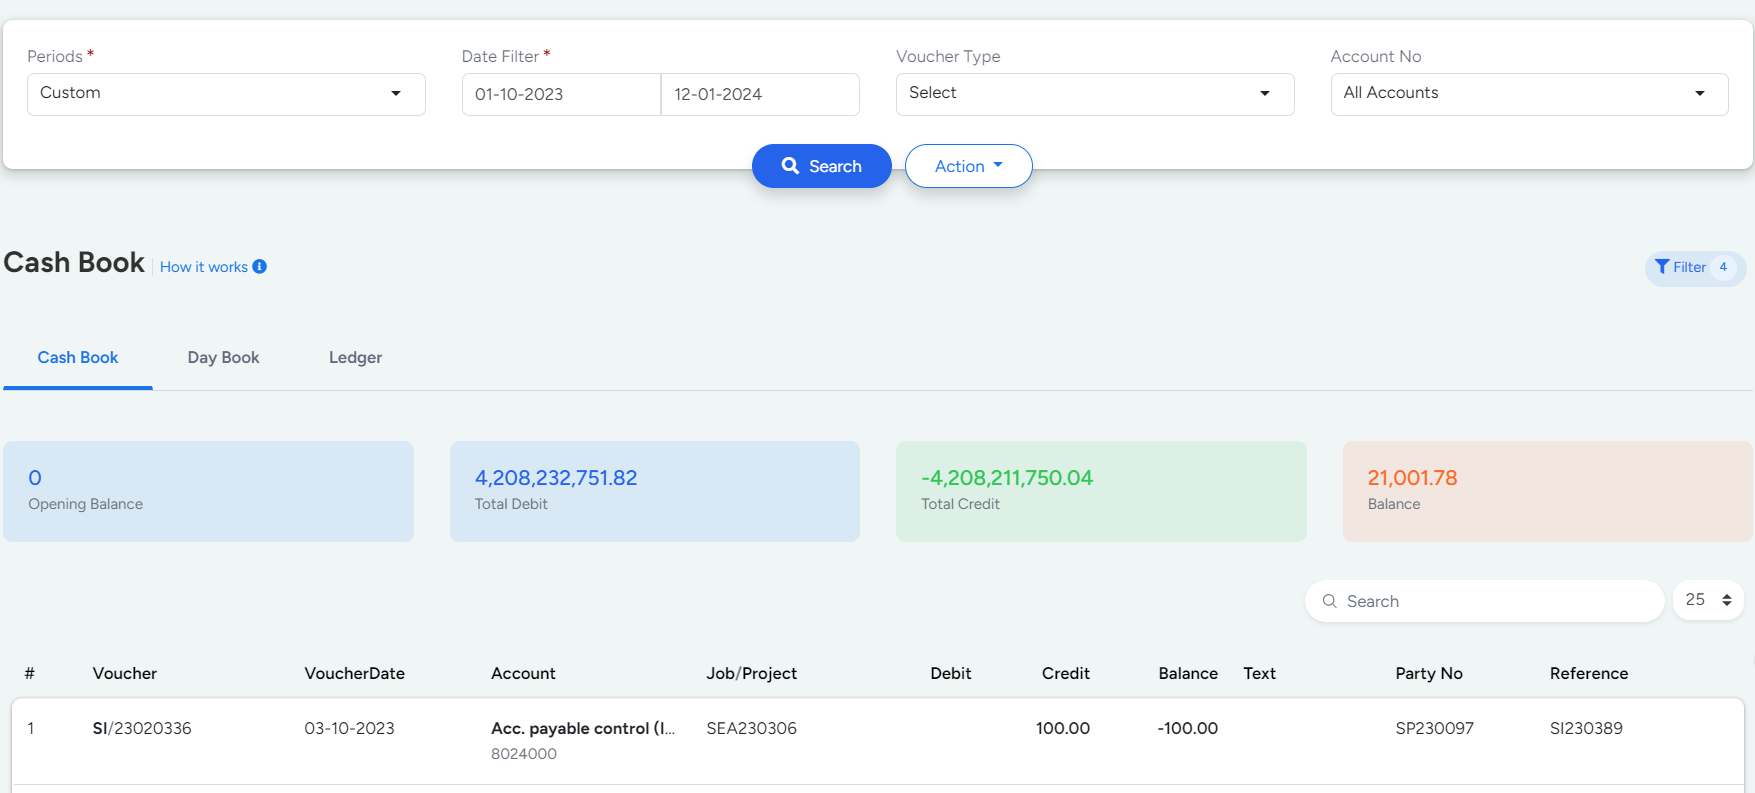
Cash Book is the first segment of General Ledger that provides the transaction details based on the different voucher types.This works based on the following type of filters applied,
- Start Date and End Date
- Voucher Type (BCV / CCV /BPV /CPV)
- Account No
Finally Click Search to apply the filter.
Action available next to Search Provides features to Print and Export.
The type of Voucher(BCV /CCV /BPV /CPV) displayed is indicated in Row No which can be used as quick reference.
The date on which the voucher was created is given next to Row No.
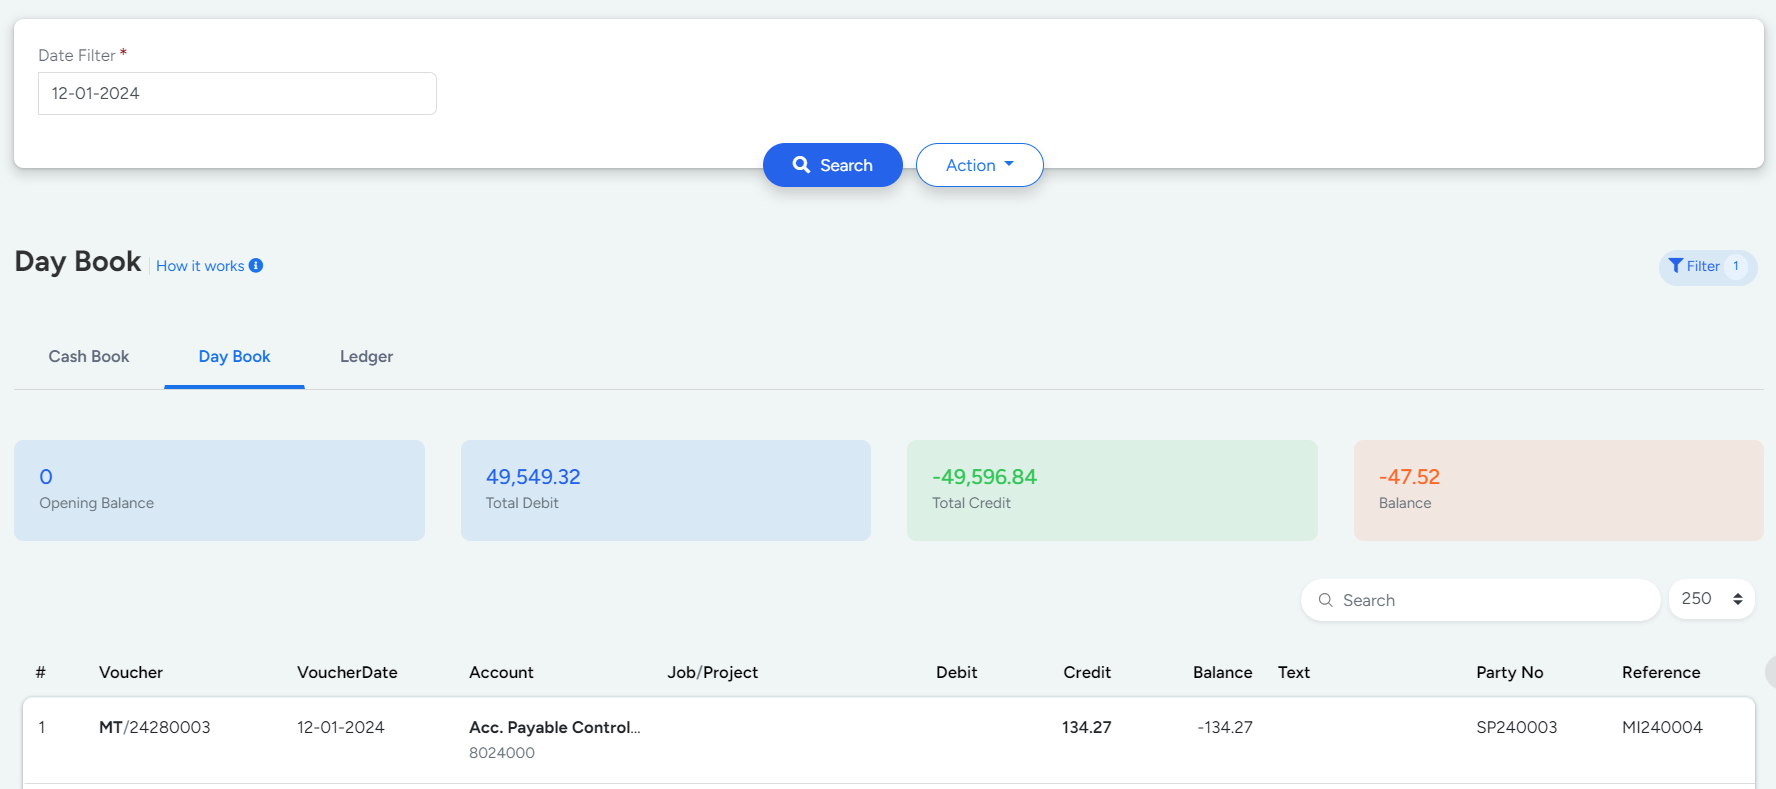
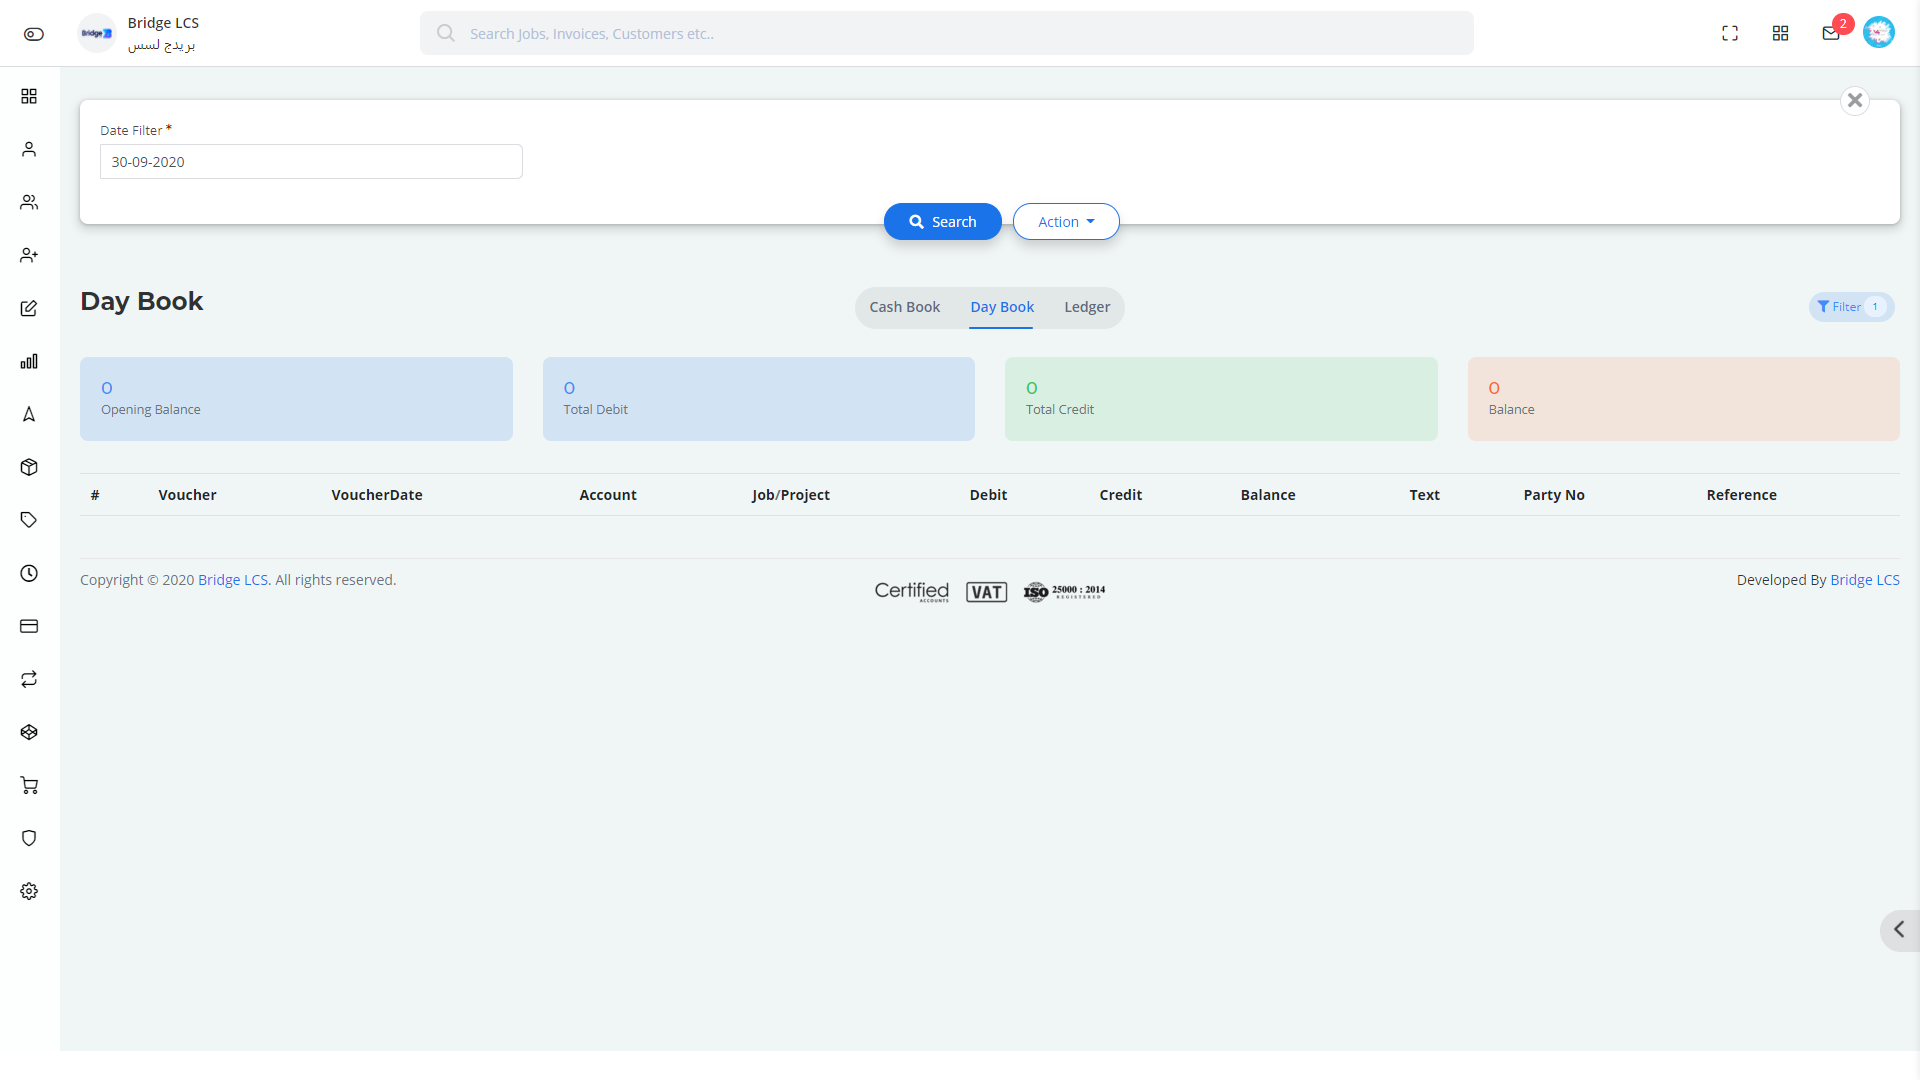
Day Book
Day Book works furnish the transactions that happened on the date selected.
Ledger
Ledger holds the transaction data as a whole. It provides the data in a detailed manner where you can apply filters individually based on the customer .
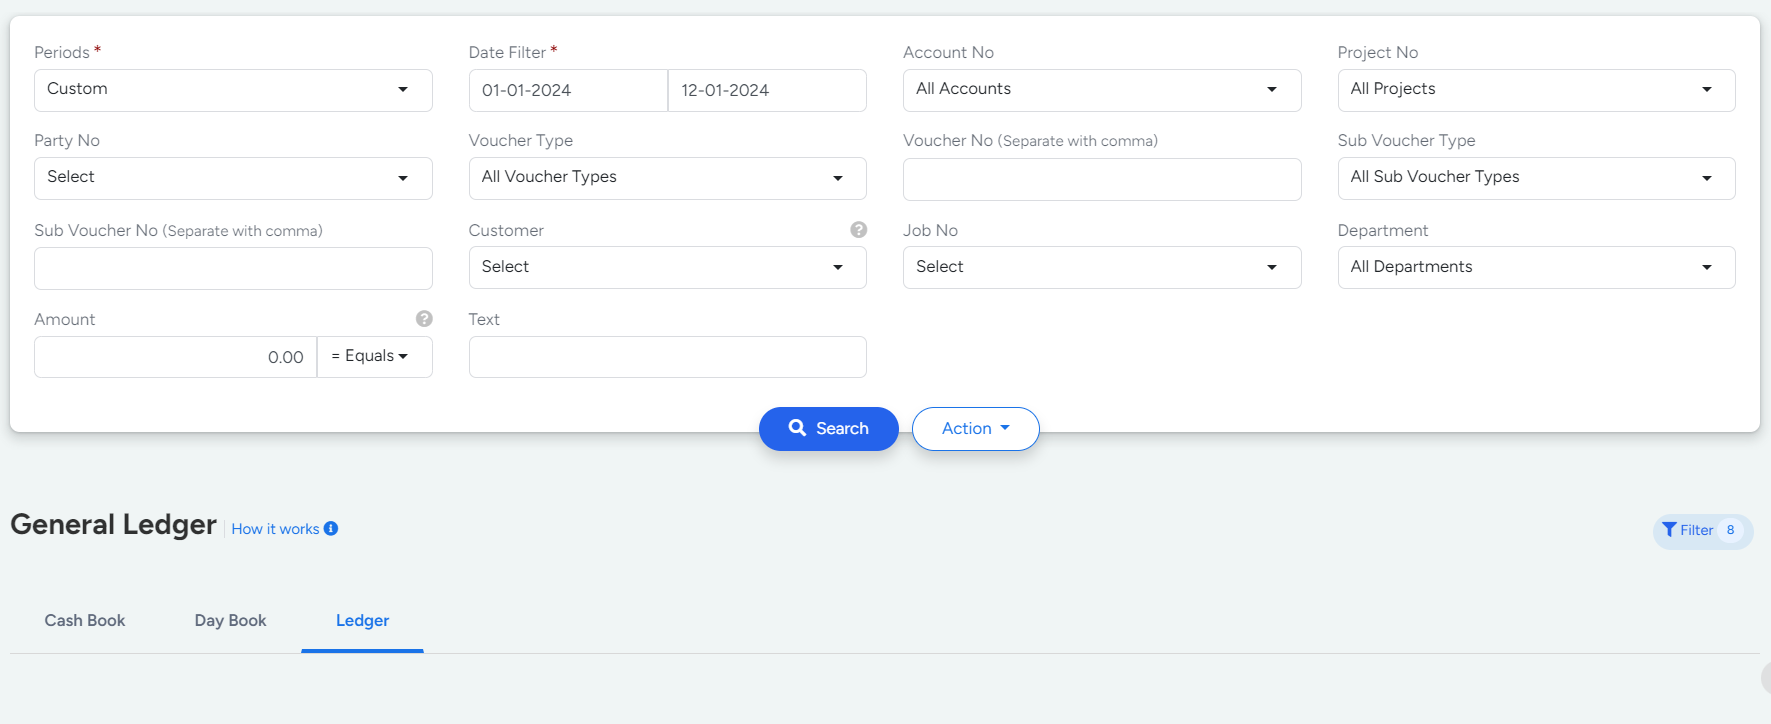
Action available next to Search Provides features to Print and Export.
Below are the filters that can be applied to fetch detailed report,
- Start Date and End Date
- Account No
- Party No
- Project No
- Voucher Type
- Voucher No
- Sub Voucher Type and No
- Customer and Job No

Double Clicking on the Column opens a new page where the voucher is displayed and the cancelled Voucher is indicated as a watermark for your reference.
Advanced Features
Opening Balance, Total Debit, Total Credit and Balance is given in the top section based on the filters applied for quick reference.
Filters Available can be hidden by Clicking on the Filter Feature available at the right corner of the page.

The Video inserted below explains you the working of " General Ledger " to have a better understanding
General Invoice
General Invoice is the invoice besides Job Functions. This includes,
- General Customer Invoice
- General Supplier Invoice
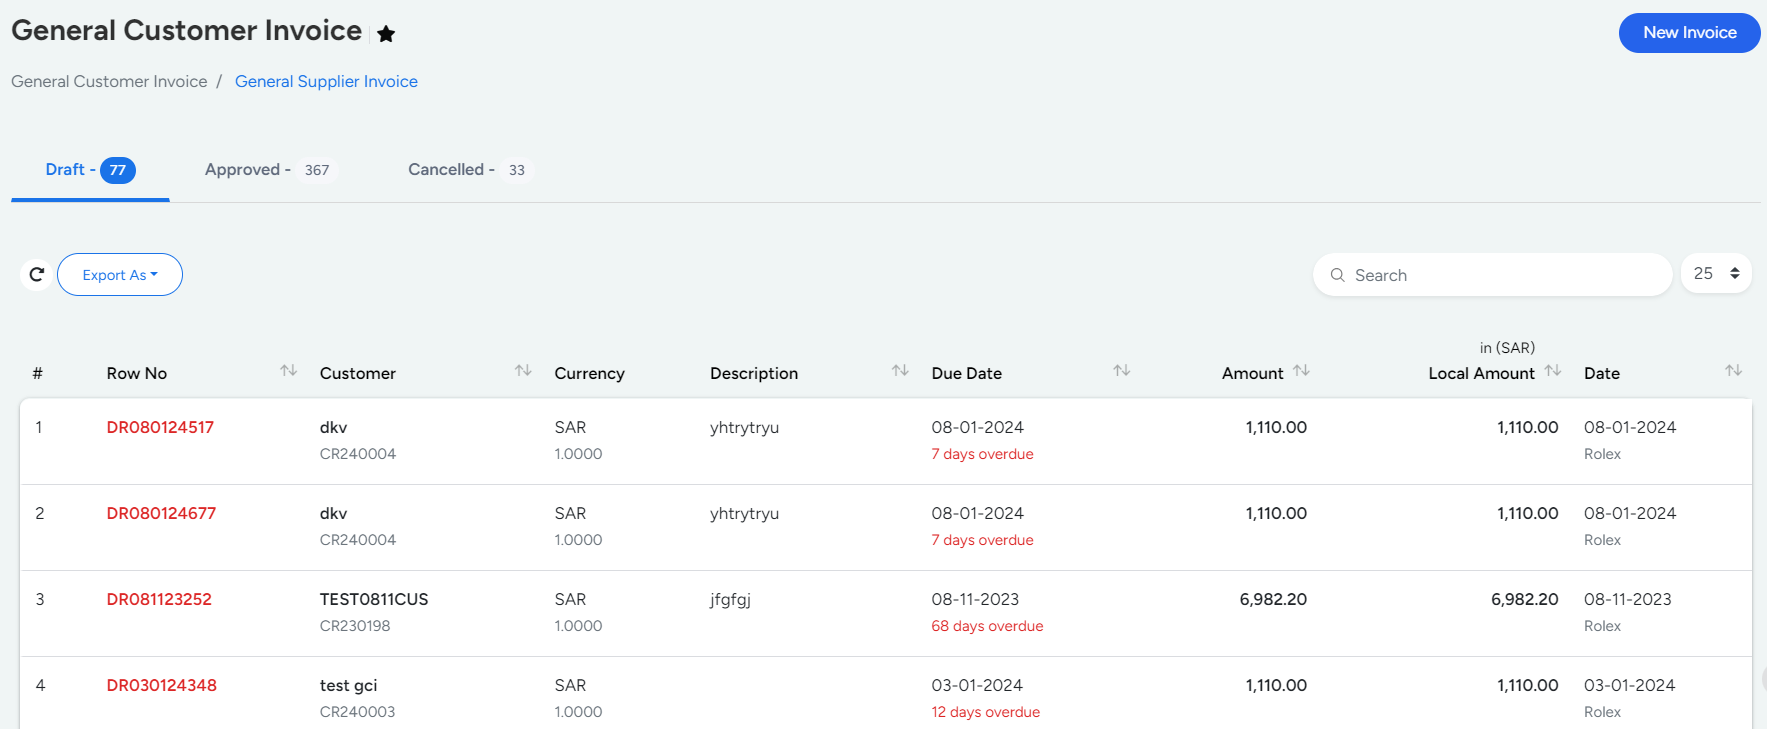
General Customer Invoice
General Customer Invoice does not Include Job Functions. This is created for operations apart from Logistics Functions.
How to Create General Customer Invoice
- Step 1
- Go to Finance --> General Invoice --> Customer Invoice
- Step 2
- New Invoice --> Select the mandatory fields like Customer Name, Account and Service .
- Step 3
- Capture the Amount and Quantity in Precise.

Sub Segments Included are
- Draft
- The Initial Stage of generated Invoice is Draft State which needs to be verified by the concerned person to proceed.
The Row No ofDraft Invoices are indicated in Red Colour.
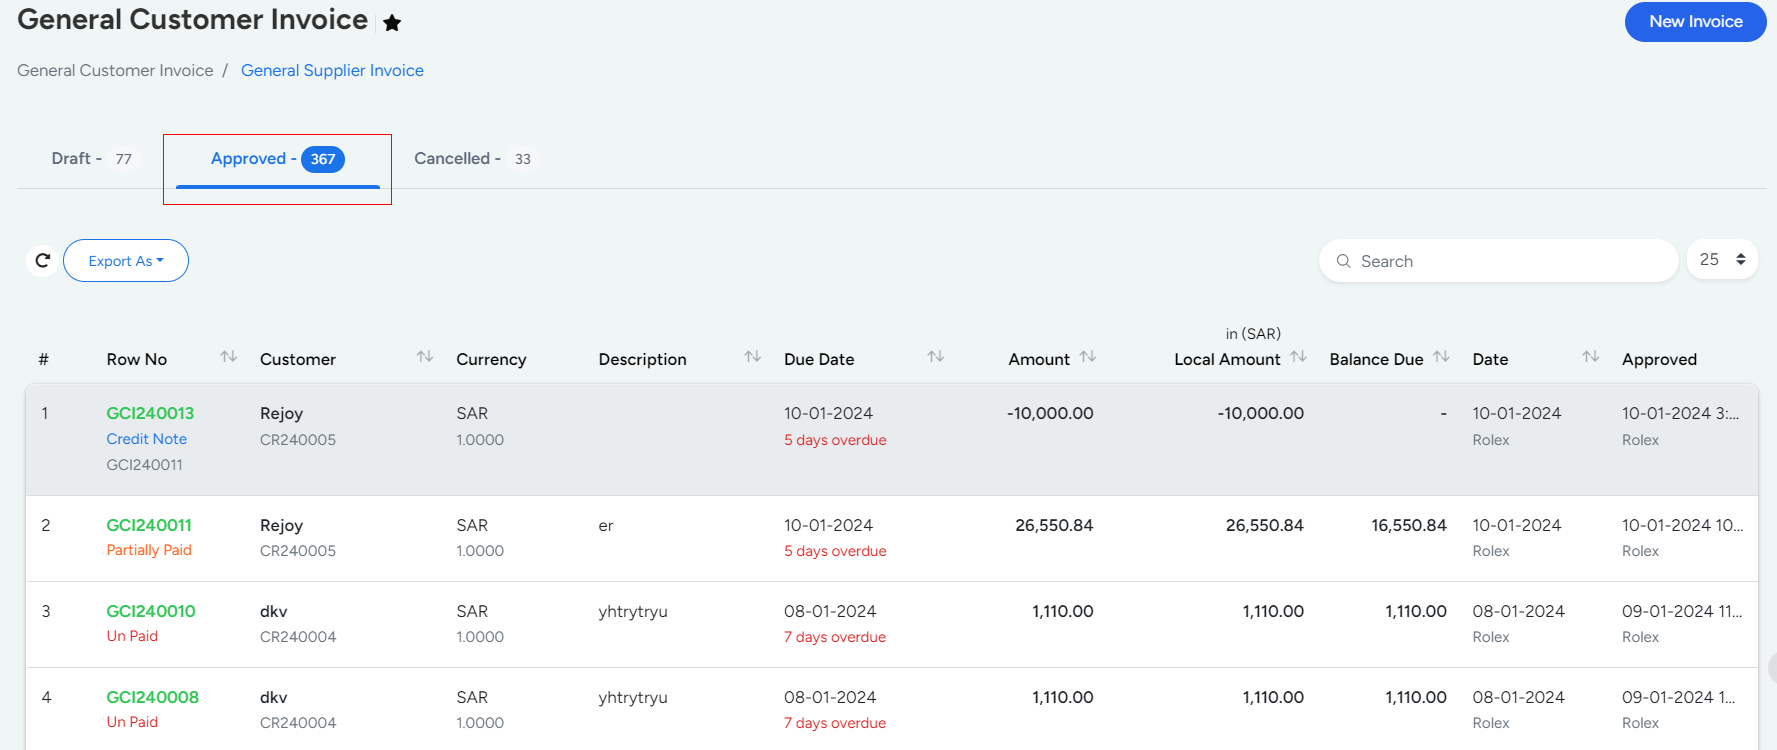
- Approved
- Once the details are verified and Confirmed they can be moved to an Approved State.
The Row No of approved Invoices are indicated in Green Colour.
- Cancelled
- This has the list of invoices deleted from Approved and Unapproved Sections.
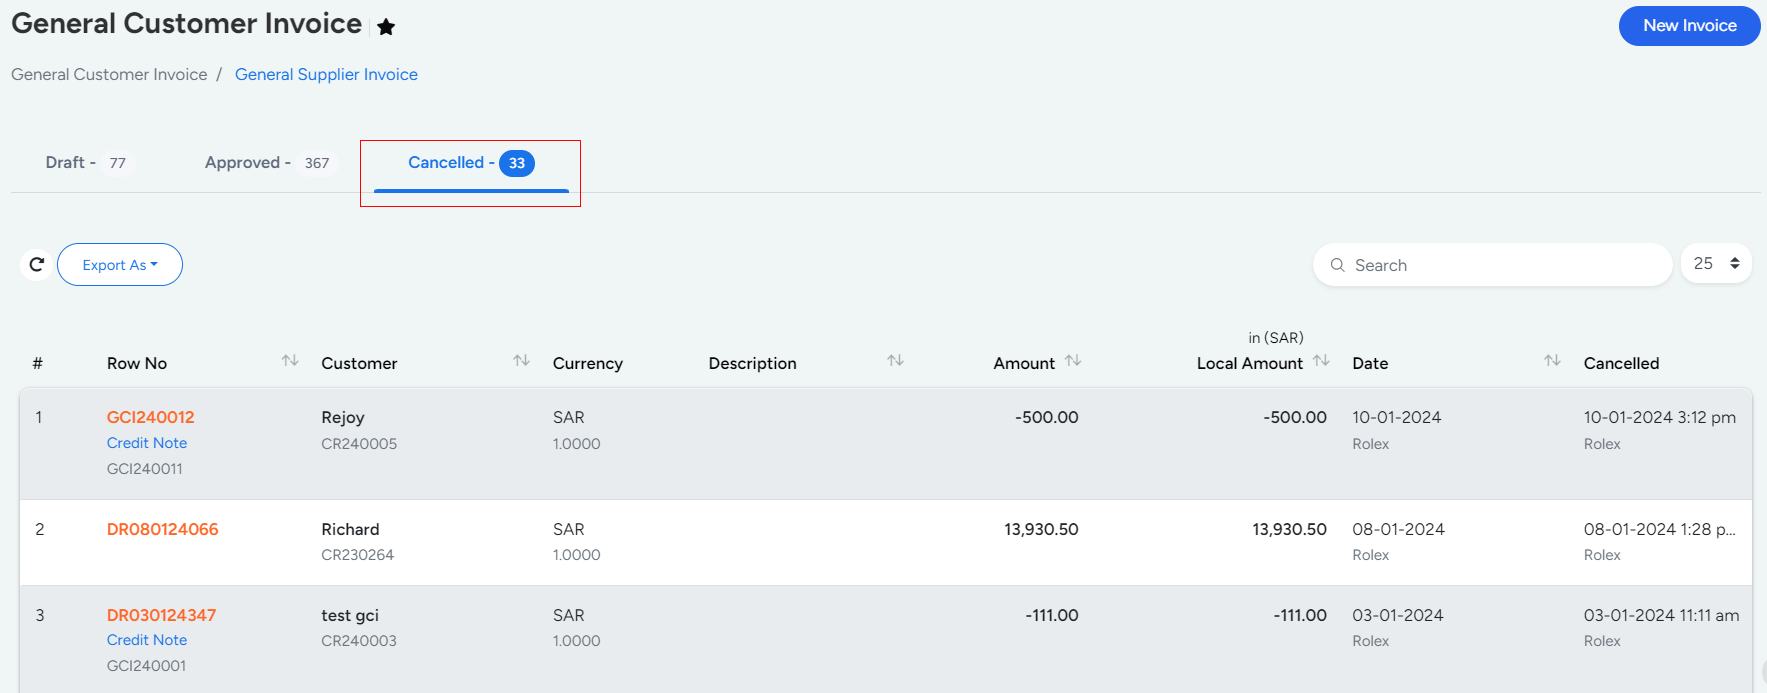
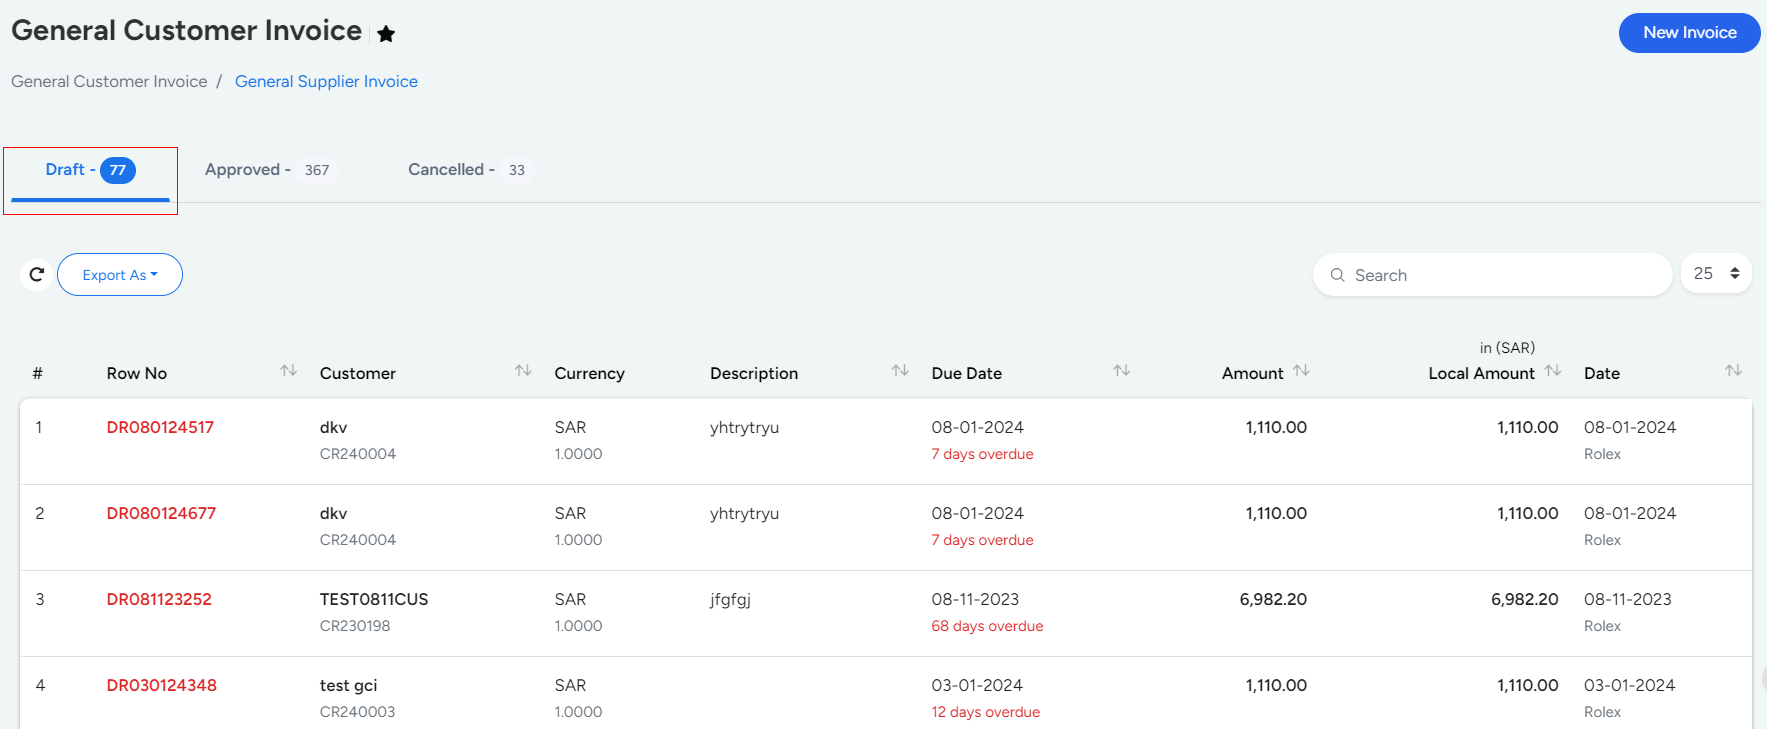
Flow Chart
Actions Performed
- Approve
- Edit
- View
- Delete
- Disapprove
- Replicate.
Advanced Features
Invoices with Attachments are indicated with an attachment symbol along with the row number.

Double Clicking on the Row No allows the user to create a Memo.

Double Clicking anywhere on the column except Row no gives you the view of attributes entered.
Sorting Can be made Column Wise Alphabetically.
General Supplier Invoice
General Supplier Invoice is not related to Logistics Operations. This can be created to capture the expenses made for office purposes such as things used on a daily basis, Stationeries etc.
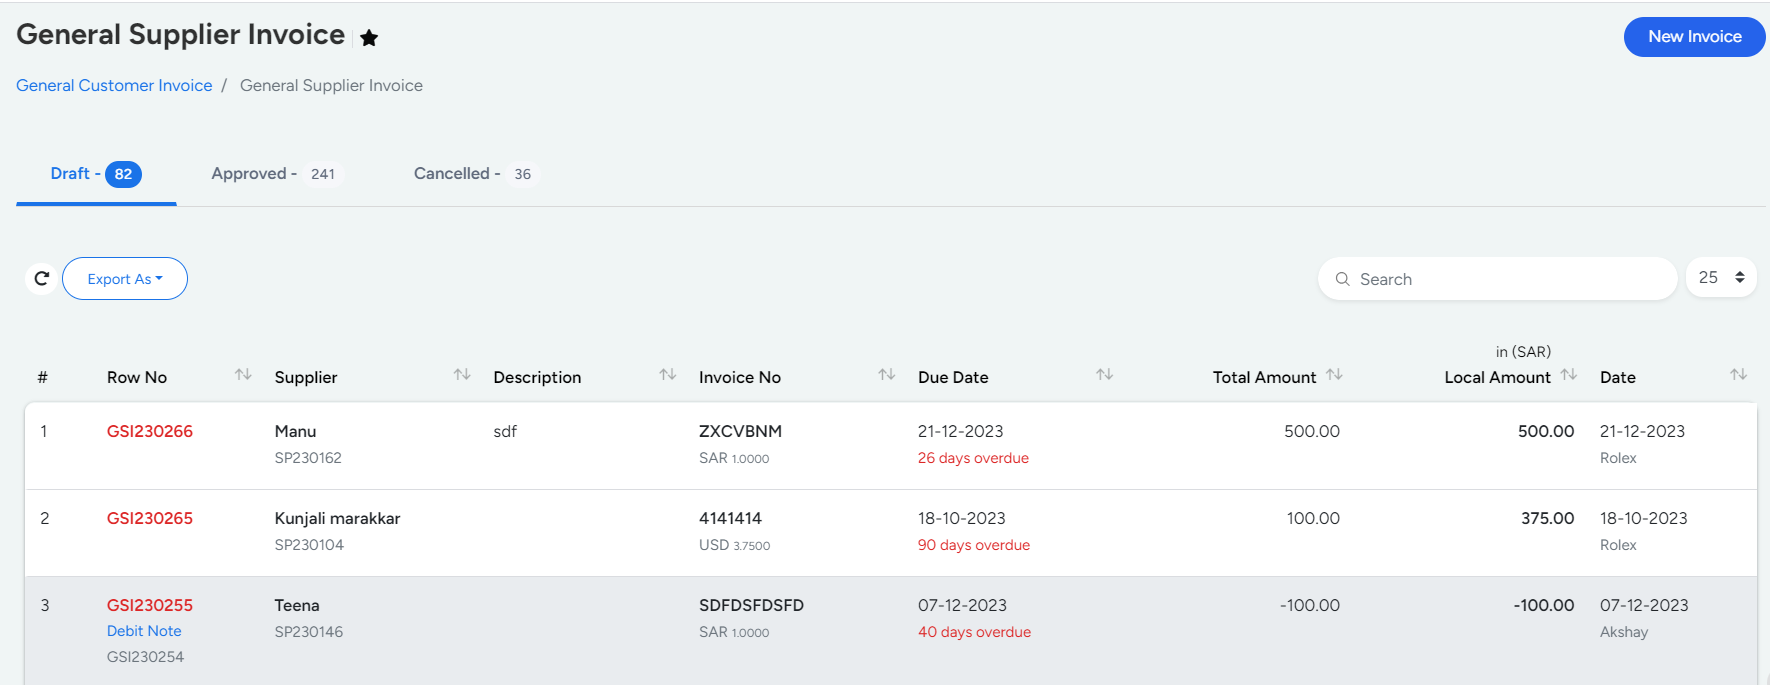
How to Create General Supplier Invoice
- Step 1
- Go to Finance --> General Invoice --> Supplier Invoice
- Step 2
- New Invoice --> Select the mandatory fields like Customer Name,Posting Date, Account and Service .
- Step 3
- Capture the Amount and Quantity in Precise.
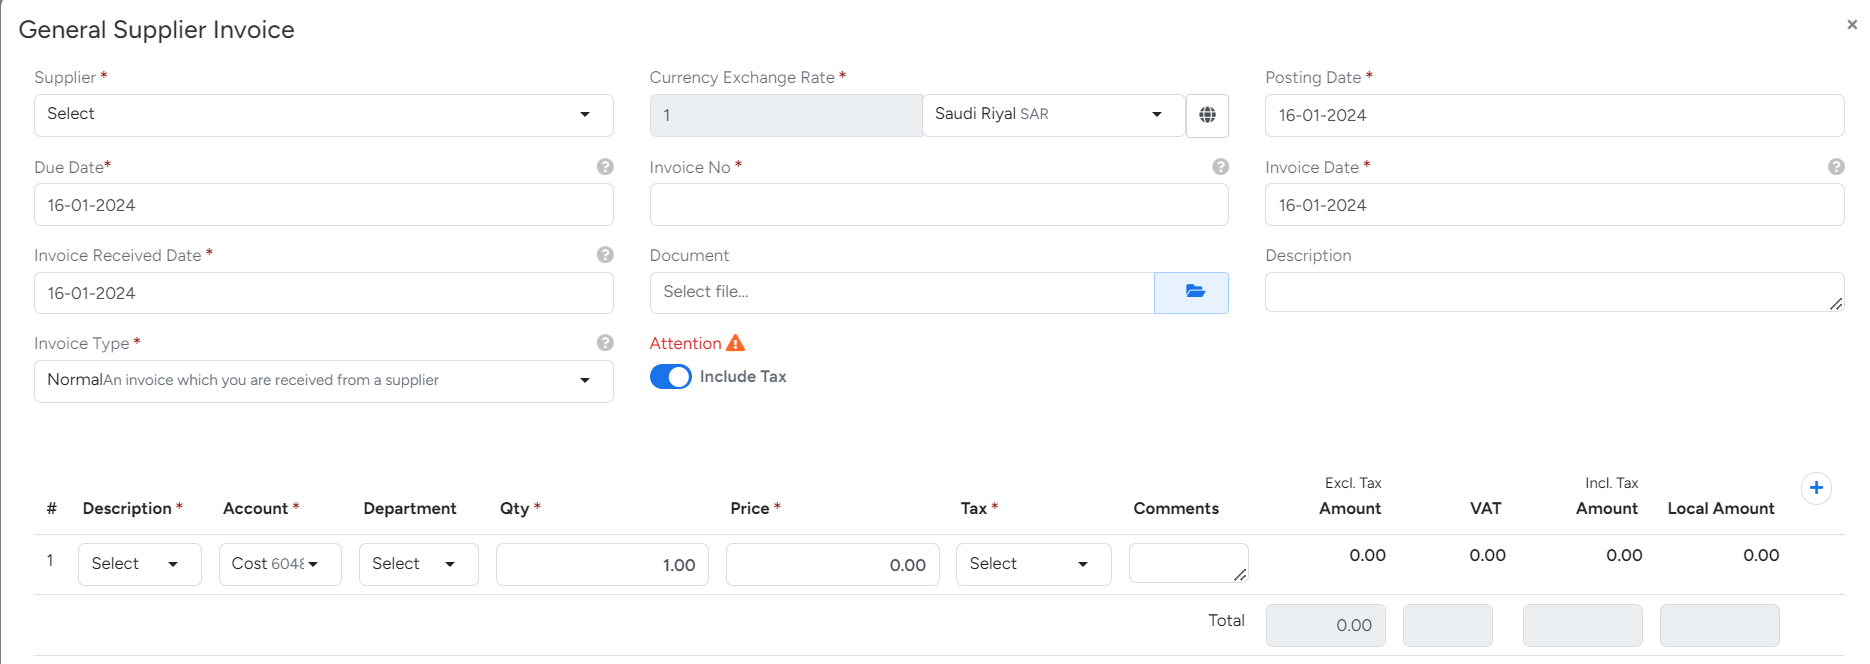
Sub Segments Included are
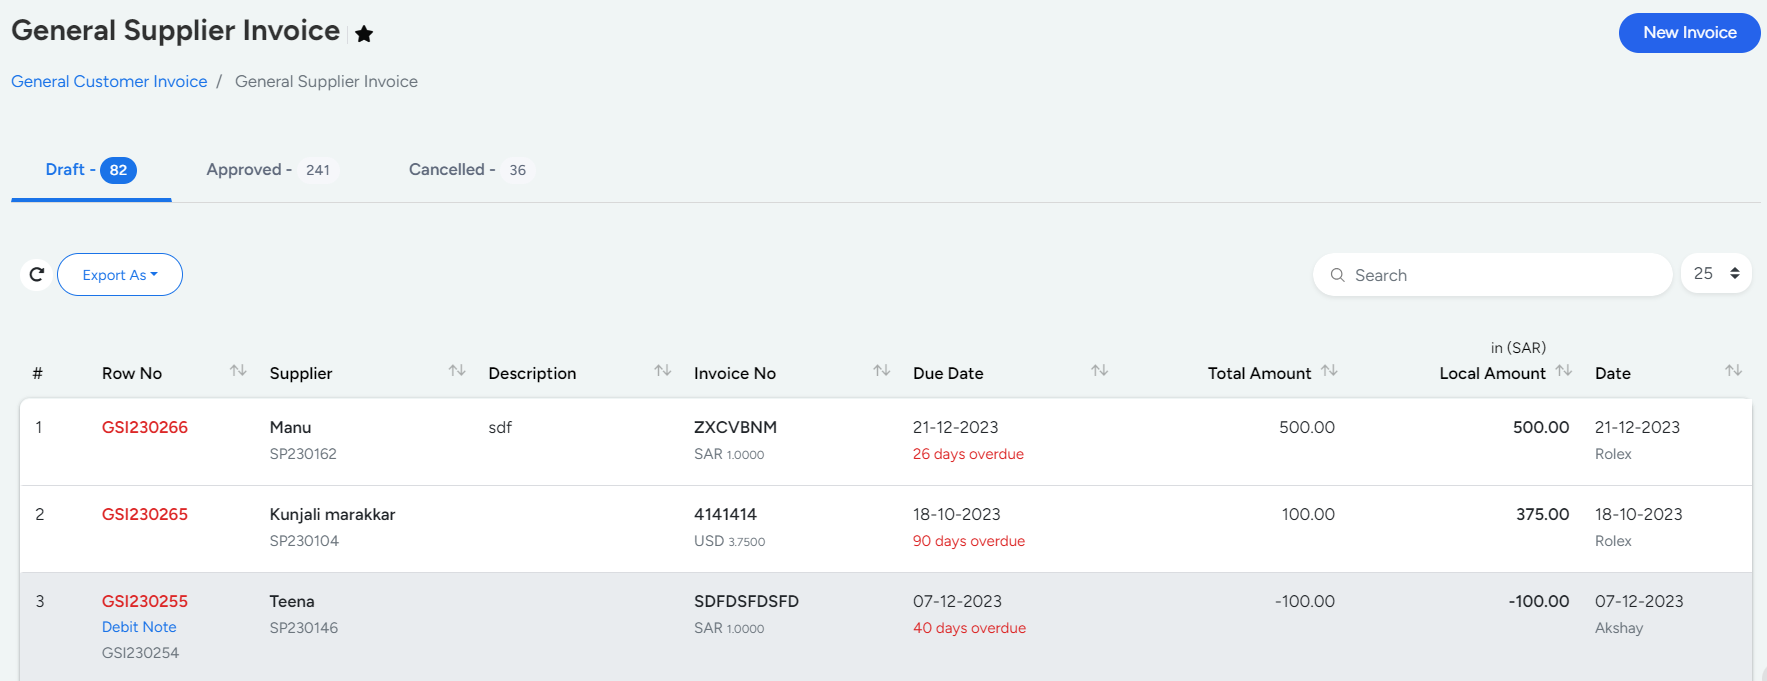
Draft
The Initial Stage of generated Invoice is Draft State which needs to be verified by the concerned person to proceed.
The Row No of Draft Invoices are indicated in Red Colour.
Approved
Once the details are verified and Confirmed they can be moved to an Approved State.
The Row No of Unapproved Invoices are indicated in Green Colour.
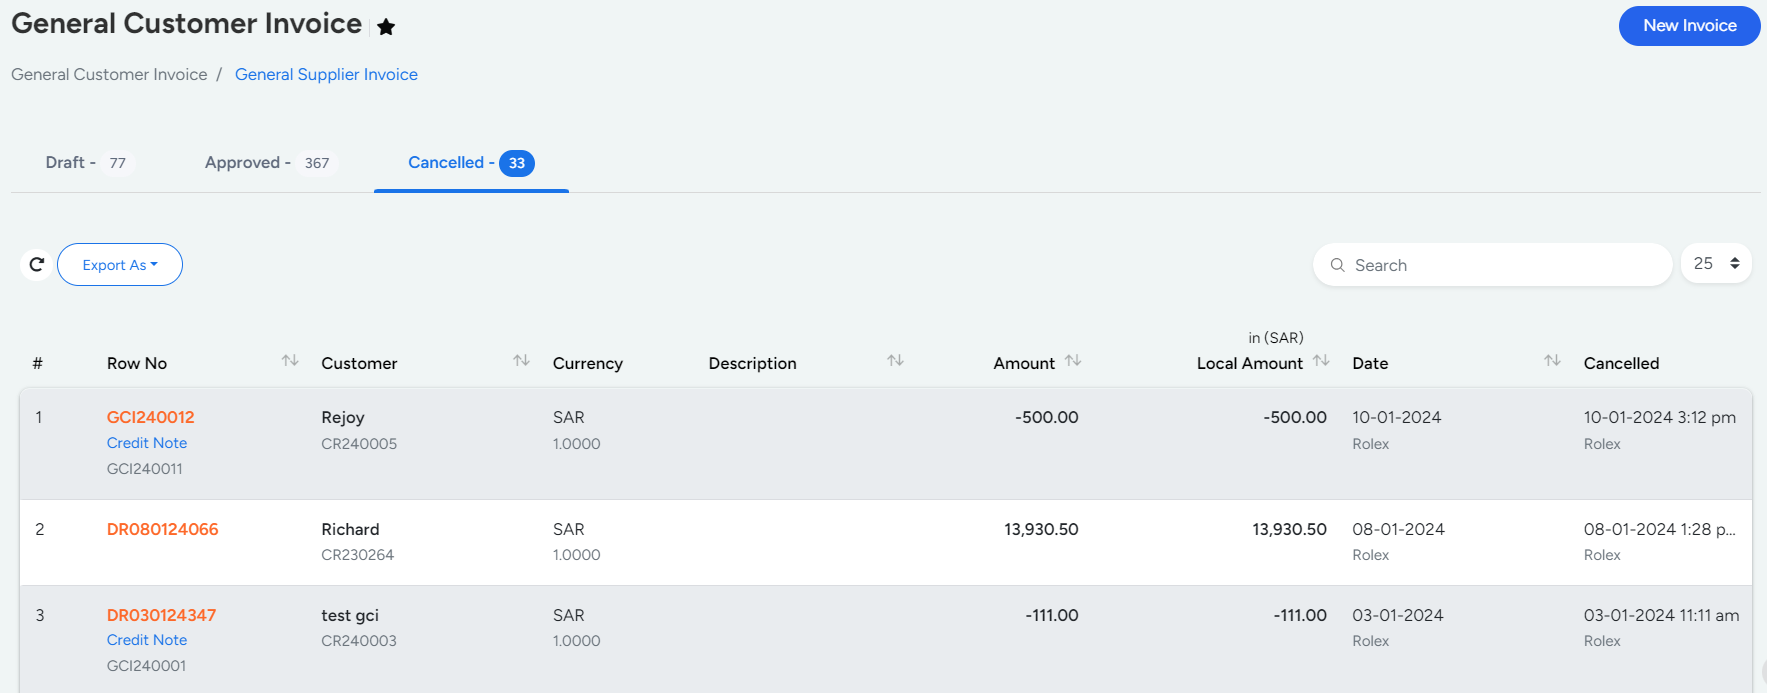
Cancelled
This has the list of invoices deleted from Approved and Unapproved Sections.
Flow Chart
Actions Performed
- Approve
- Edit
- View
- Delete
- Disapprove
- Replicate
Advanced Features
Invoices with Attachments are indicated with an attachment symbol along with the row number.
Double Clicking on the Row No allows the user to create a Memo
Double Clicking anywhere on the column except Row no gives you the view of attributes entered.
Sorting Can be made Column Wise Alphabetically.
Bulk Income
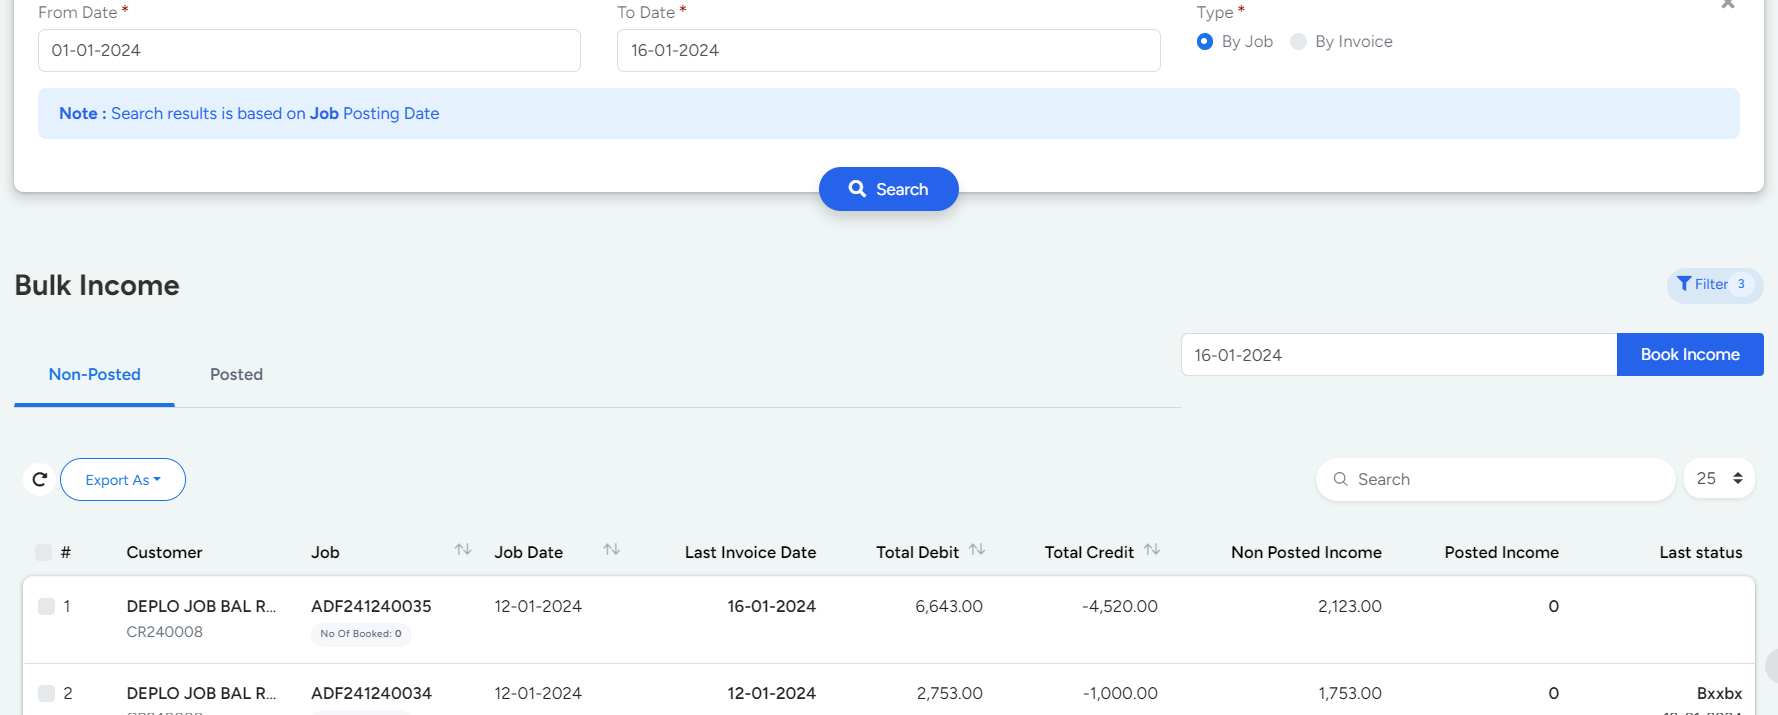
Bulk Income helps to Book Income in Bulk based on Jobs and Invoices.
This Works based on the Following,
- From Date and To Date
- By Job / Invoice
After selecting the Filter Press Search to Proceed.
It has two different Sections
- Not Posted
- Posted
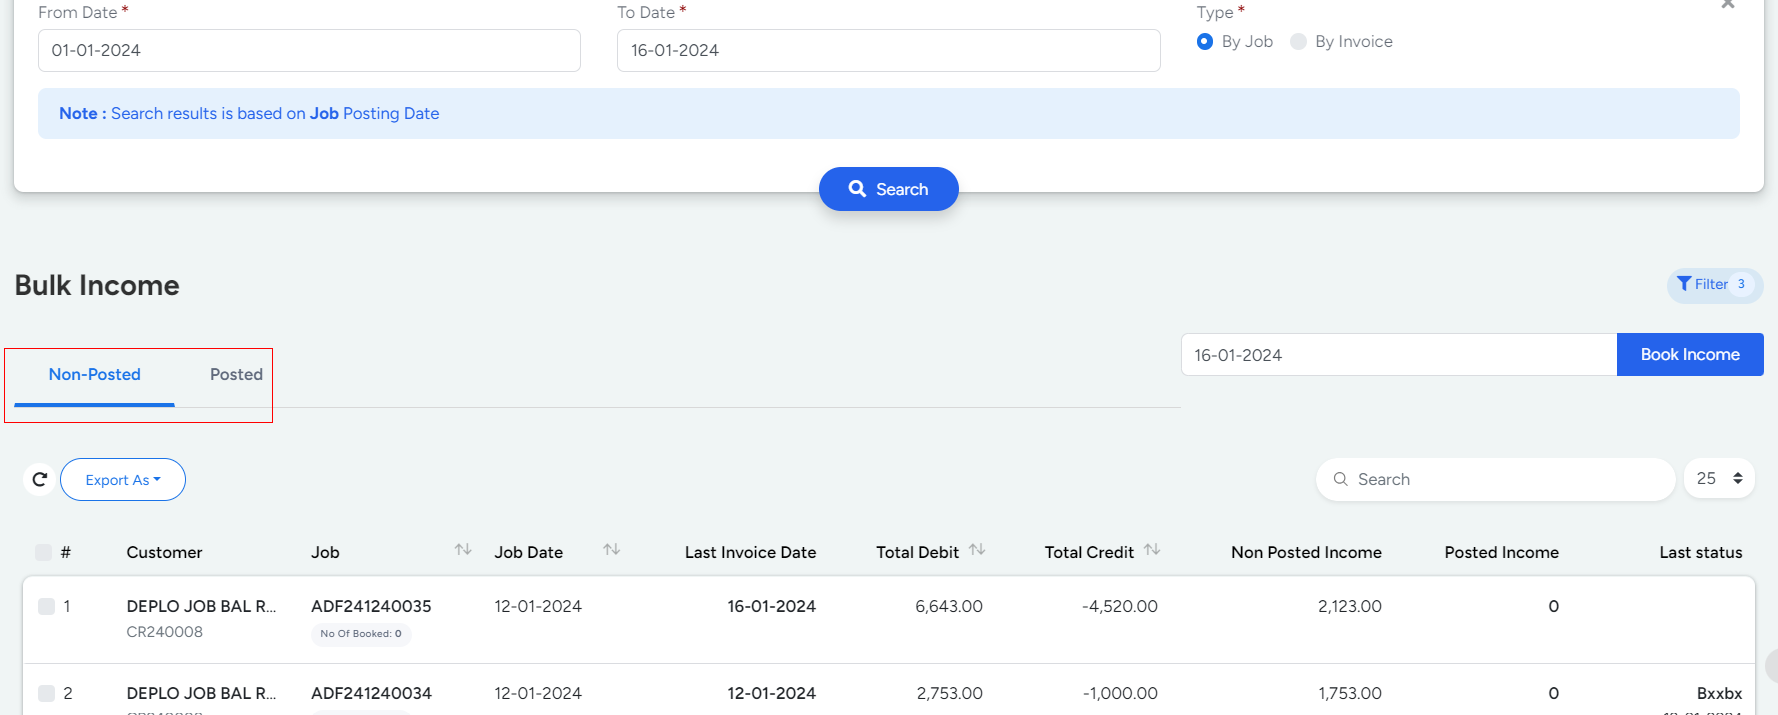
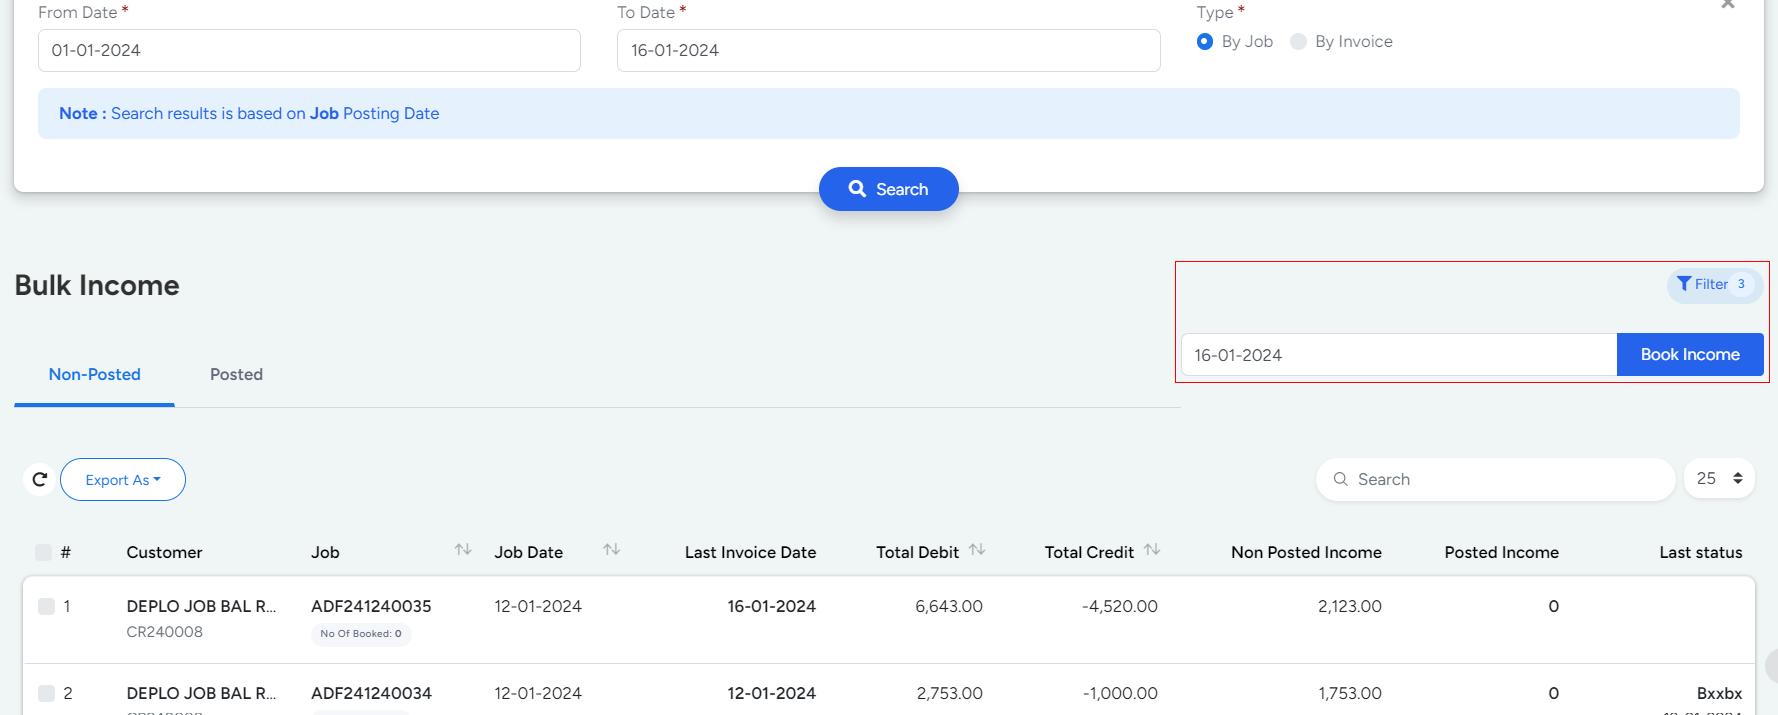
- Non Posted
- Non Posted has a list of Invoices which have not Booked Income Even Once.
The Income can be booked by the following steps,
- Select a Particular Invoice or Multiple Invoices which needs to be Posted.
- Click the Post Income Button Available at the right corner.
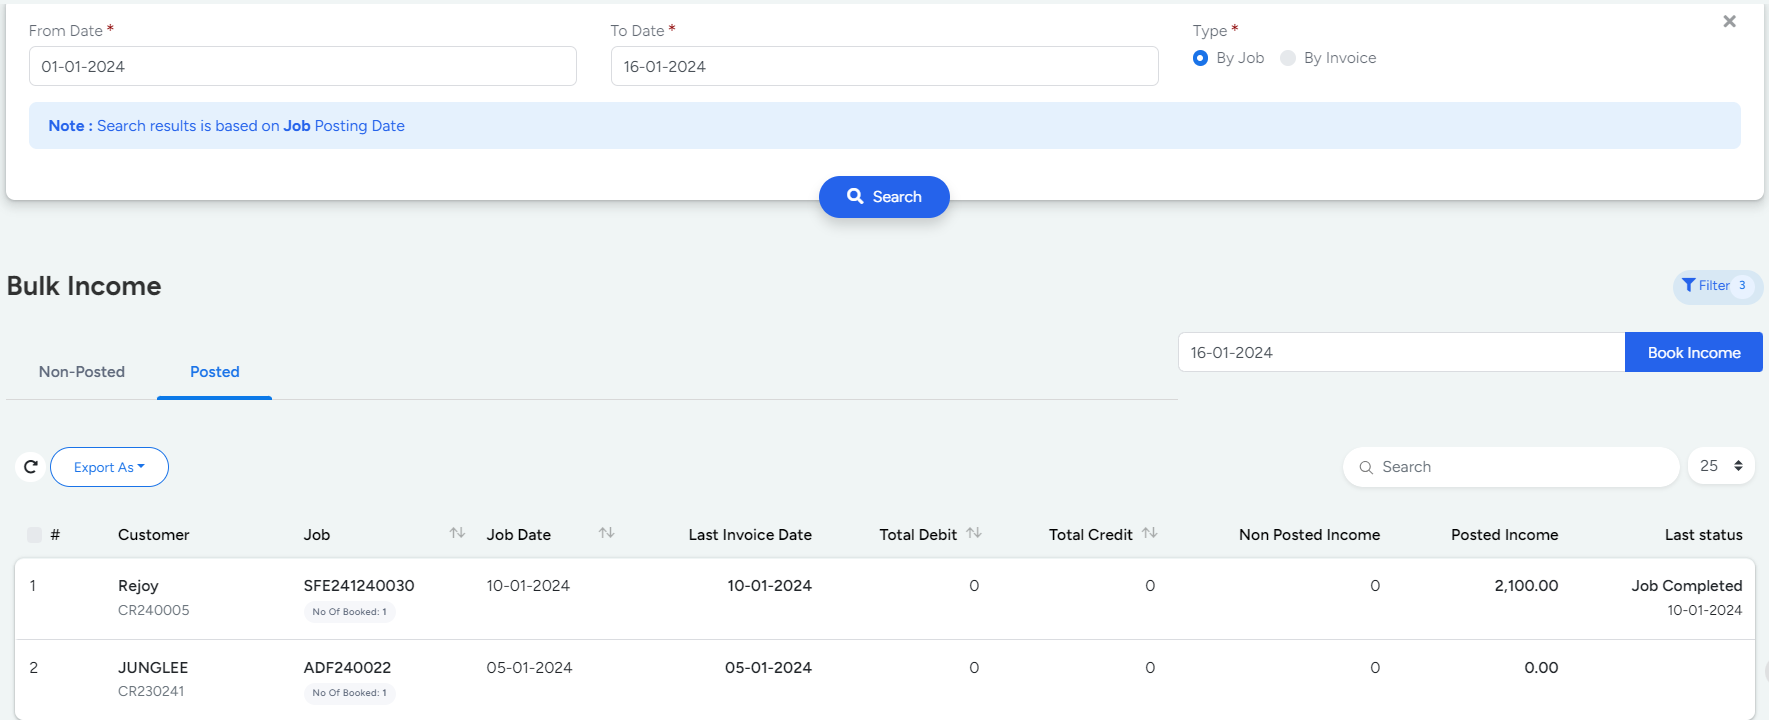
- Posted
- Posted has a list of Invoices whose income is posted at least once and has additional income which needs to be captured.
Sum of Income Posted can be identified from Posted Income Column and additional Income that needs to be posted is available in Non Posted Income Column.
Advanced Features
No of Jobs , Sum of Non Posted Income and Sum of Posted Income can be viewed on the section available below the filter as a quick reference .
The date available near Post Income is Considered to be the date of Posting / Booking Income.
Banking
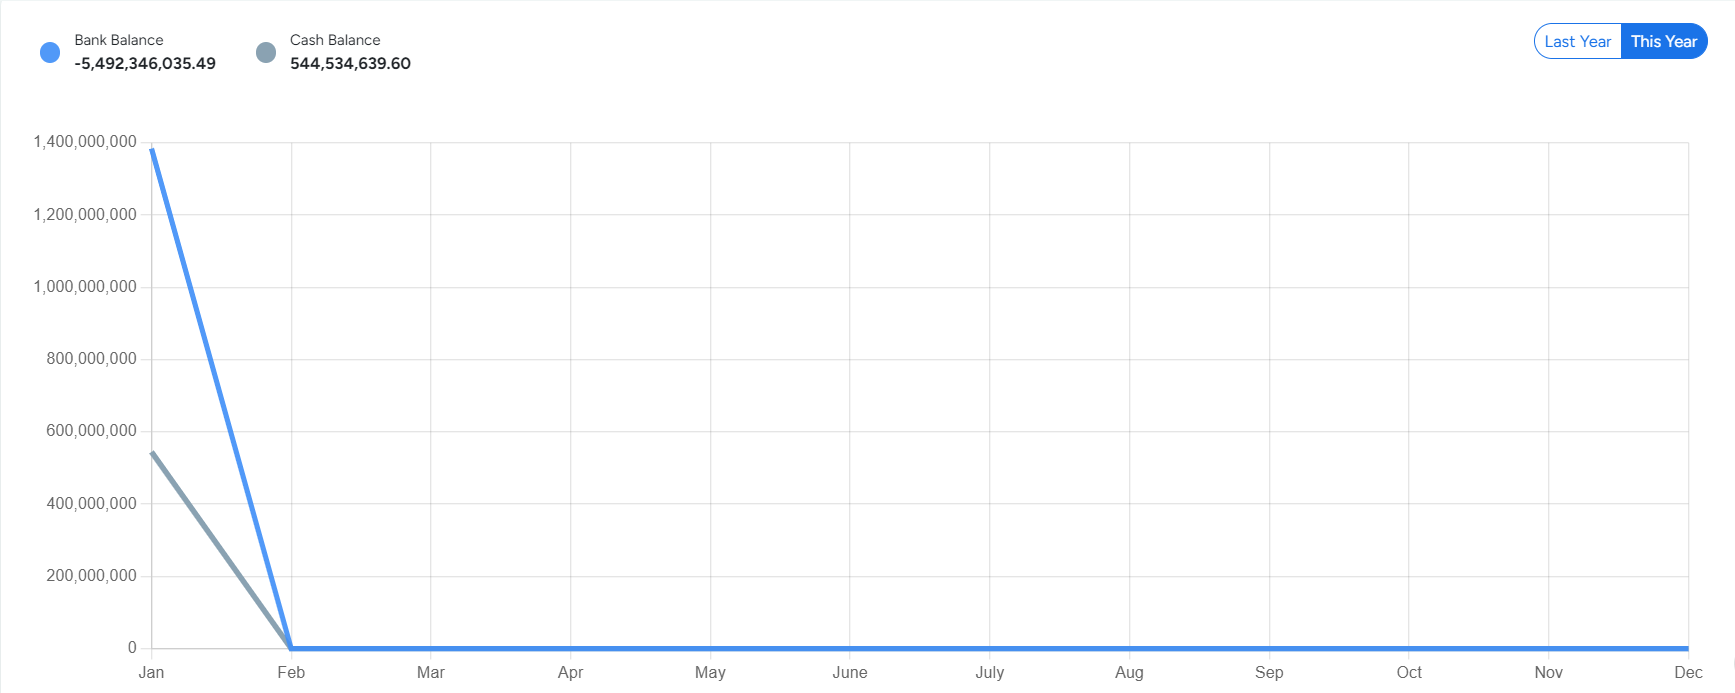
Bank Balance and Cash Balance will be presented in graphical form.
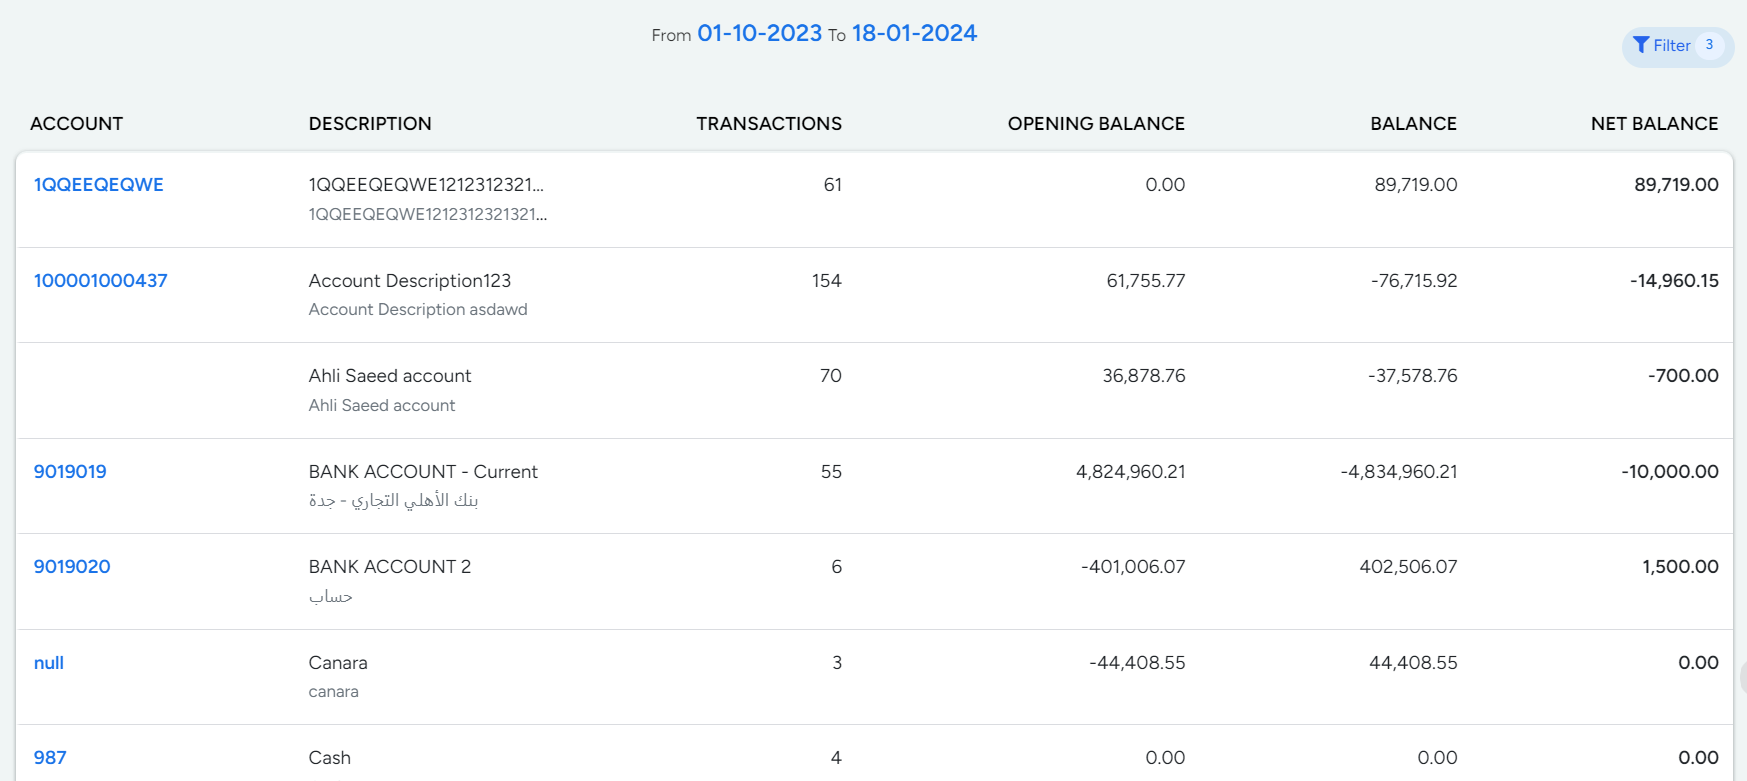
For the chosen date range, information on Transactions, Opening balance, Net balance, and Balance of the specific bank accounts will be displayed.
Closing
Period Closing
Closing module involves the following Sub Modules
- Period Closing
- Year Closing
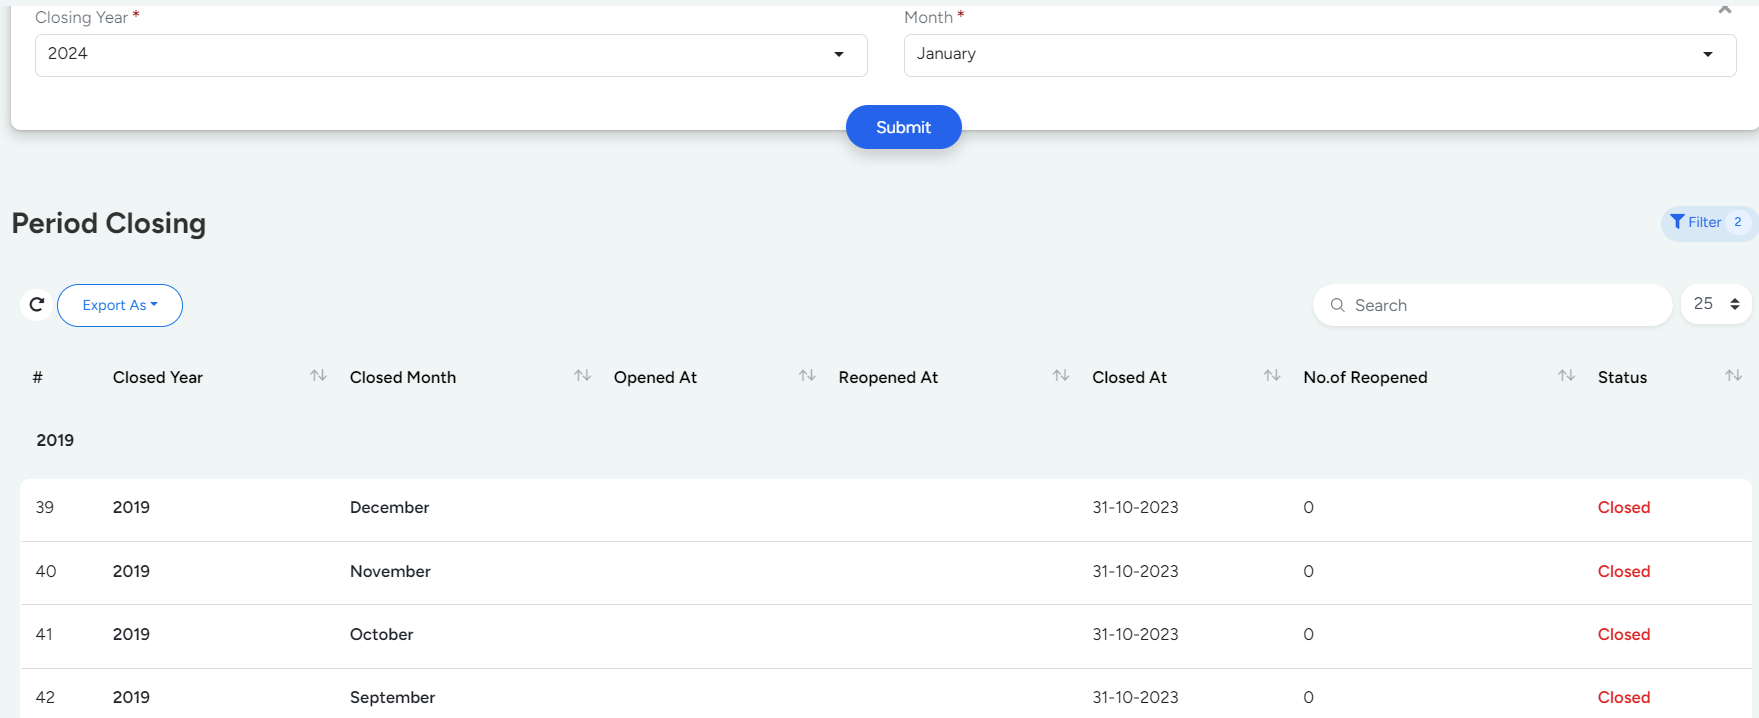
Period Closing, also known as month-end closing, is the process where all jobs, invoices, and payments for the period are finalised, making them unable to be modified afterward.
- The Period closing list page will show all transactions i.e Closed, Opened, re- opened.
- You can filter the period closing data by entering the Date and month Filter
Here are the general steps to process period closing
- Step 1
- Navigate to the Finance Module → Closing section → Period Closing
- Step 2
- To process period closing, Click on the filter button
- Step 3
- Select the Closing year. Choose the specific year from the dropdown list.
- Step 4
- Select the Month Choose the desired month from the options provided.
- Step 5
- Click Submit. Click the Submit button to send the data you have entered.
Actions performed
- Close / Re-Open
- Delete
Year Closing
Year-End Closing is the process where all transactions, invoices, and payments for the year are finalized, making them permanent and unmodifiable.
Here are the general steps to process year closing
- Step 1
- Navigate to the Finance Module → Closing section → Year Closing
- Step 2
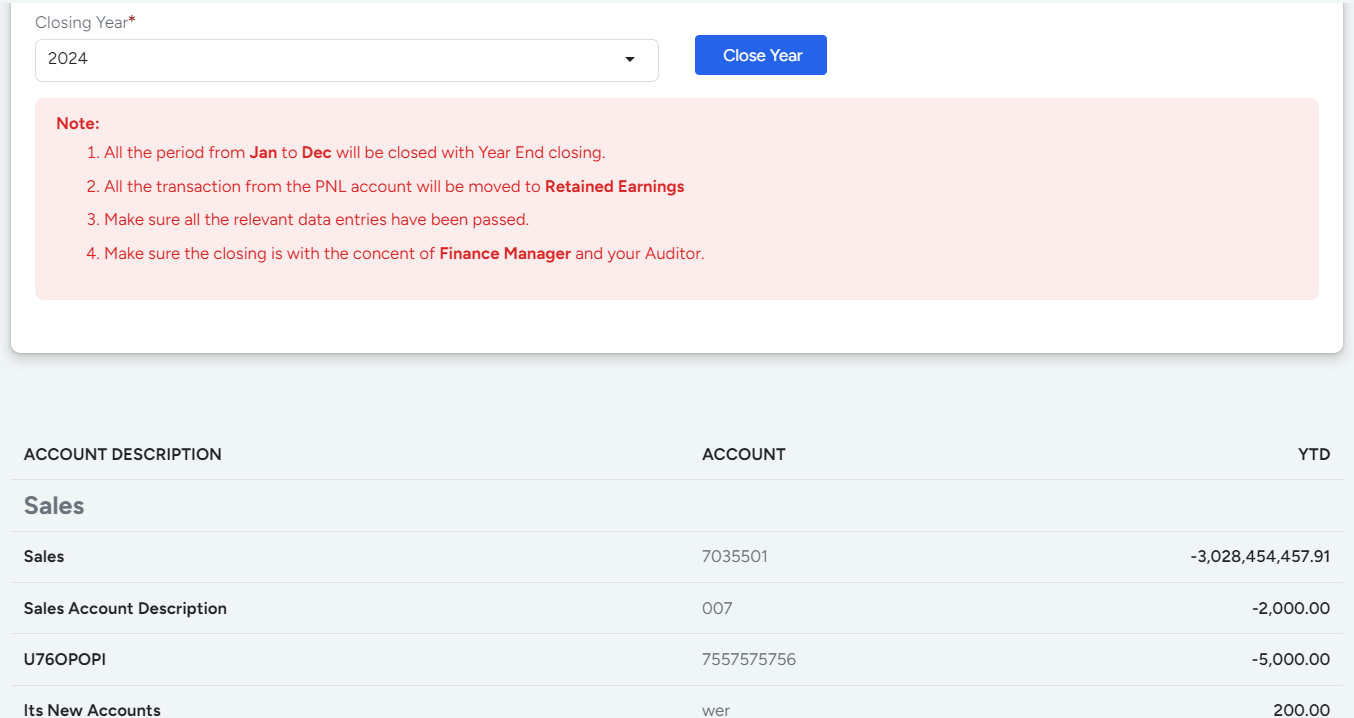
- Select the Closing year Choose the specific year from the dropdown list.
- Step 3
- Select Close year. Click on the Close Year button to process and finalize the data you have entered
- All the period from Jan to Dec will be closed with Year End closing.
- All the transaction from the PNL account will be moved to Retained Earnings
- Make sure all the relevant data entries have been passed.
- Make sure the closing is with the concent of Finance Manager and your Auditor.
Tax Report
Tax Report furnishes the VAT details involved in the system .
This is categorised into three sections,
- Input Tax Report
- Output Tax Report
- Summary
Input Tax Report
Input Tax Report deals with the tax involved with the Supplier / Purchase made from your side.
The type of Invoices Involved are ,
- Supplier Invoice
- Purchase Invoice
- Maintenance
- Terminal Cost
- General Supplier Invoice
- Payment Voucher with account type Input Tax
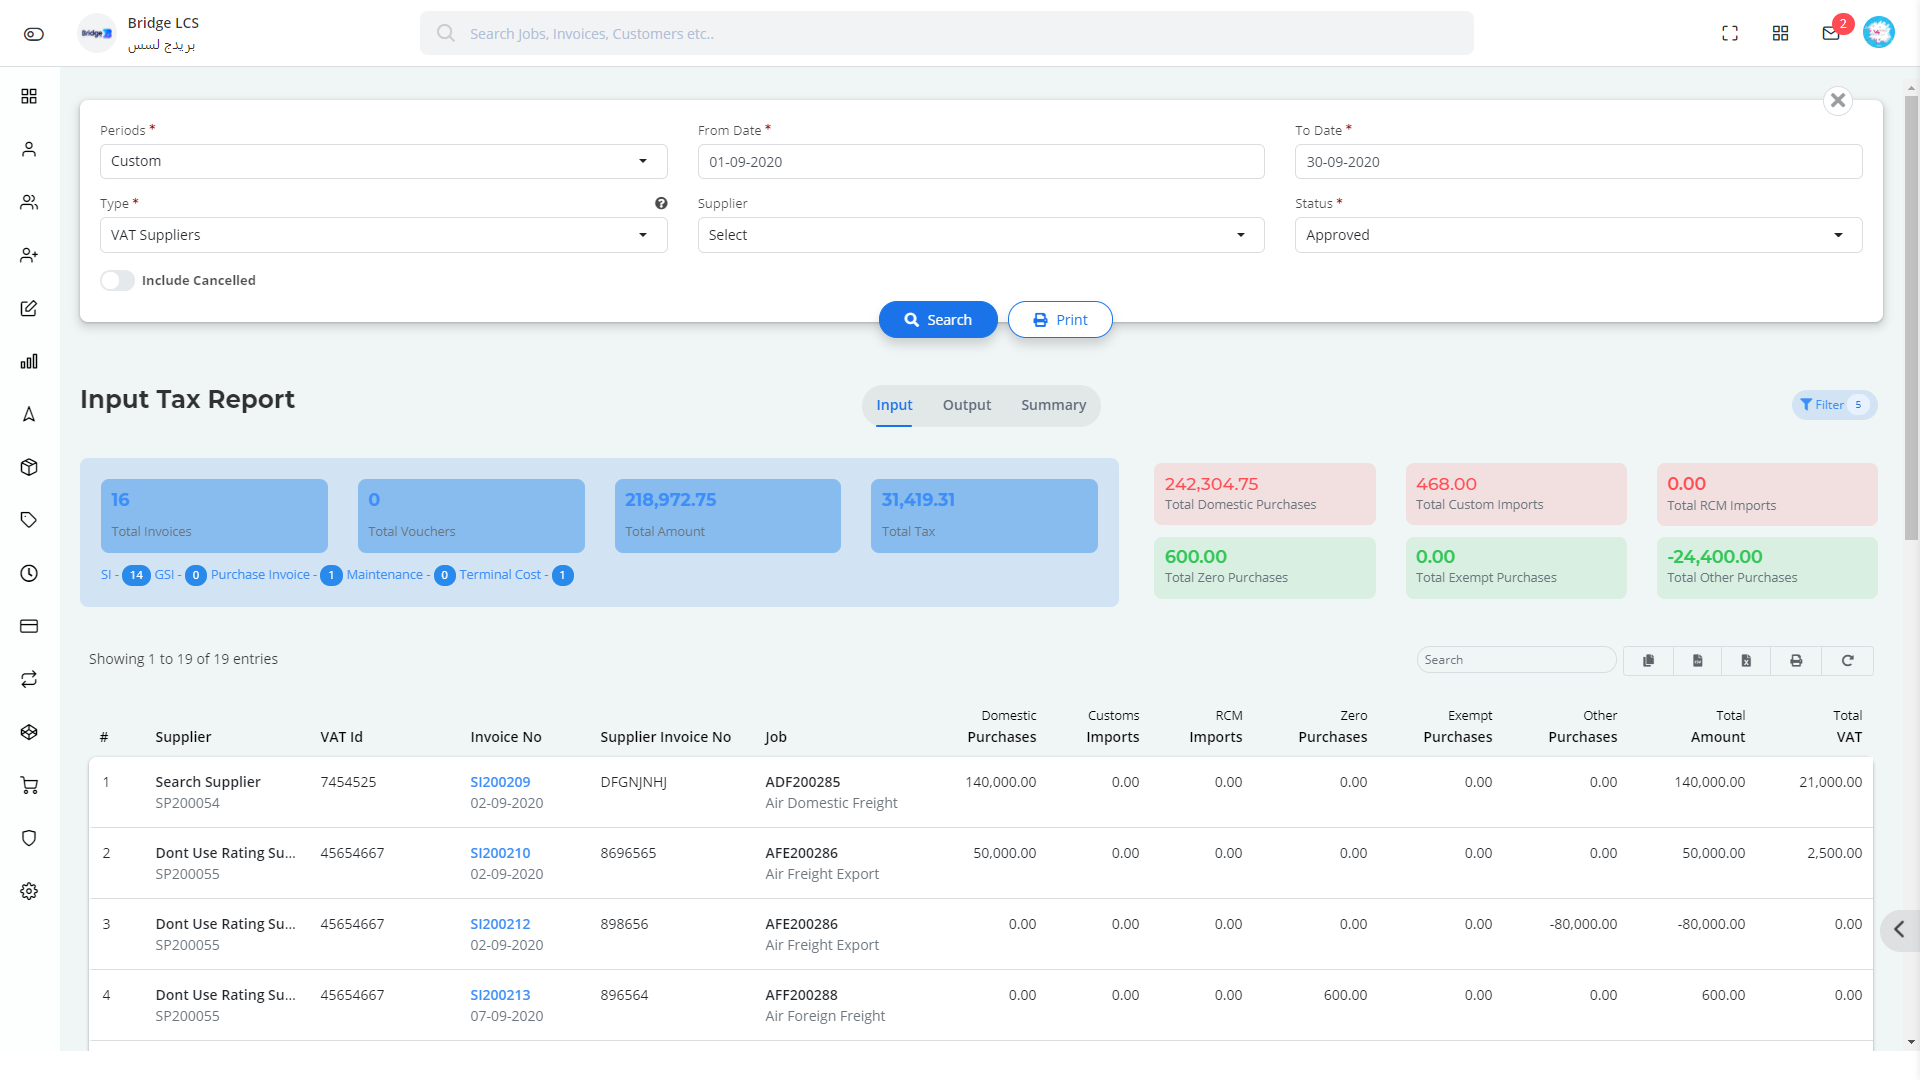
It provides the details of Supplier and their respective Job, VAT ID, Invoice No, Supplier Invoice No, Purchase, Amount and Tax etc.
The Page is divided into different sections to display the invoices from various categories,
First Section involves Supplier Invoice, Second Involves General Supplier Invoice, third involves Maintenance followed by Terminal Cost,Purchase invoice and Payment Voucher (provided the account type is Input Tax).
Sum of All Invoices are given at the end of the page.
This works based on the following filters,
- Period (*) {Custom/Last week/Last month/Last Year etc}
- From Date and To Date (*)
- Type(*)(VAT/Non VAT Suppliers)
- Suppliers(*)
- Status (*)
Once the filters are applied, Click Search to Proceed.
The Video inserted below explains you the working of " Input Tax " to have a better understanding
Output Tax Report
Output Tax Report deals with the sales Invoices.
The types of Invoices Involved are,
- Final Invoice
- General Customer Invoice
- Payment Voucher with account type Output VAT
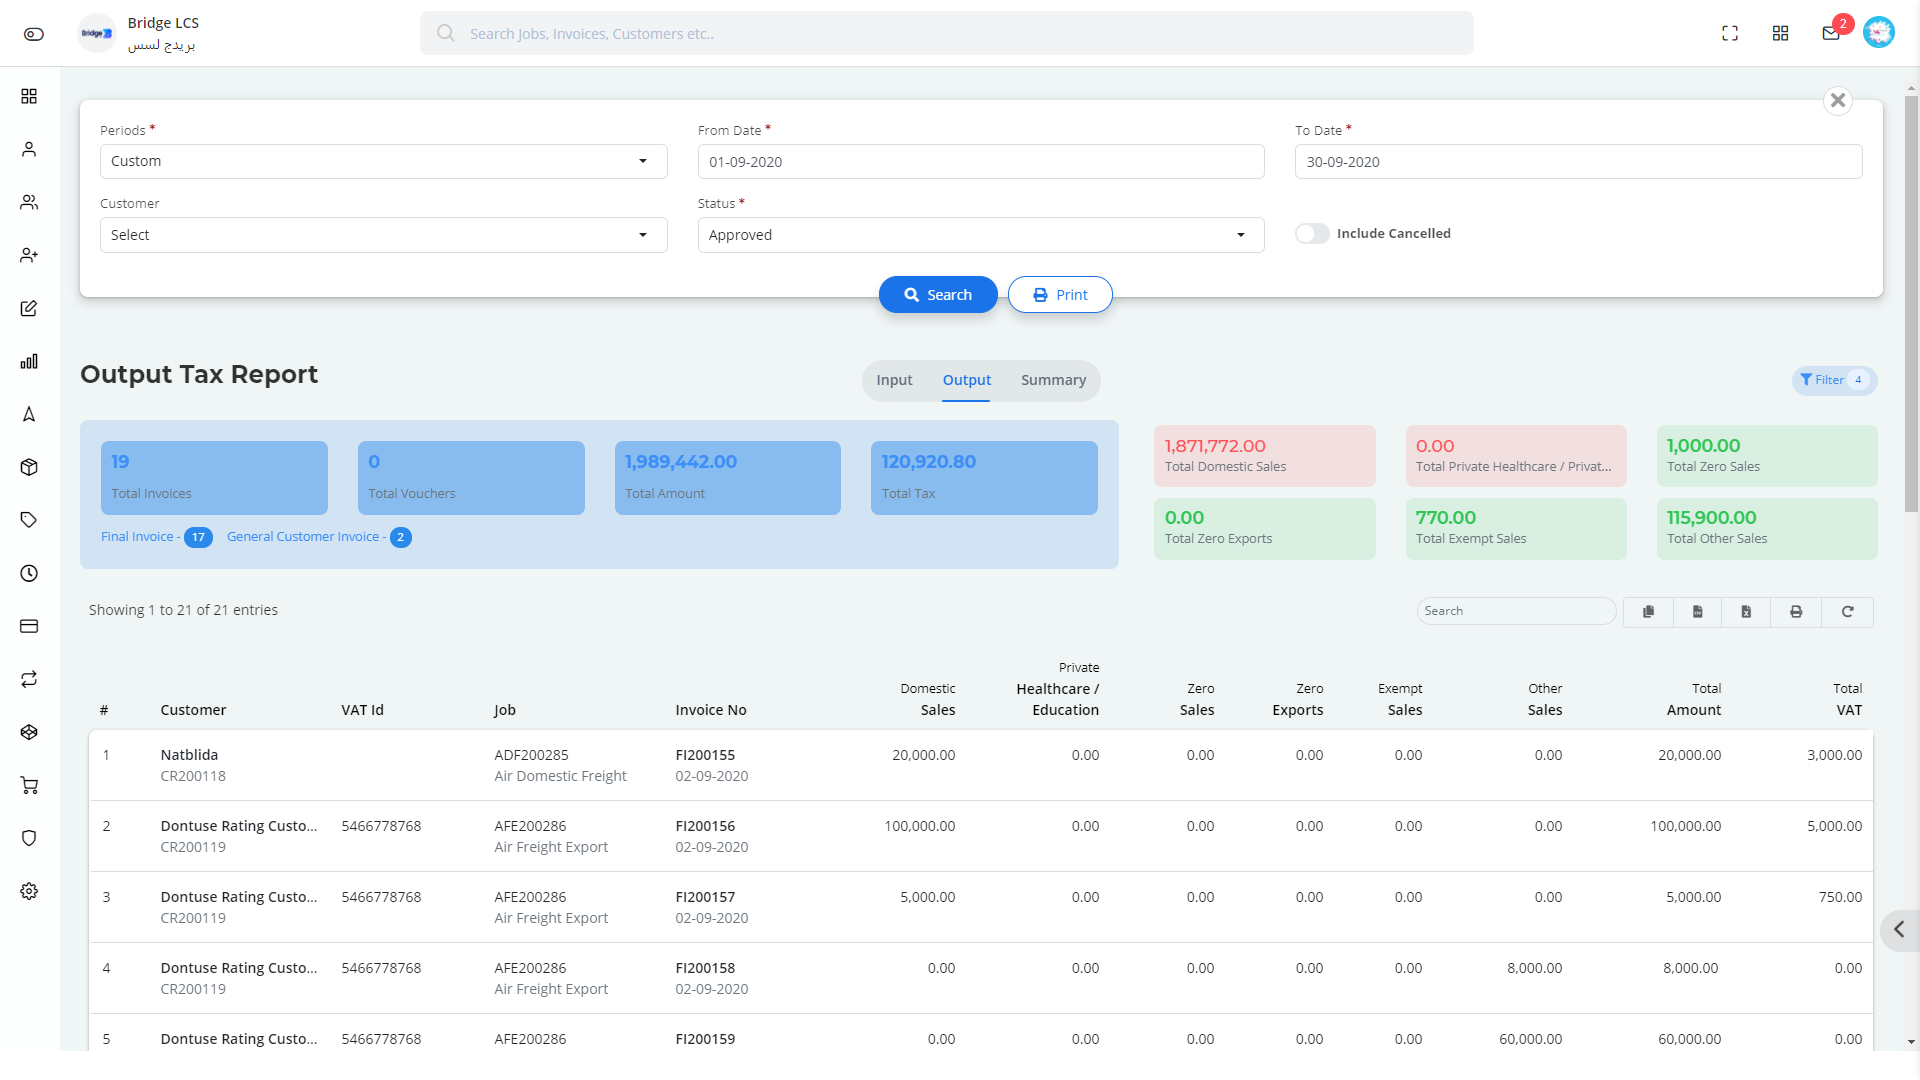
It provides the details of Customer and their respective Job, VAT ID, Invoice No, Supplier Invoice No, Purchase, Amount and Tax etc.
The Page is divided into different sections to display the invoices from various categories,
Page has Customer Invoice followed General Customer Invoice.
The Video inserted below explains you the working of " Output Tax " to have a better understanding
Summary
Summary involves reports from both Input Tax Report and Output Tax. It provides a consolidated report with the following,
- VAT on Sales
- VAT on Purchases
- No VAT Id Filled On Purchases
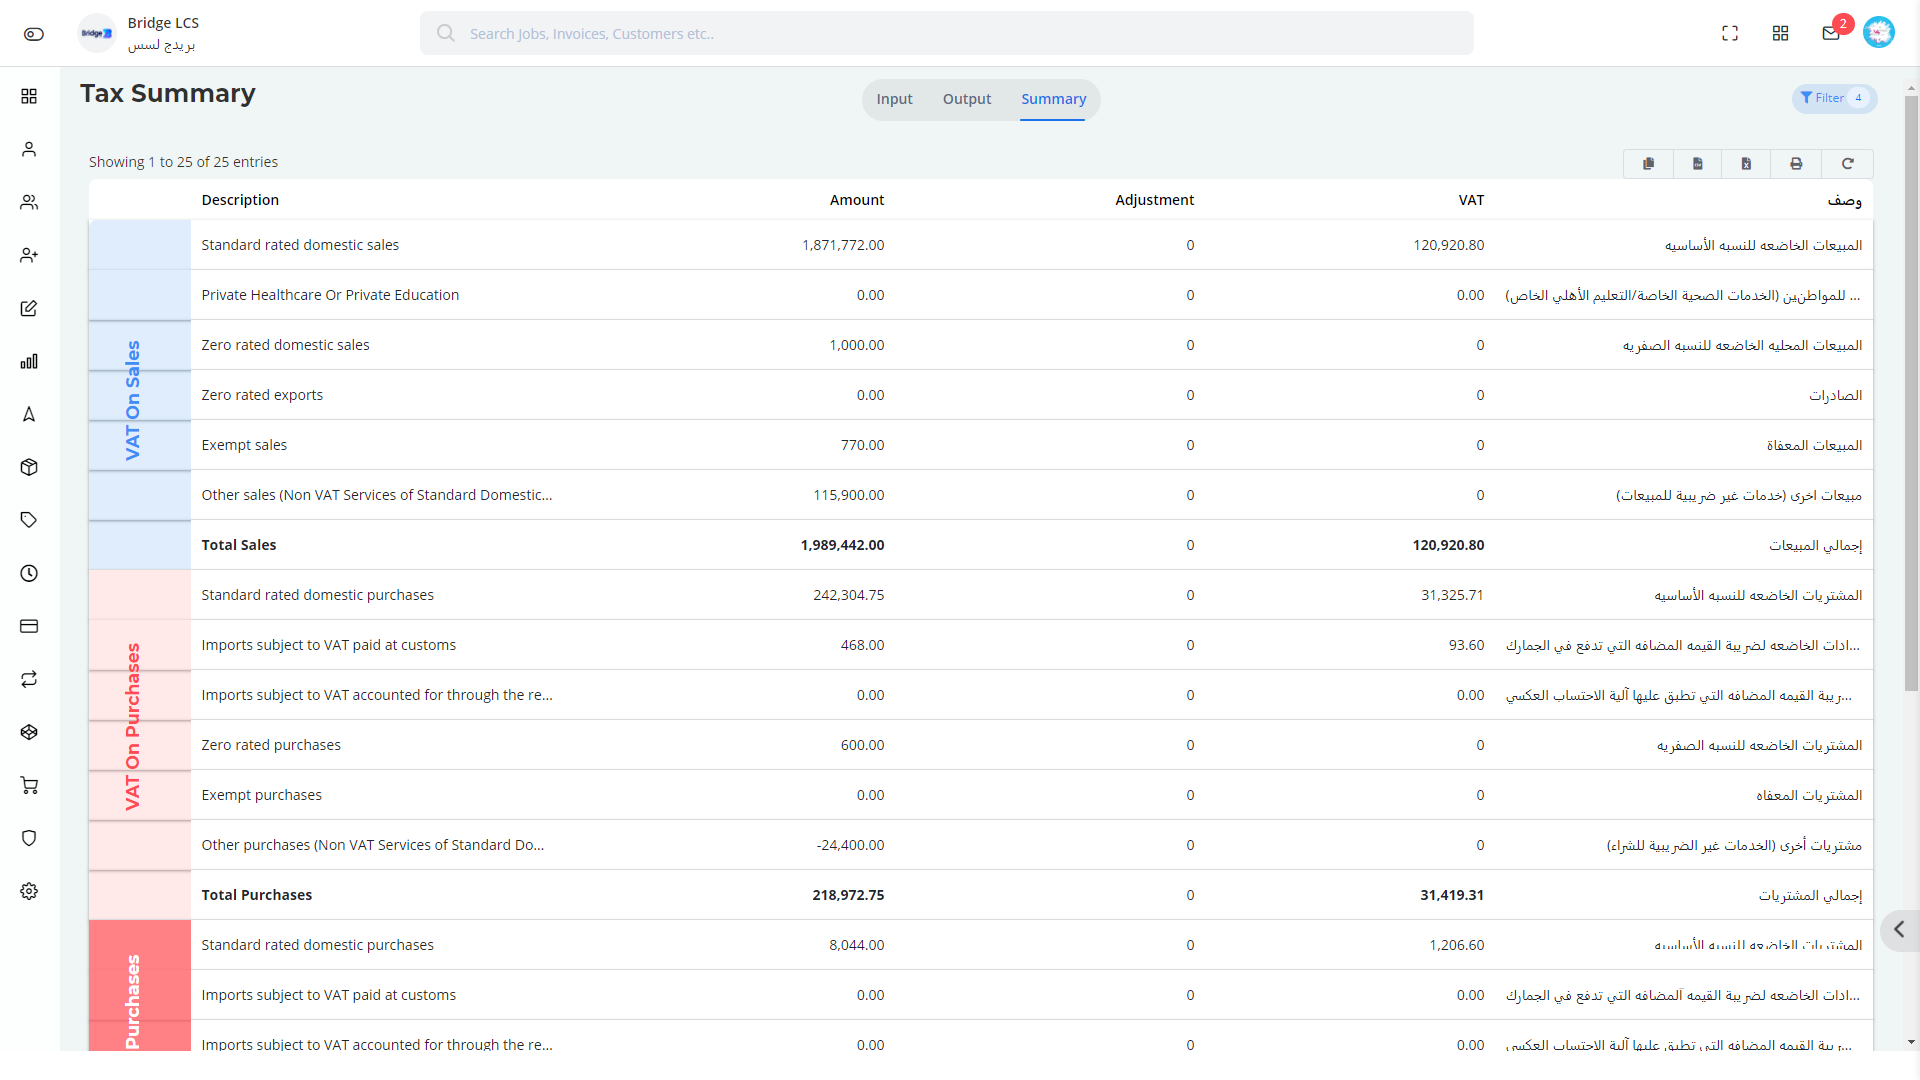
The Video inserted below explains you the working of " Tax Summary " to have a better understanding
Advance Features :(Applicable to Input and Output Tax Report)
The Middle Section displays the Total Invoices, Total Vouchers , Total Amount and Tax involved based on the filters applied.

Filters can be hidden by clicking on the filter button.

Double Clicking on the customer Name / Supplier Name gives you the view of Invoice.

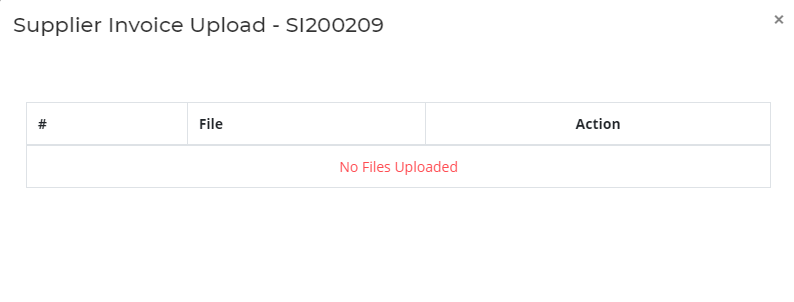
Double Clicking on the Invoice Number gives you the list of Documents uploaded.
Reports
Report Section includes summary of transactions happening in multiple sections. It is divided into the following sectors,
- Accounts
- Business
- Payments
- Purchases
- Sales
- Taxes
- Receivables
- Payables
- Employee
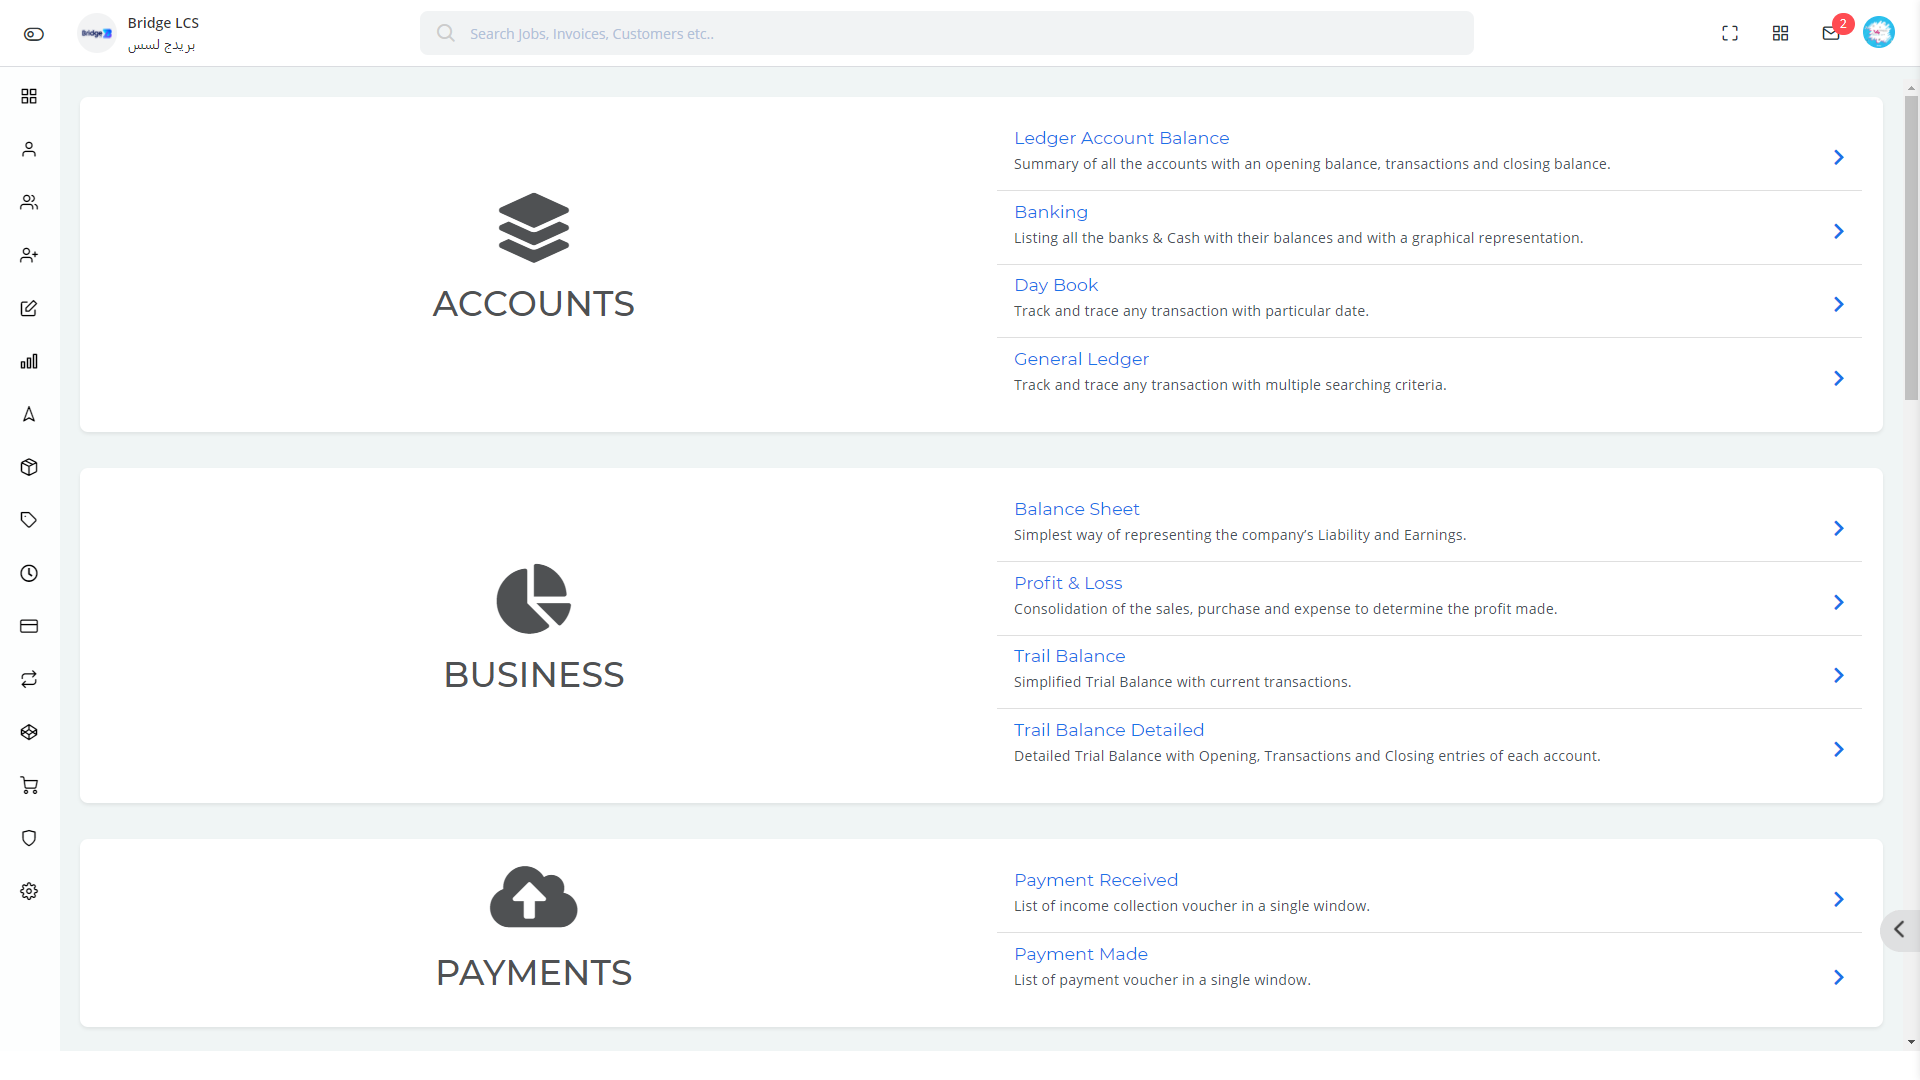
Accounts
Accounts section involves the report of total transactions happening in the accounts .
The segments involved are
Ledger Account Balance
It furnishes the synopsis of accounts with opening balance, closing transactions and transactions.
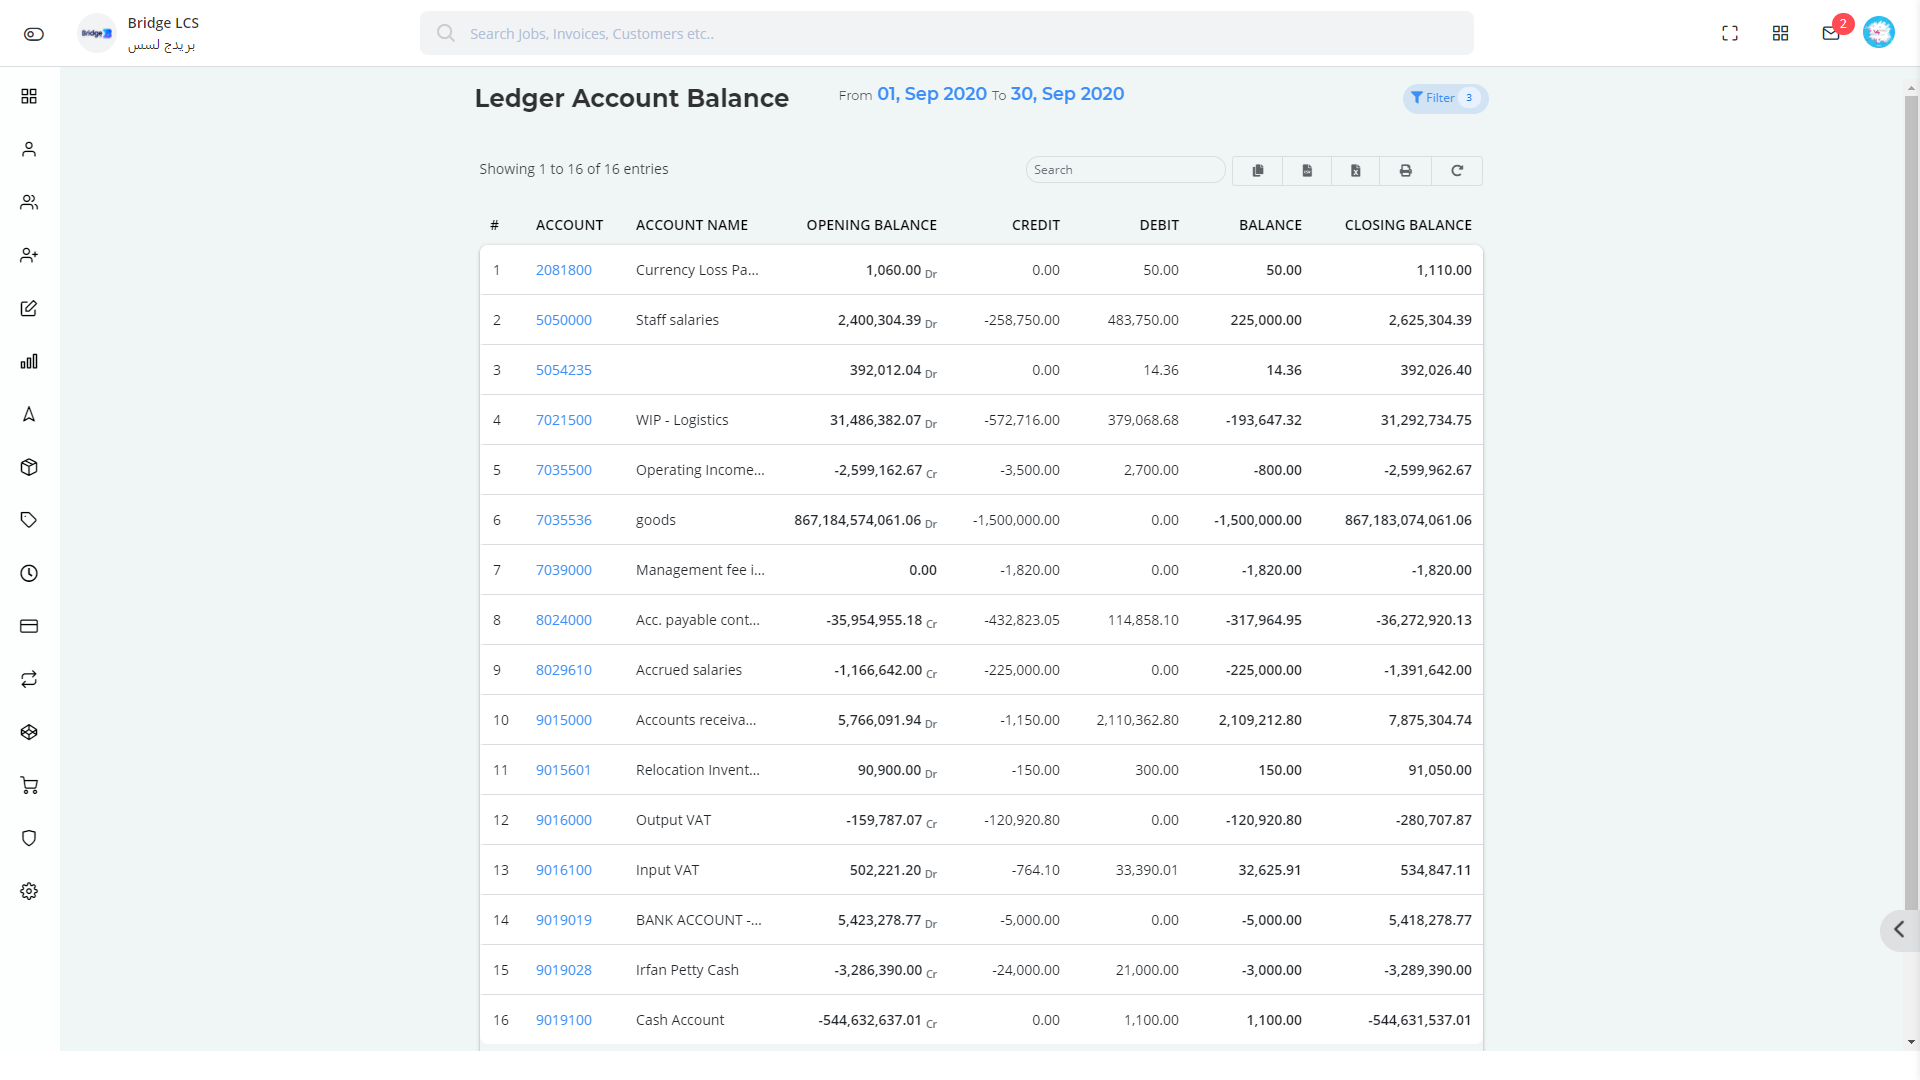
Clicking on the column provides you a pop up window where the list of vouchers involved in the account can be viewed .
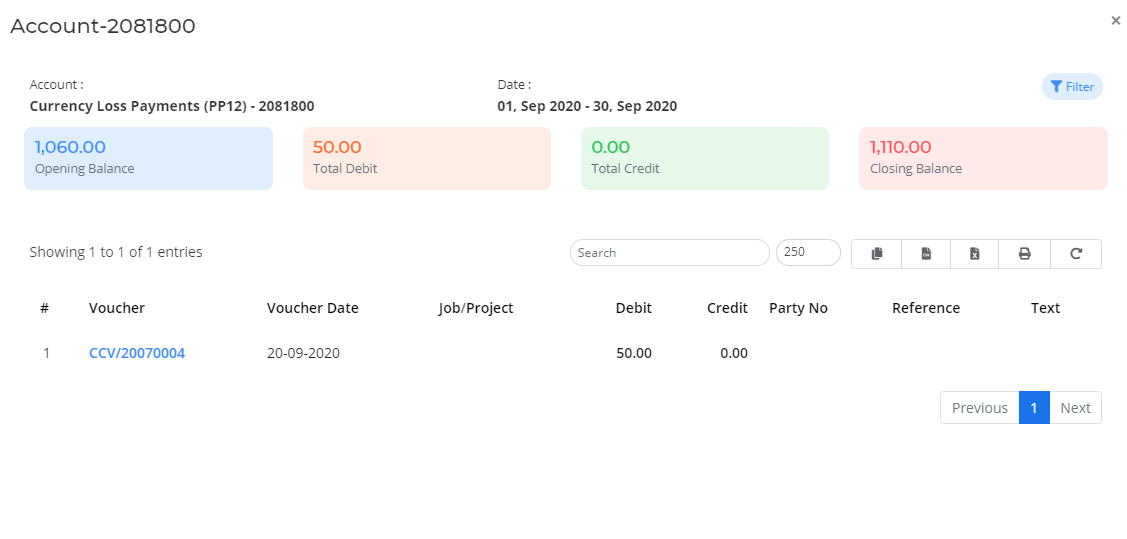
Double Clicking on the voucher gives you the detailed view of the voucher .
To get data precisely in terms of a certain period, click on the filter to get the required options and the period selected will be displayed in the top section along with the total opening and closing transactions.
Banking
It furnishes the synopsis of the list of banks along with its opening balance, number of transactions happened followed by net balance.
It provides a graph on the top section where the comparison of bank balance and cash balance can be seen.
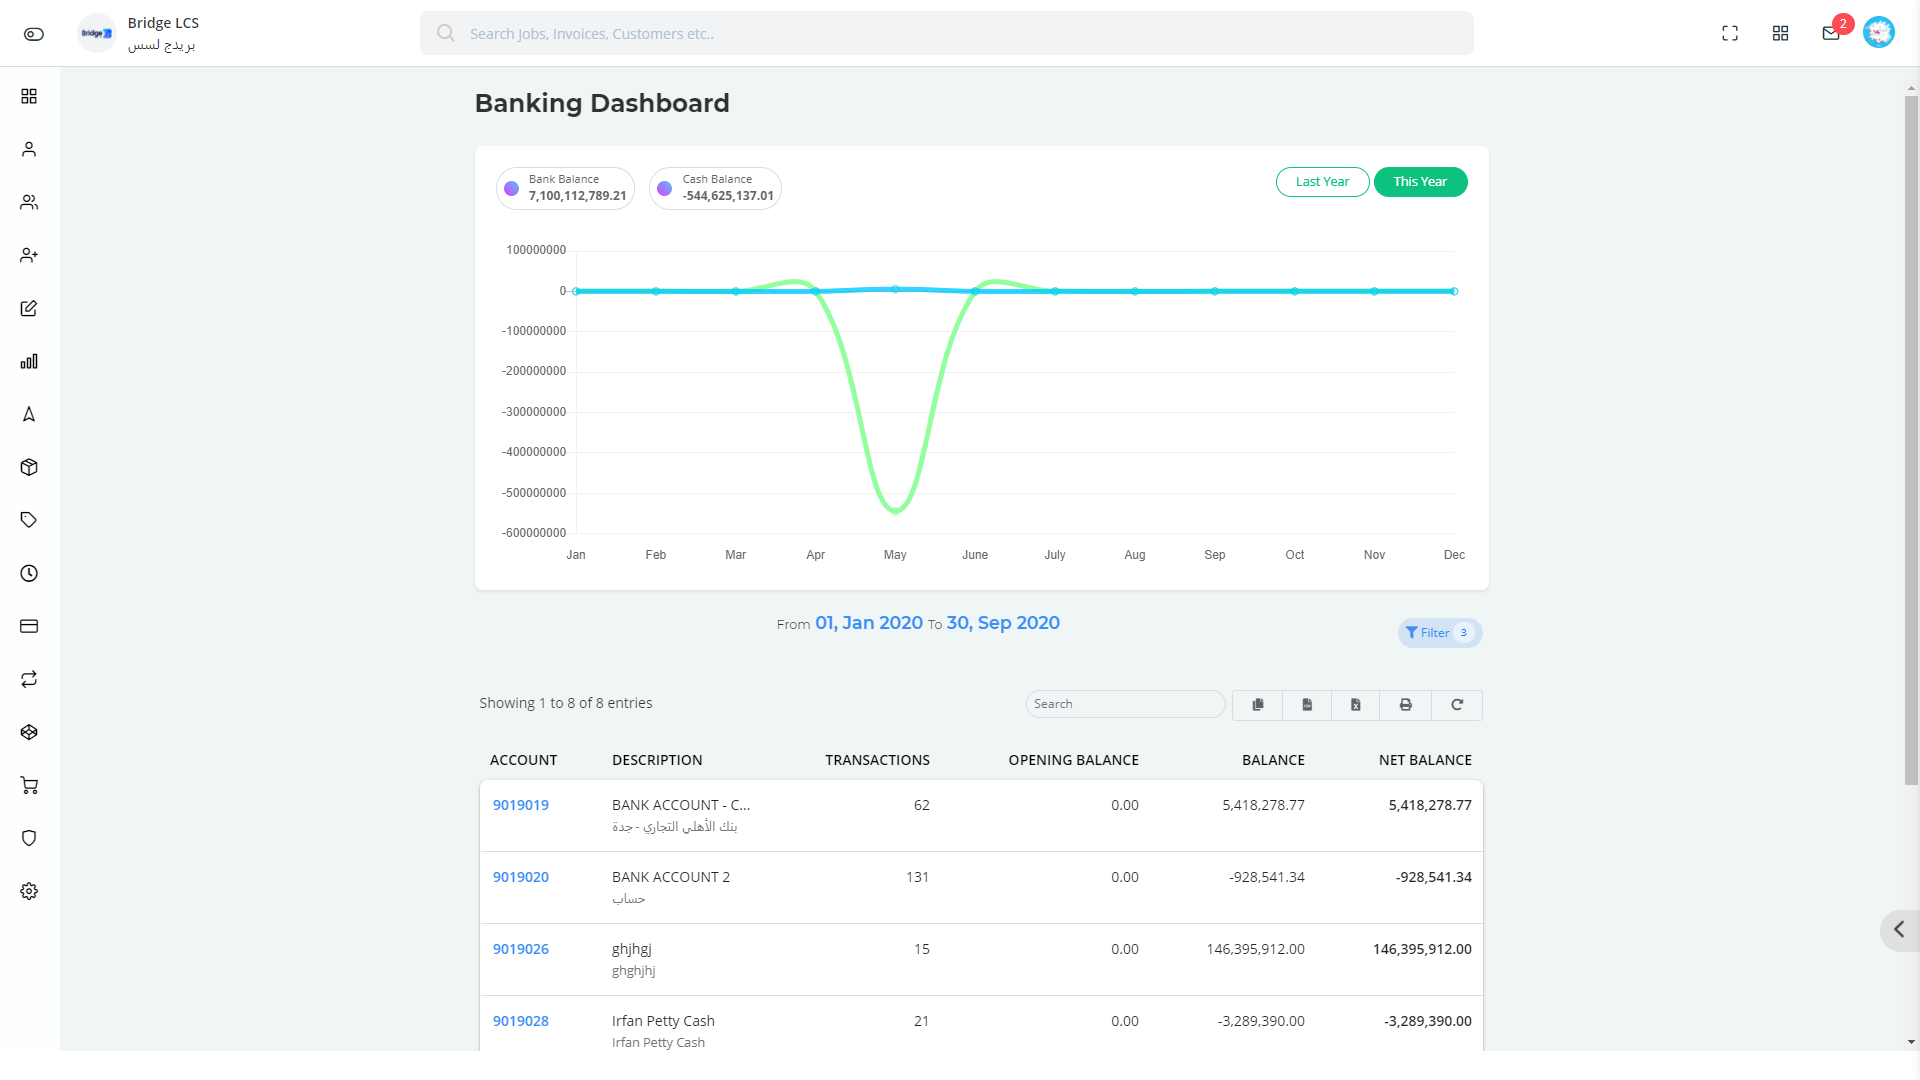
Filter
Click on the Filter to select the time period and exact date of data to be viewed.
Period Selected is displayed in the center of the page.

Double Clicking on the account name provides a pop up window where the list of transactions happened along with the Voucher and Transaction date can be found.
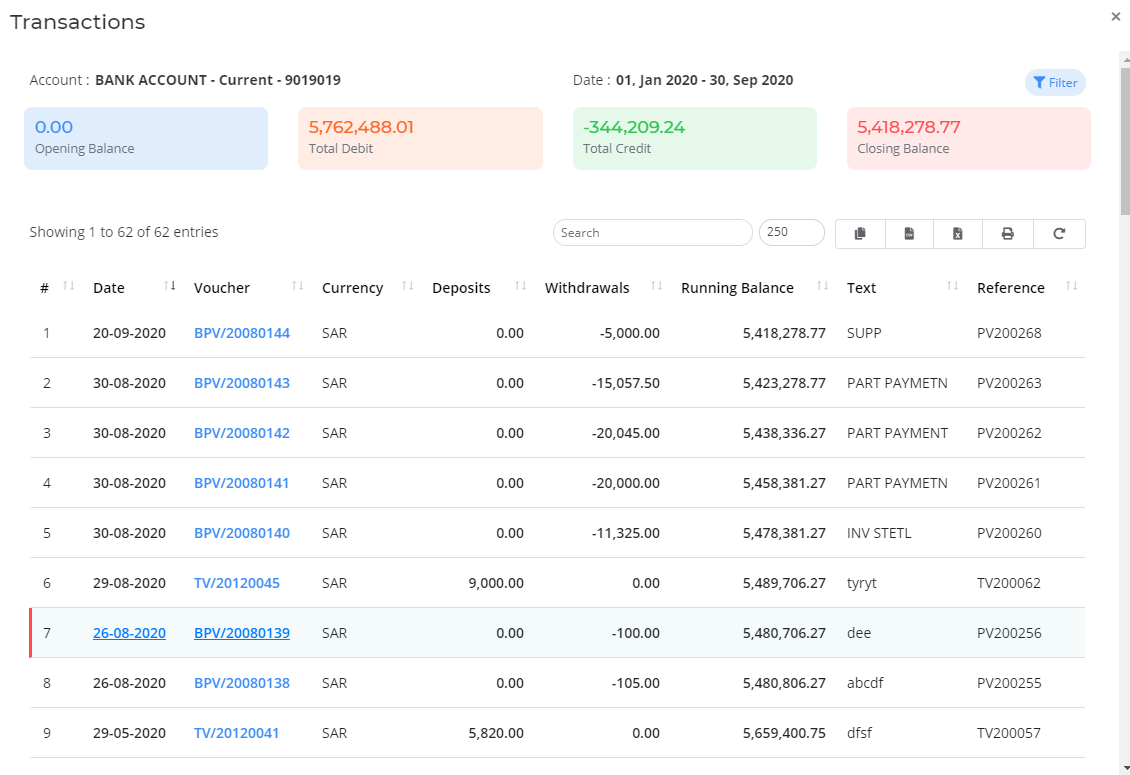
To Sort Further, Click on the filter available inside the popup and make modifications as required.
Total opening and closing transactions will be displayed on the top section of the pop up window.
Day Book
Day Book provides the transaction data that happened on the selected day.
Functioning of Day Book : Refer Finance --> General Ledger --> DayBook.
General Ledger
Functioning of General Ledger : Refer Finance --> General Ledger.
Business
Business section has the following segments
- Balance Sheet
- Profit and Loss
- Trial Balance
- Trial Balance Detailed.
Refer Finance --> Balance Analysis to know the detailed working of the sections.
Payments
Payment Section captures the payments made and received in total.
It has the following sub segments,
- Payment Received
- Payment Made
Payment Received
It furnishes the list of Payments received during the selected period of time.
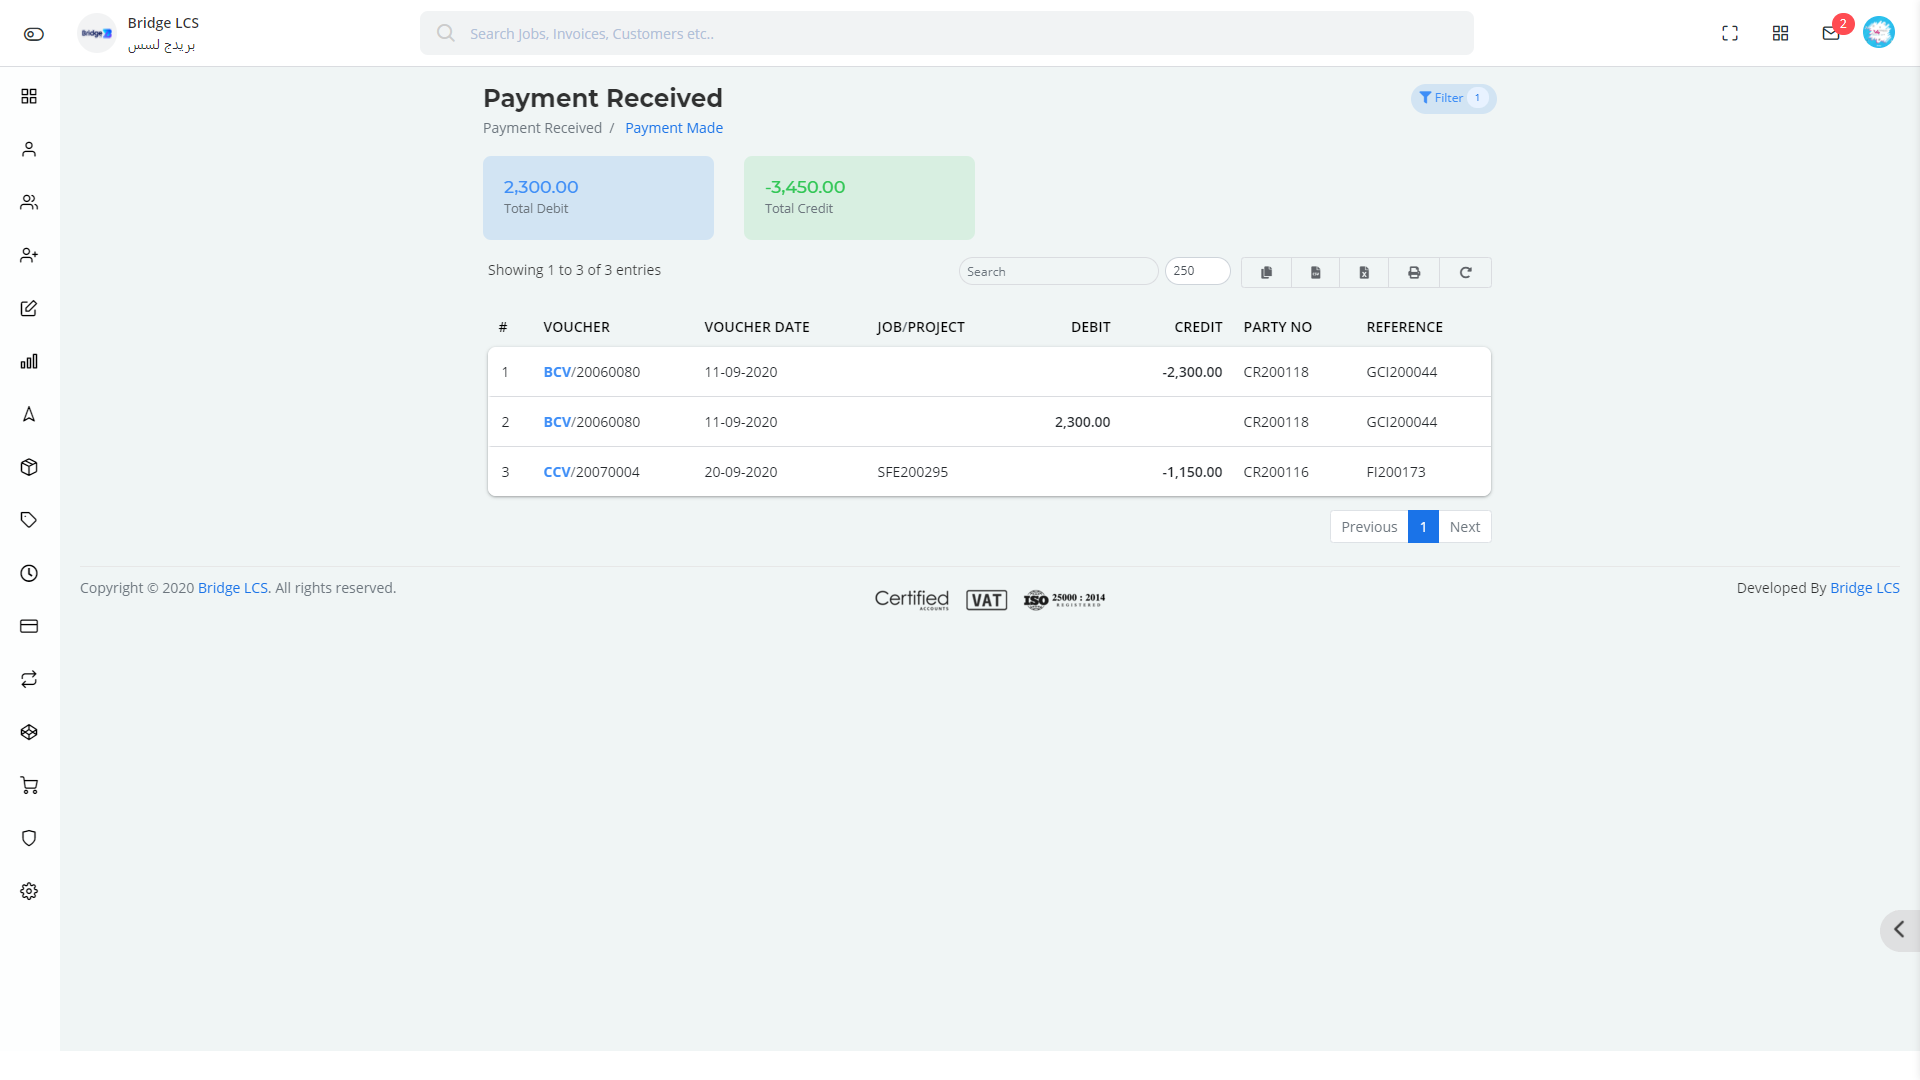
Click on the Filter button present at the right corner to get the following filter options,
- Period(*)
- From Date and To Date(*)
- Party No ( Supplier Id )
- Voucher Type (BPV/CPV)
Click Search to Proceed

Clicking on the Voucher Type provides you the Payment Voucher respective to the entry selected.
Print button available next to search prints the whole list of data listed.
Payment Made
It furnishes the list of Payments Made during the selected period of time.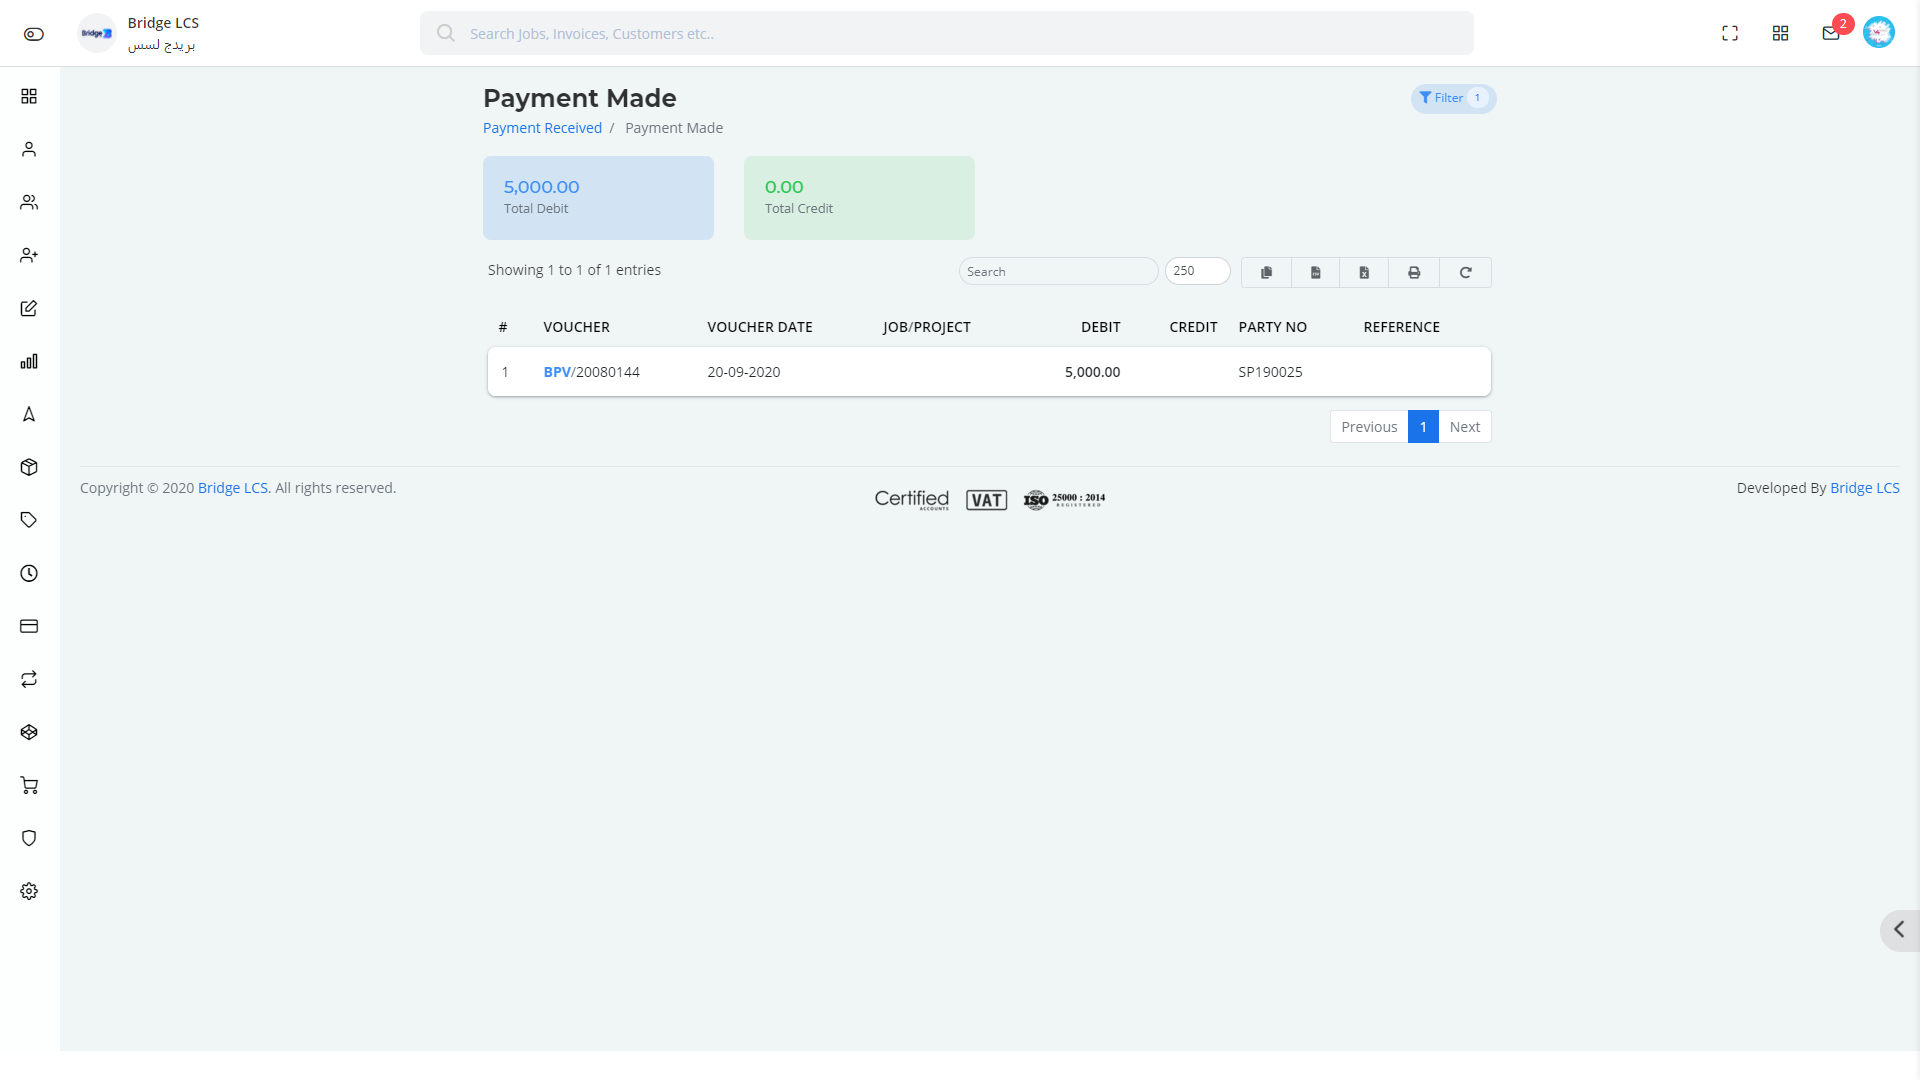
Click on the Filter button present at the right corner to get the following filter options,
- Period(*)
- From Date and To Date(*)
- Party No ( Customer Id )
- Voucher Type (BCV/CCV)
Click Search to Proceed.

Clicking on the Voucher Type provides you the Payment Voucher respective to the entry selected.
Print button available next to search prints the whole list of data listed.
Purchases
The Purchase section holds the list of transactions that happened while purchasing . It includes
- Purchase by Supplier
- Purchase by Description
Purchase By Supplier
Purchase by Supplier captures the list of transactions happening based on the suppliers selected.
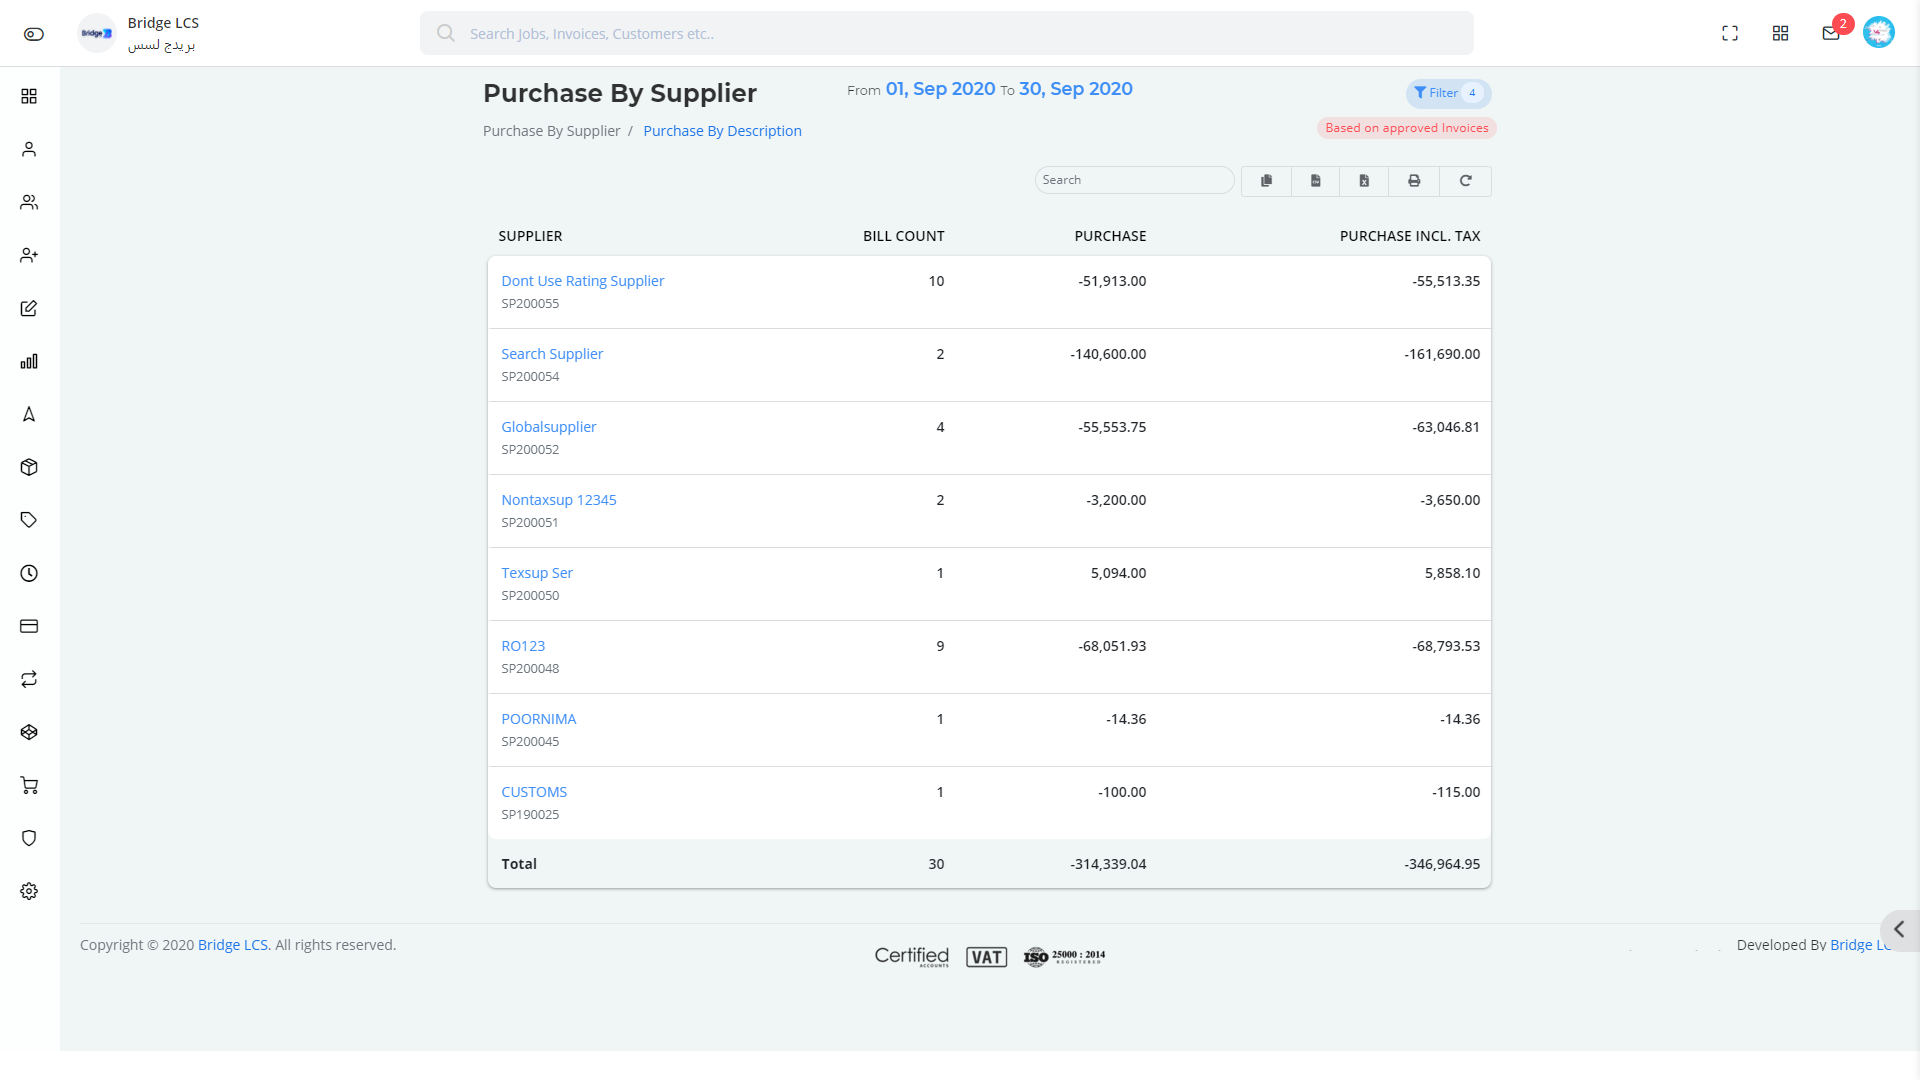
In order to select the supplier , Click on the Filter Button Available at the right Corner. A separate section will be introduced where you can select the list of Suppliers along with the period for a detailed report.

The Period Selected will be displayed on the center of the page.
Once the filter is applied the list of suppliers will be displayed along with the total amount involved (with and without tax).
Double Clicking on the Supplier Name opens a new Pop Window with the following details,
Pop Up Window displays the list of Vouchers involved in the total transaction along with the credit, debit and respective project ./ Job.
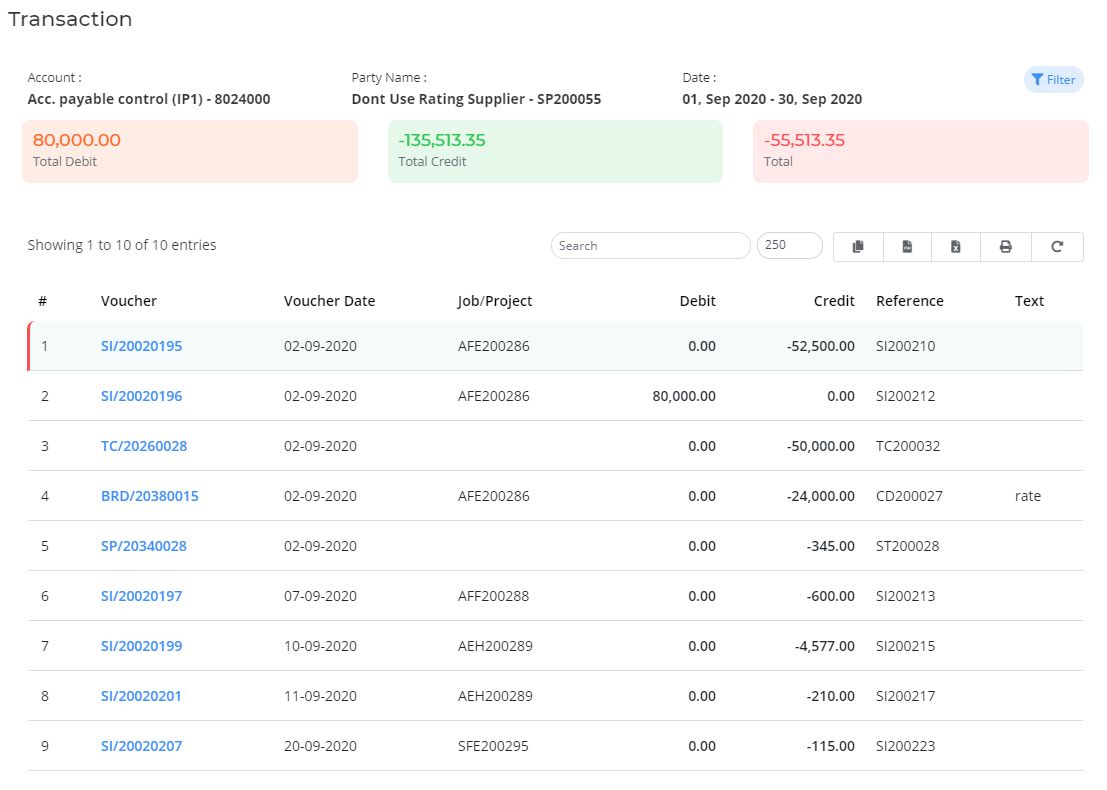
Print button available next to search prints the whole list of data listed.
Advanced Features
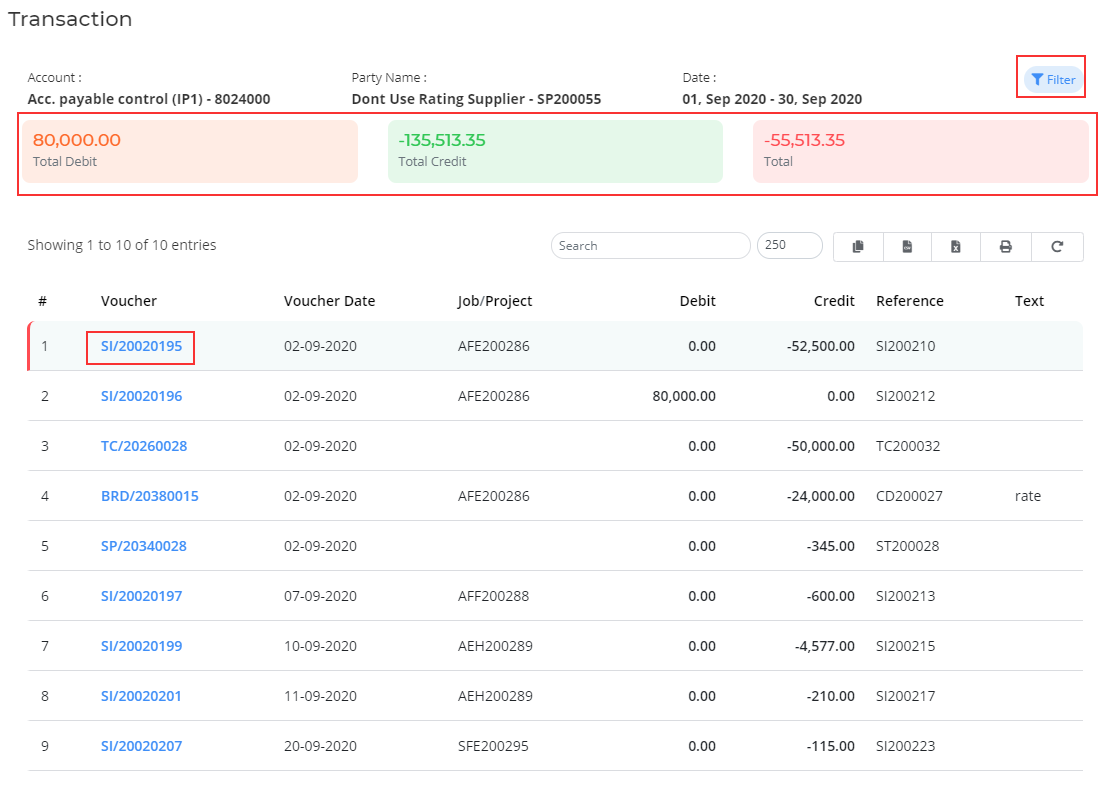
Clicking on the Voucher Number opens the payment voucher in a separate window.
Clicking on the filter button provides a separate filter wherein you can apply a deep filter to get data in precise.
Total debit, Total Credit and Net Total is given in a separate section as per the filter applied.
Purchase By Description
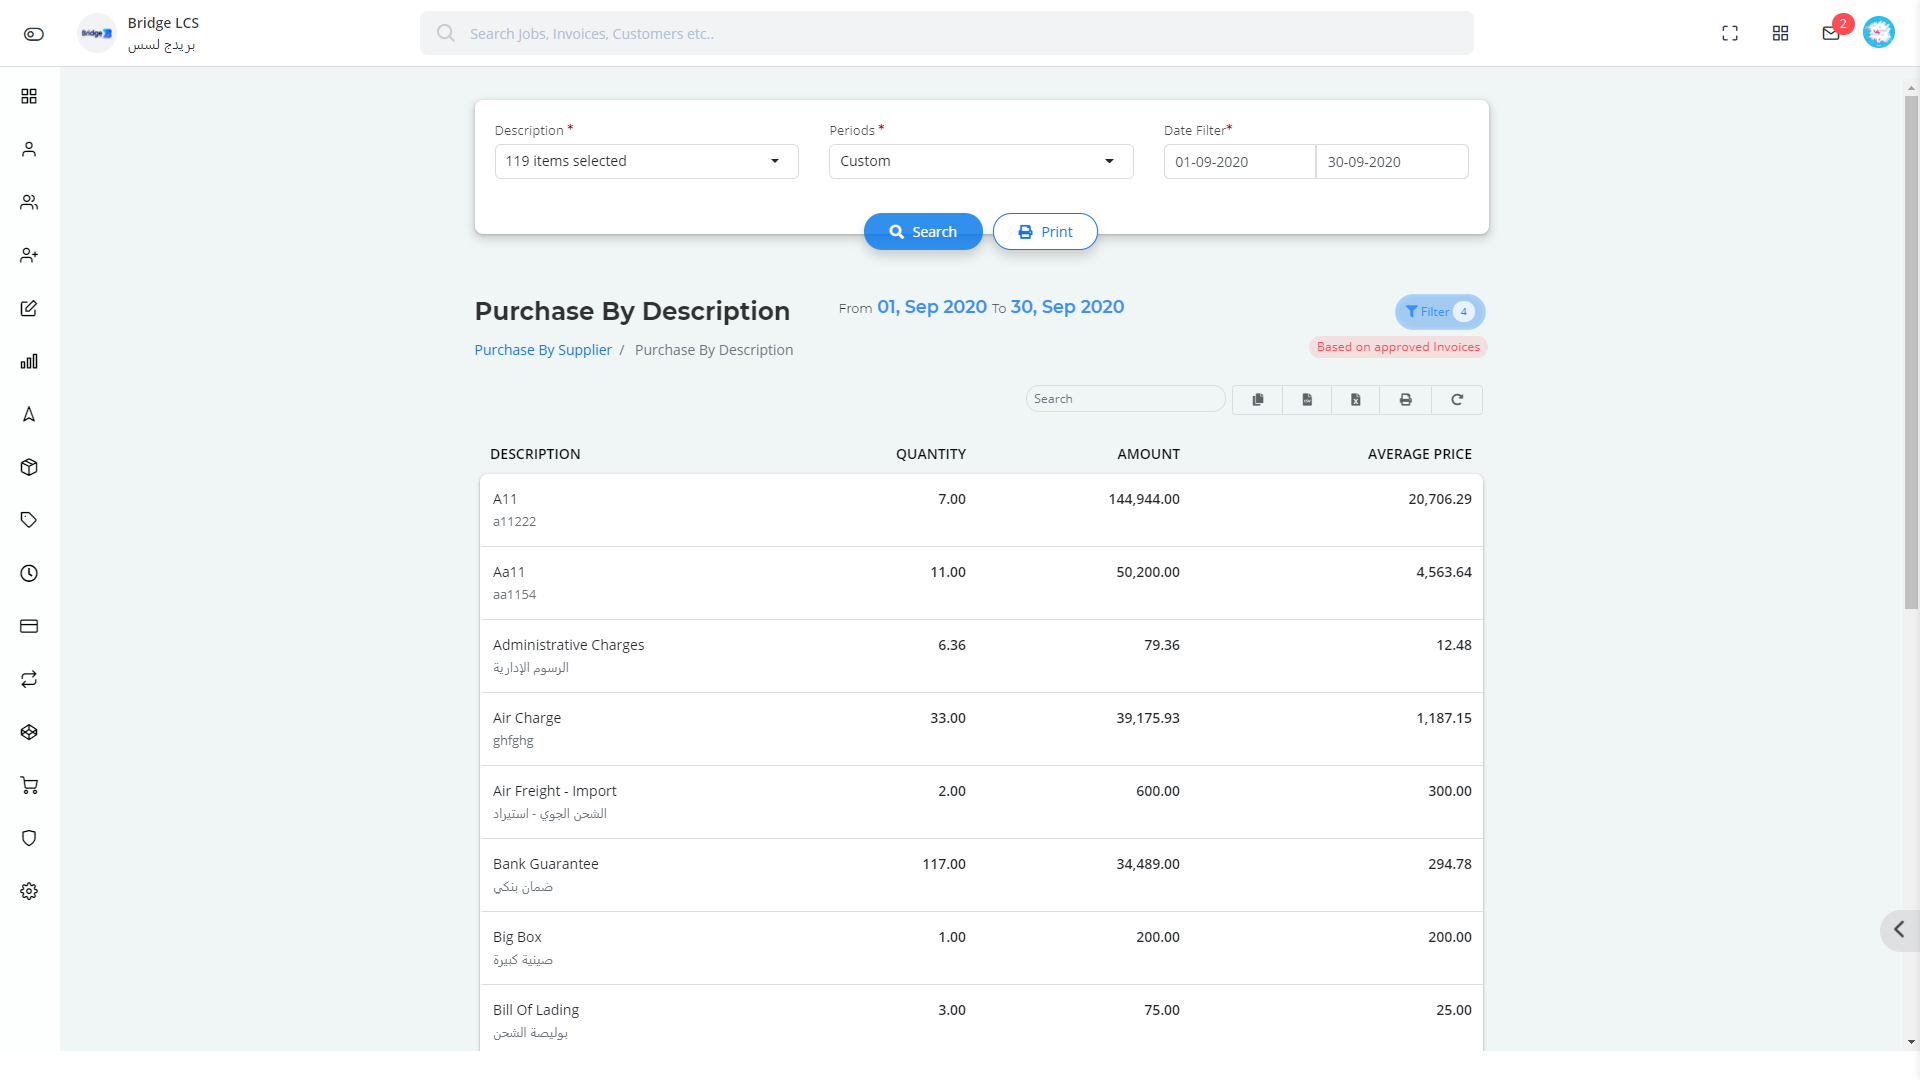
Purchase By Description gives you the list of transactions happened based on the description selected.
In order to select the description , Click on the Filter Button Available at the right Corner. A separate section will be introduced where you can select the list of descriptions along with the period for a detailed report.
Print button available next to search prints the whole list of data listed.
The Period Selected will be displayed on the center of the page.
Sales
Sales projects the transaction details involved based on the sections given below,
- Sales by Customer
- Sales by Description
- Sales by Salesman
Sales By Customer
Sales by Customer captures the list of transactions happening based on the Customer selected.
In order to select the Customer , Click on the Filter Button Available at the right Corner. A separate section will be introduced where you can select the list of Customers along with the period for a detailed report.
The Period Selected will be displayed on the center of the page.
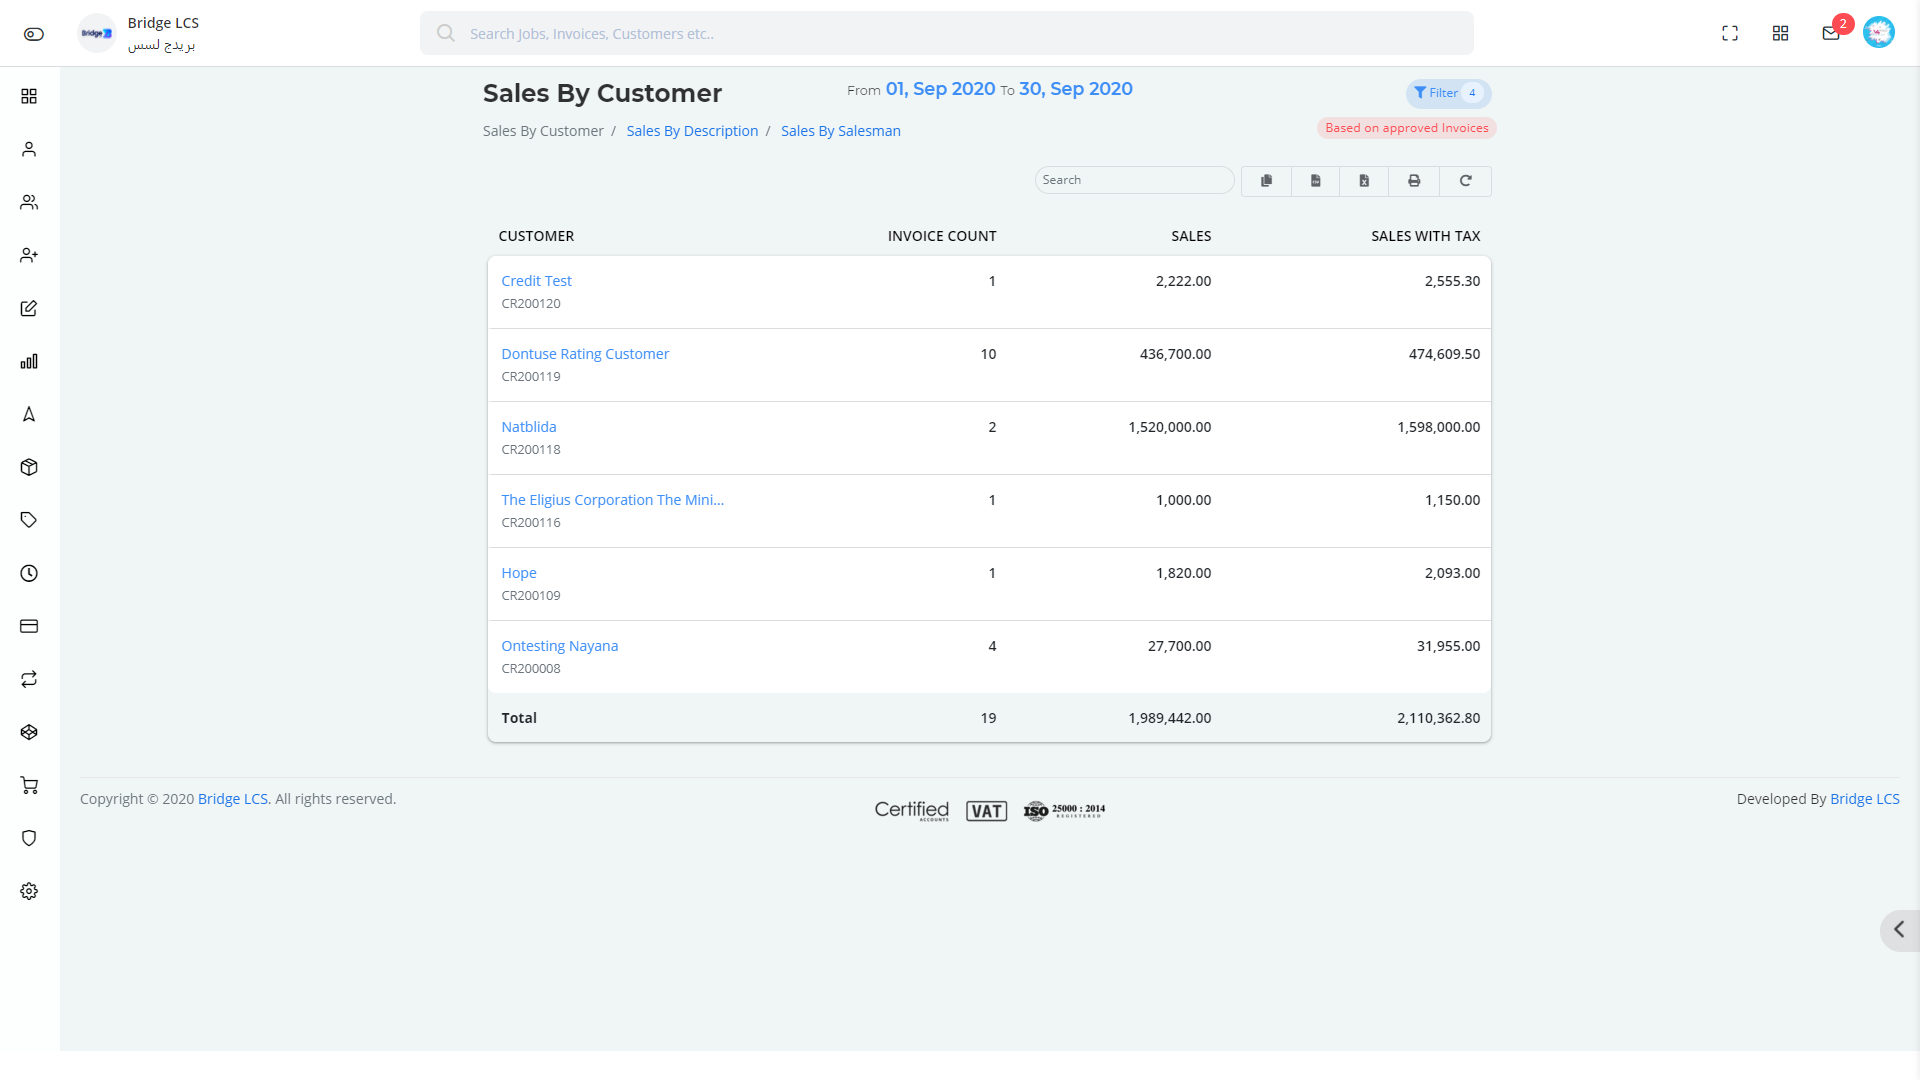
Once the filter is applied the list of Customers will be displayed along with the total amount involved (with and without tax). This also has the number of Invoices created for a particular customer (Approved).
Double Clicking on the Customer Name opens a new Pop Window with the following details,
Pop Up Window displays the list of Vouchers involved in the total transaction along with the credit, debit and respective project ./ Job.
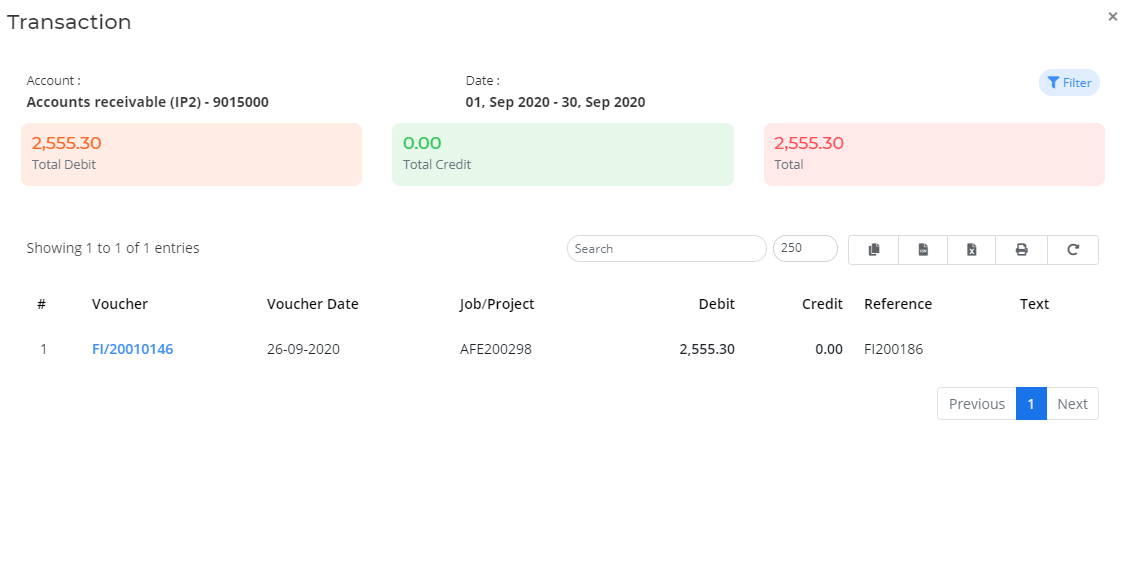
Print button available next to search prints the whole list of data listed.
Sales By Description
Sales By Description gives you the list of transactions happened based on the description selected.
In order to select the description , Click on the Filter Button Available at the right Corner. A separate section will be introduced where you can select the list of descriptions along with the period for a detailed report.
The list displayed includes number of transactions along with amount and average price.
Print button available next to search prints the whole list of data listed.
The Period Selected will be displayed on the center of the page.
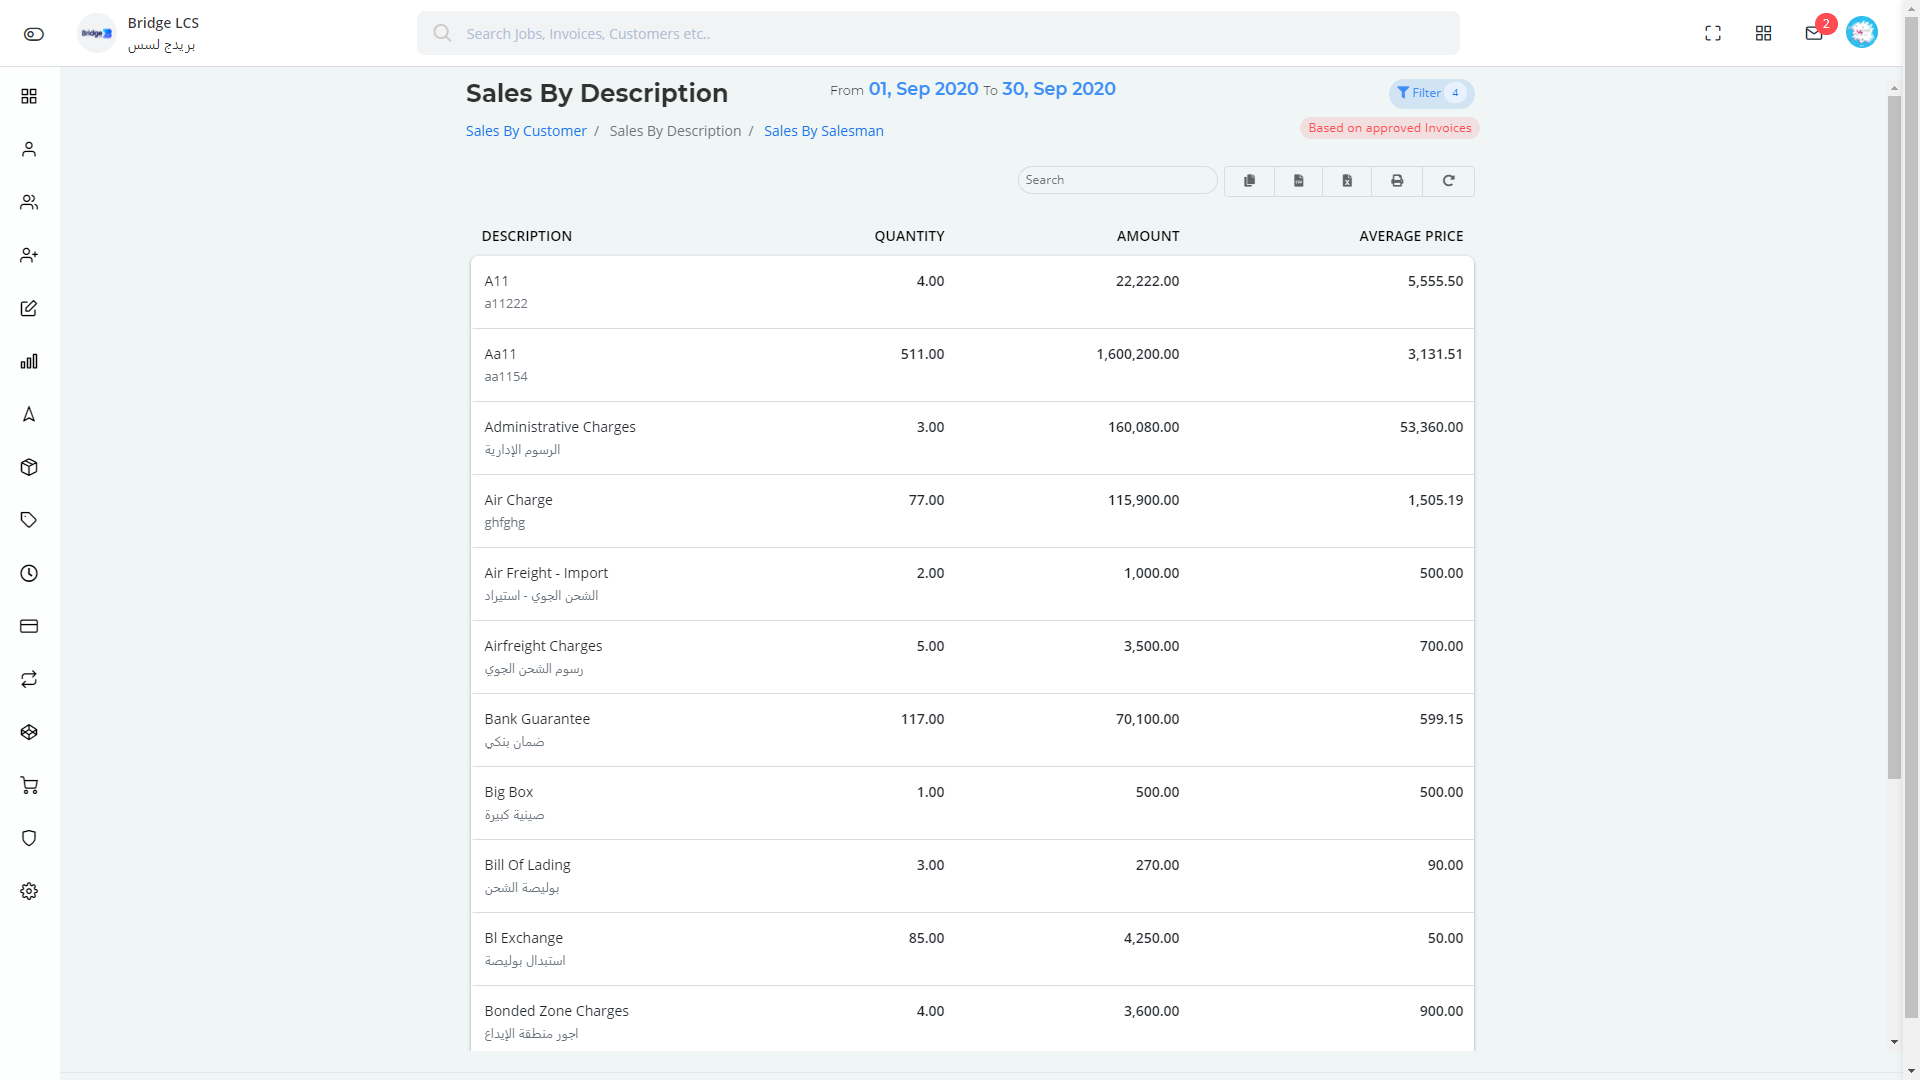
Sales by Salesman
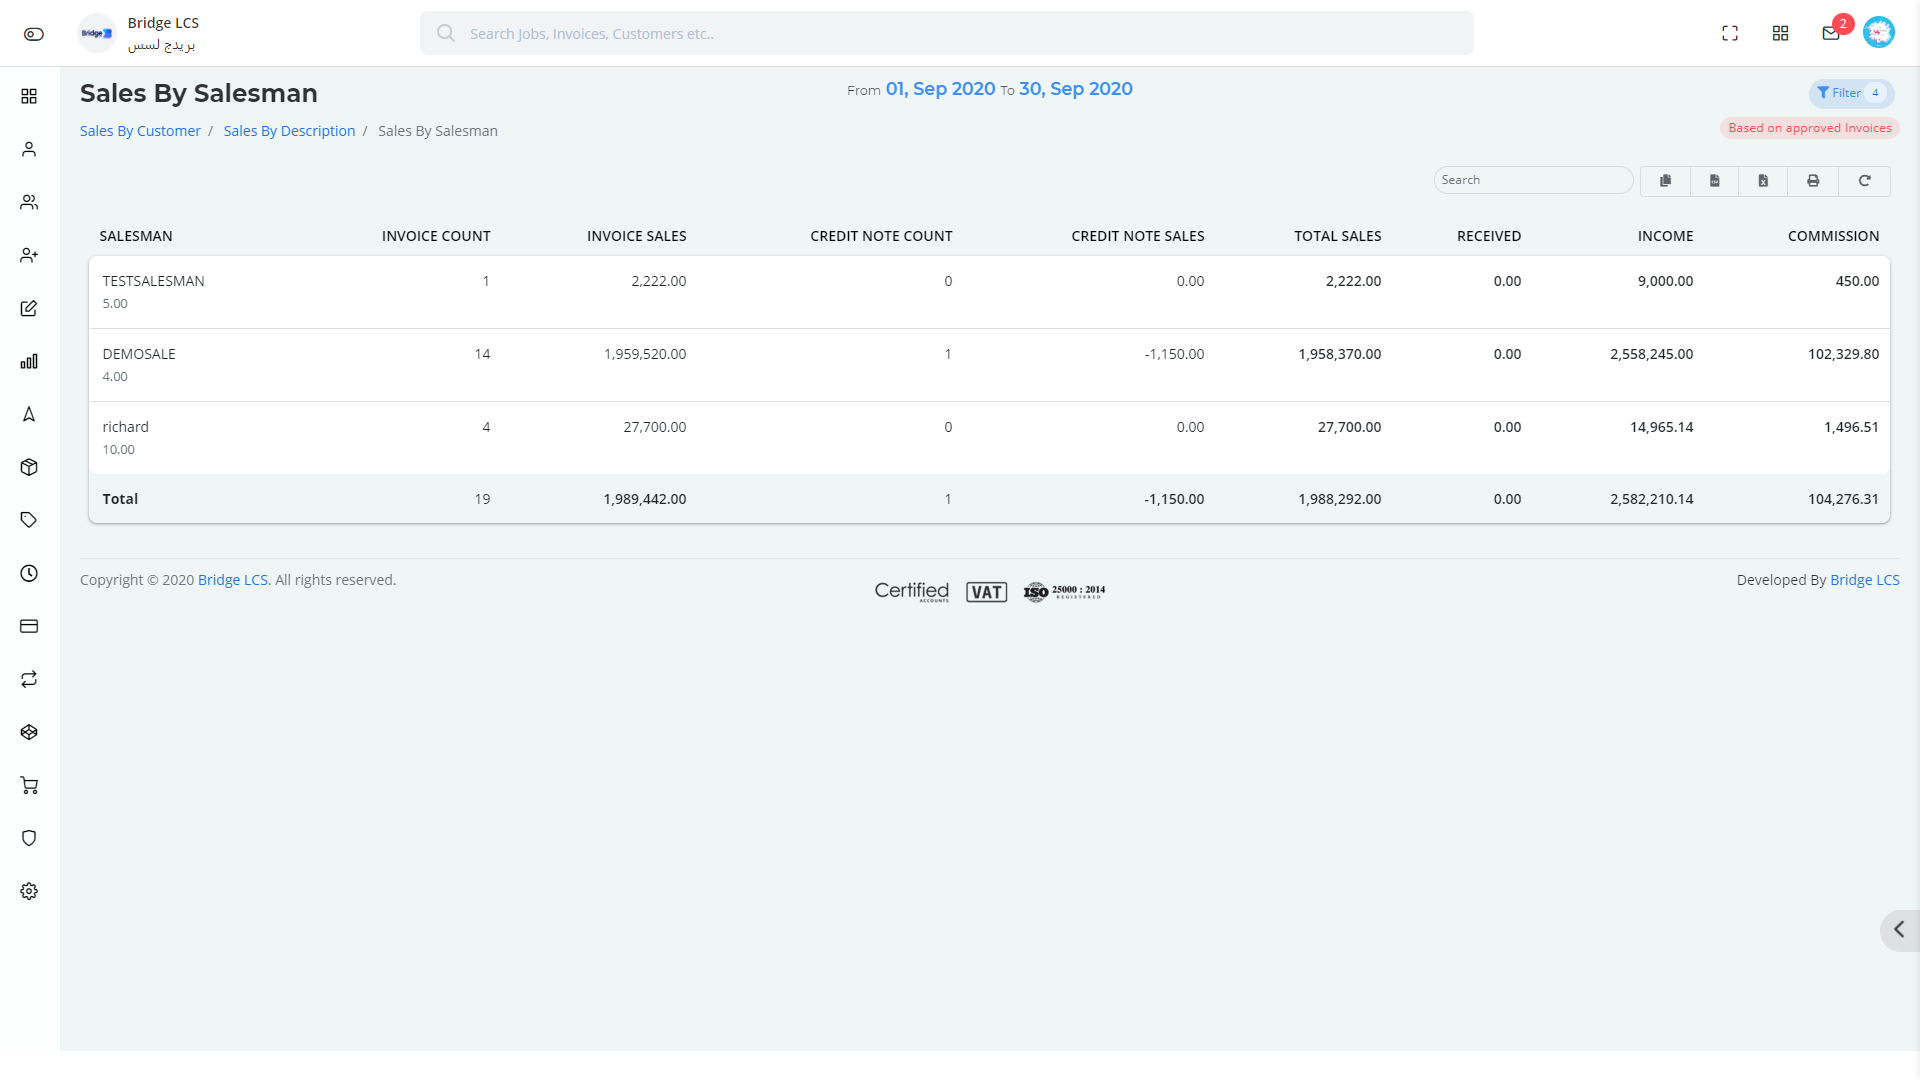
Sales by Salesman captures the list of transactions happening based on the Salesman selected.
In order to select the Salesman , Click on the Filter Button Available at the right Corner. A separate section will be introduced where you can select the list of Suppliers along with the period for a detailed report.
The Period Selected will be displayed on the center of the page. Once the filter is applied the list of Salesmen will be displayed along with the following details,
- Invoice Sales (Amount in Final Invoice)
- Credit Note Count
- Credit Note Sales
- Total Sales
- Income earned by the company
- Commission given to the salesman
This also has the number of Invoices generated by a particular Salesman(Approved).
Print button available next to search prints the whole list of data listed.
Taxes
It holds the following modules,
- Inward Summary
- Outward Summary
- Inward Ledger
- Outward Ledger
- Tax Reports
Inward Summary
Inward Summary is similar to Input Tax Reports.
This holds the summarised list of Supplier Invoices, General Supplier Invoices, Maintenance, Terminal Cost, Payment Vouchers.
Click on the Filter Icon to get the view of the filter. Filters that needs to b applied are,
- Period (*)
- From Date and To Date (*)
- Type (*) { VAT Suppliers / No VAT Suppliers }
- Supplier
- Status { Approved Supplier Invoices / Non Approved Supplier Invoices }.
Once the filters are applied, Click on Search to proceed.
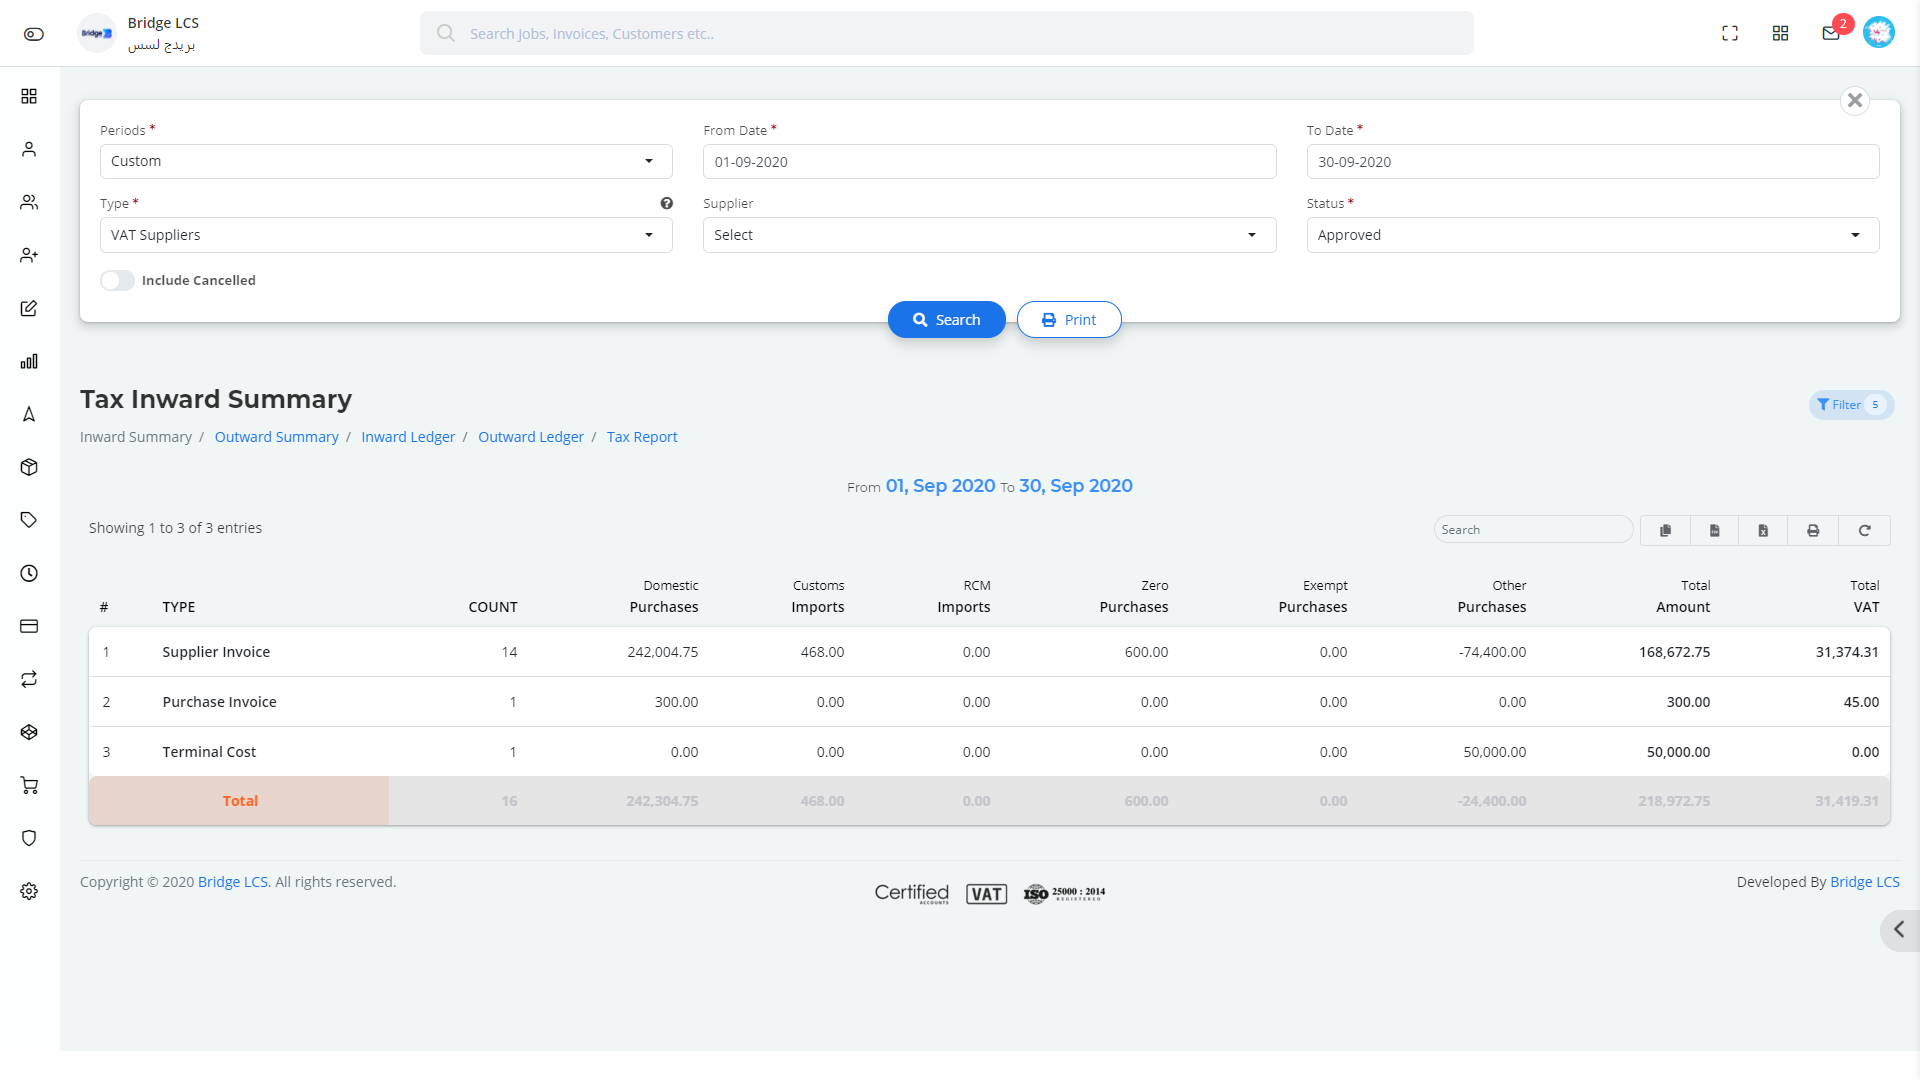
Inward Summary has a list which depicts the number of invoices made (respective to each section) in the selected period along with the amount and VAT.
The Period Selected is displayed on the Center of the Page.
The Sum of multiple sections will be given at the end of the table.
Double Clicking on the Column redirects the User to the Input Tax Report.
Outward Summary
Outward Summary is similar to Output Tax Reports.
This holds the summarised list of Final Invoice, General Customer Invoice, Payment Voucher.
Click on the Filter Icon to get the view of the filter. Filters that needs to be applied are,
- Period (*)
- From Date and To Date (*)
- Customer
- Status (*) { Approved / Unapproved }
Once the filters are applied, Click on Search to proceed.
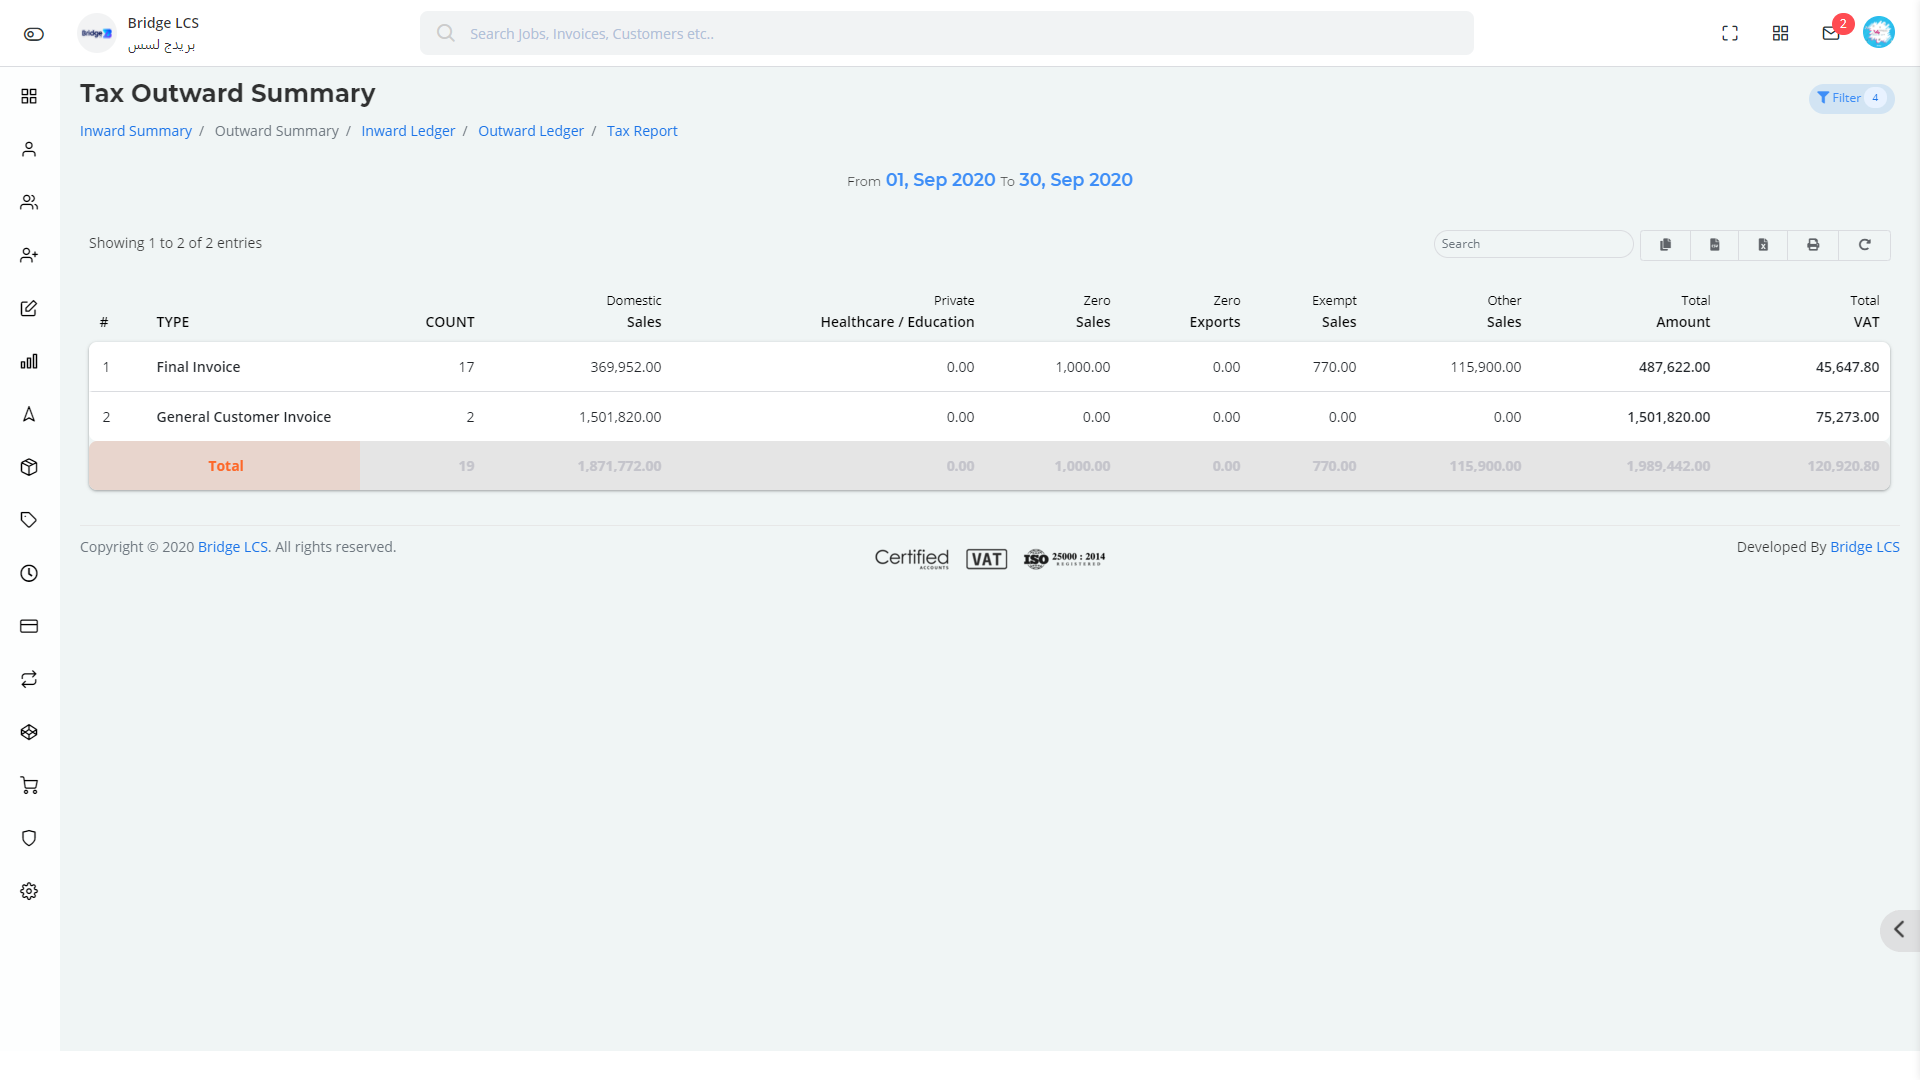
Outward Summary has a list which depicts the number of invoices made (respective to each section) in the selected period along with the amount and VAT.
The Period Selected is displayed on the Center of the Page.
The Sum of multiple invoices will be given at the end of the table.
Double Clicking on the Column redirects the User to the Output Tax Report.
Tax Inward Ledger
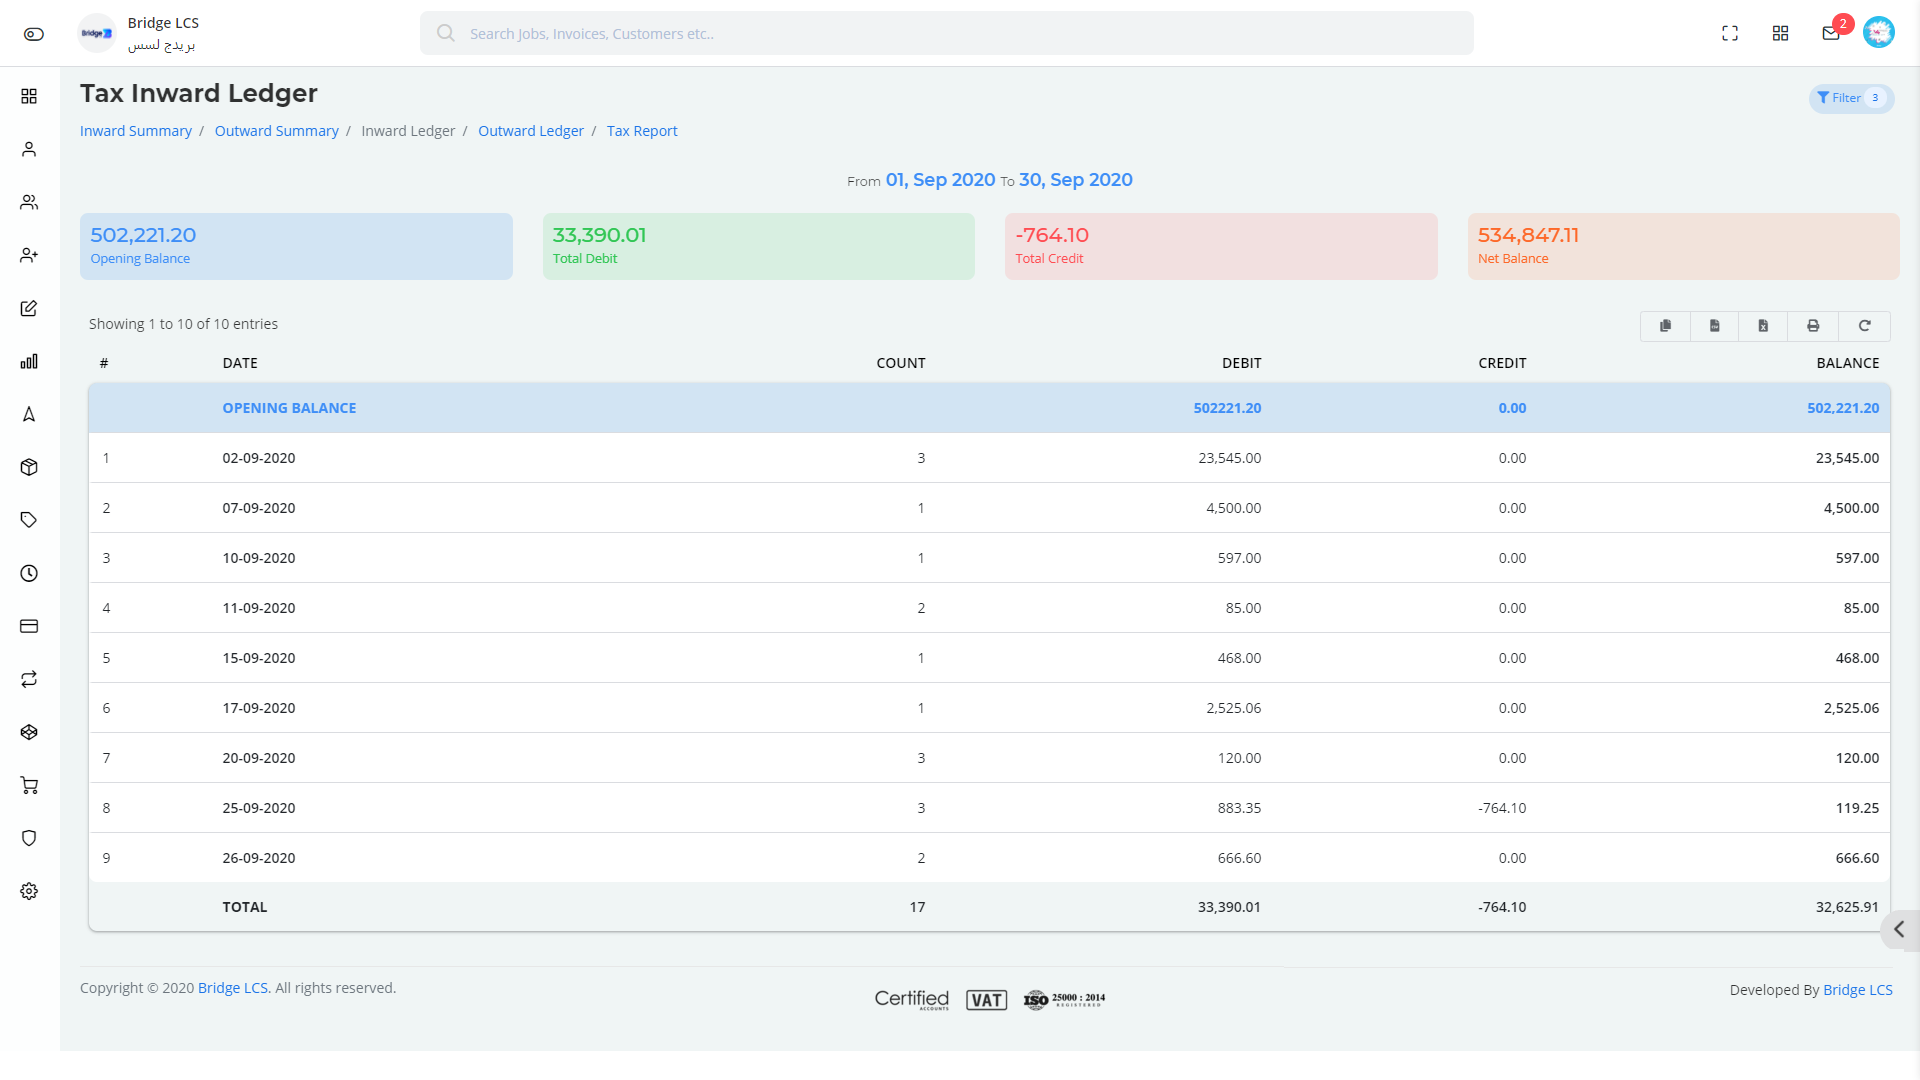
Inward Ledger depicts the Consolidated View of Inward Summary with the details like Opening Balance, Date, number of Invoices made, Credit , Debit and Balance. Invoices Like Supplier Invoices, General Supplier Invoices, Maintenance Cost, Terminal Cost,Purchase Invoice, Payment Vouchers with account type Input Tax are involved here.
Click on the Filter Icon to get the view of the filter. Filters that needs to b applied are,
- Period (*)
- From Date and To Date (*)
Clicking on the Date gives you the List of Invoices / Vouchers involved in the particular column in a pop up window which also further allows you to segregate data
This also shows the sum of opening balance, Total Debit, Total Credit and Net Balance in the middle section as per the section selected.
Tax Outward Ledger
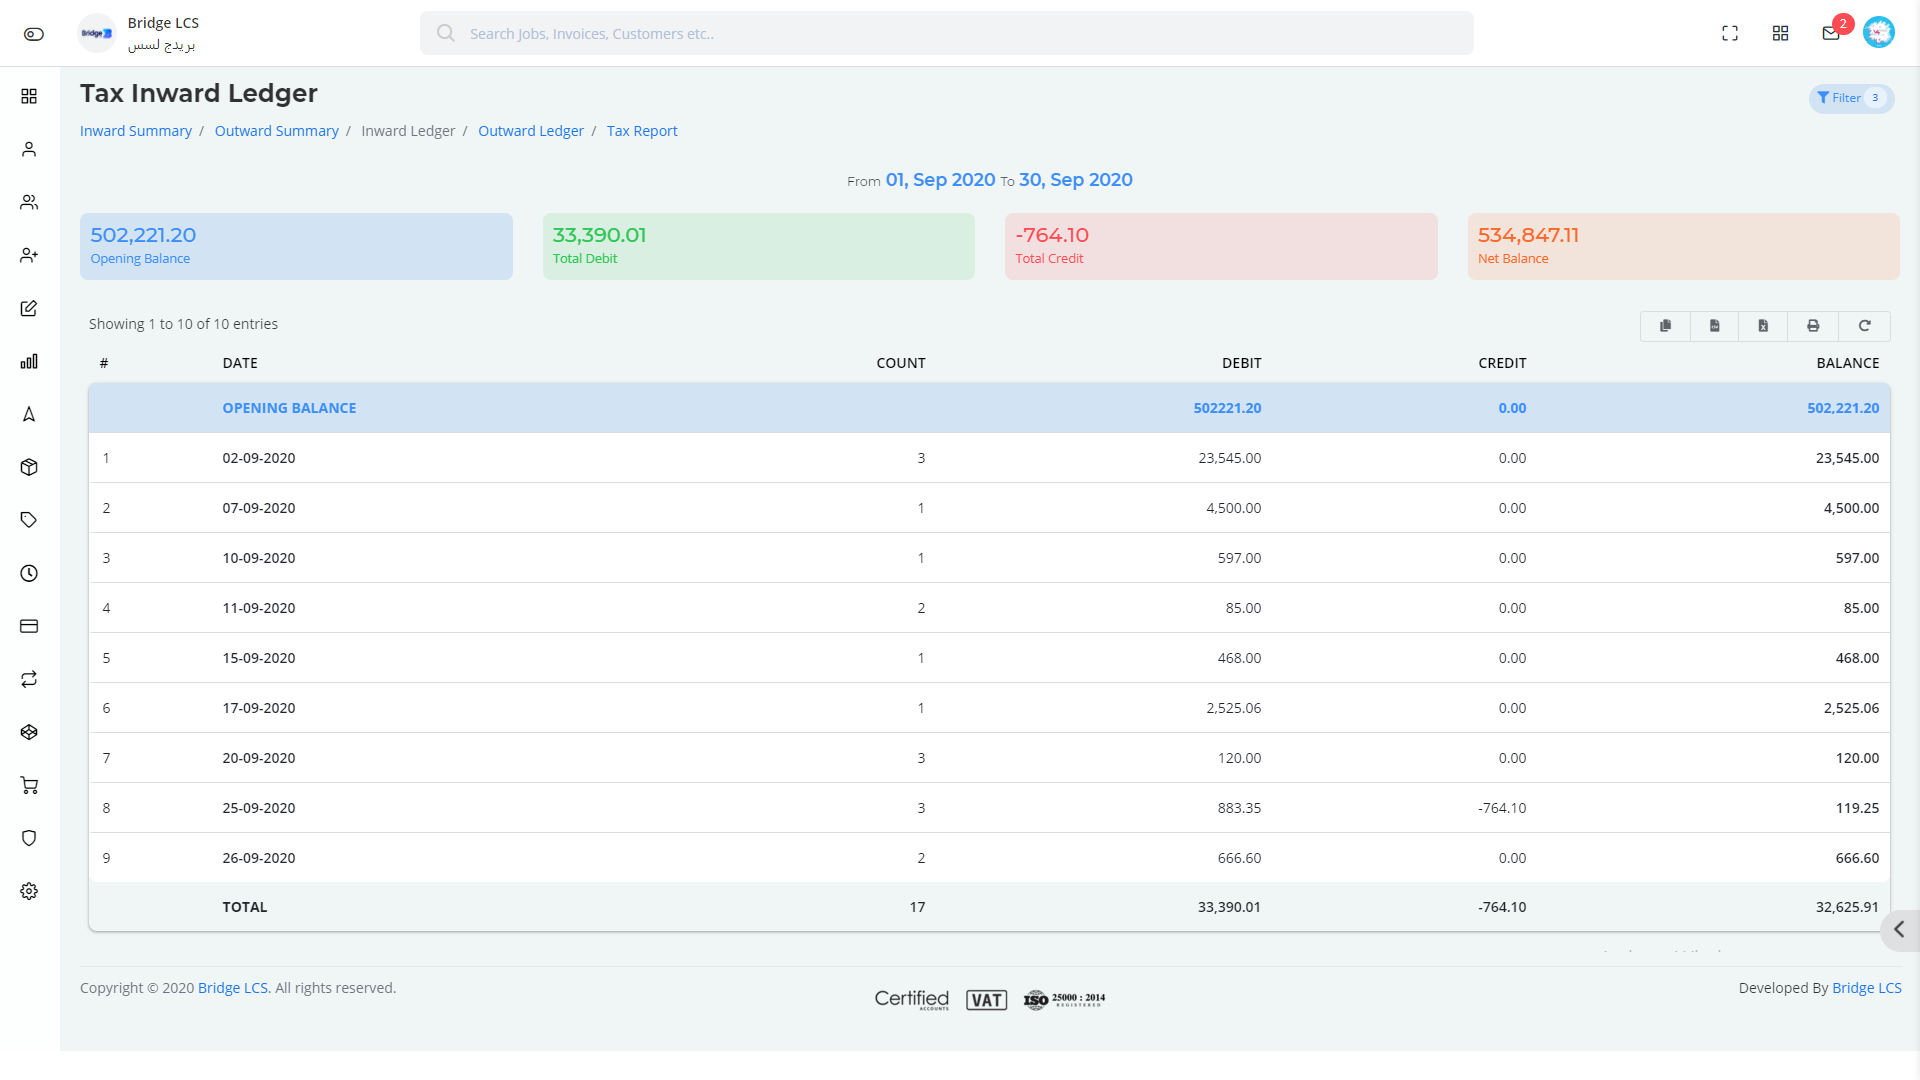
Outward Ledger depicts the Consolidated View of Outward Summary with details like Opening Balance, Date, number of Invoices made, Credit , Debit and Balance. Invoices like Final Invoice, General Customer Invoice, Payment Voucher are involved.
Click on the Filter Icon to get the view of the filter. Filters that needs to b applied are,
- Period (*)
- From Date and To Date (*)
Clicking on the Date gives you the List of Invoices / Vouchers involved in the particular column in a pop up window which can further be broken down by applying filters.
This also shows the sum of opening balance, Total Debit, Total Credit and Net Balance in the middle section as per the section selected.
Tax Reports
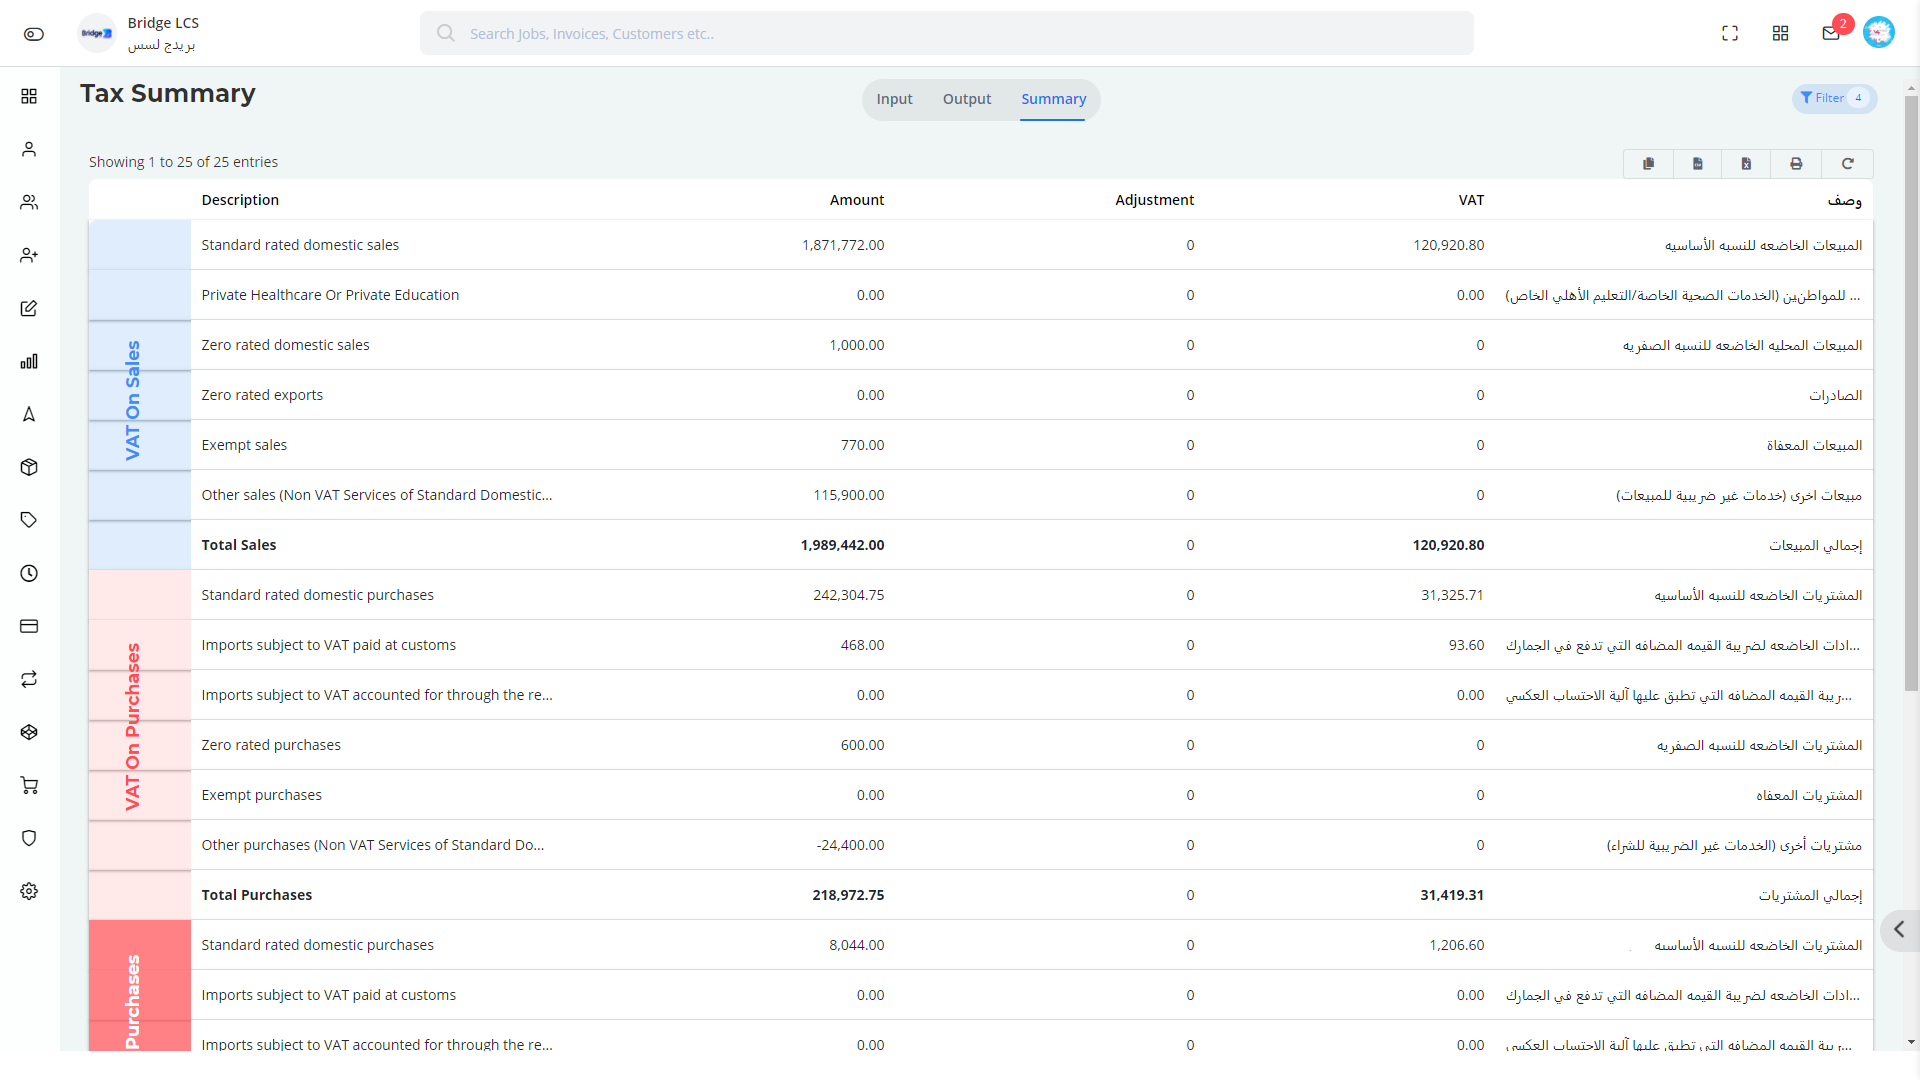
Tax Reports redirects the user to Tax Summary. It depicts a summary of VAT on Sales , VAT on Purchases and No VAT Id filled on Purchases.
Refer Finance --> Tax Report --> Summary
Receivables
It has the Following Sub Segments,
- Customer Balances
- Customer Balance Summary
- Ageing Report
- Statement
Customer Balances
Customer Balance deals with the total transactions happened against the invoice made and the pending sum .
The data are filtered based on the following ,
- Customer(*)
- Period(*)
- Date (*)
Once the required filters are applied, Click on the Search button to proceed.
Print button helps to print the data available on the page.
It furnishes the list of customers along with the invoice balance, available credit and closing balance.
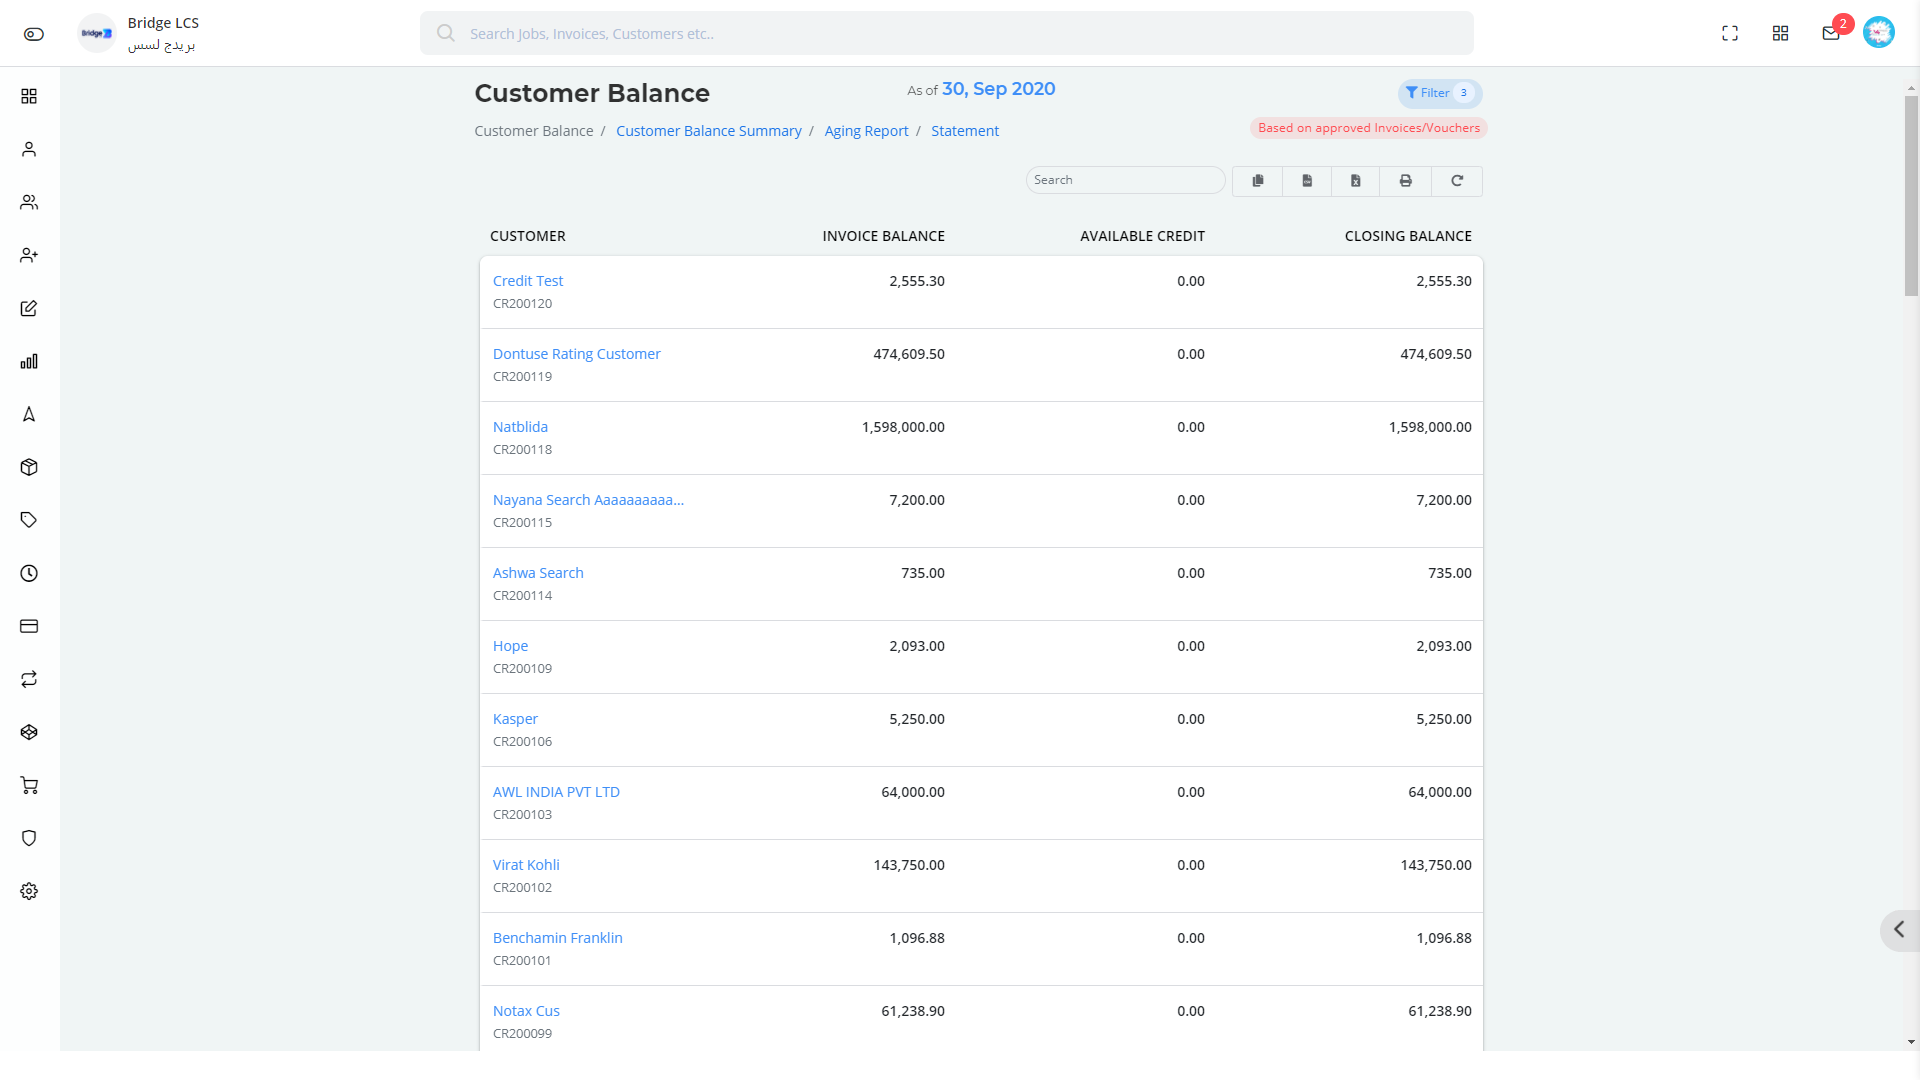
The Period Applied / Date of Data displayed is given at the center of the page.
Clicking on the customer name / anywhere in the column enables a pop up window where the list of invoices associated with the customers are furnished .
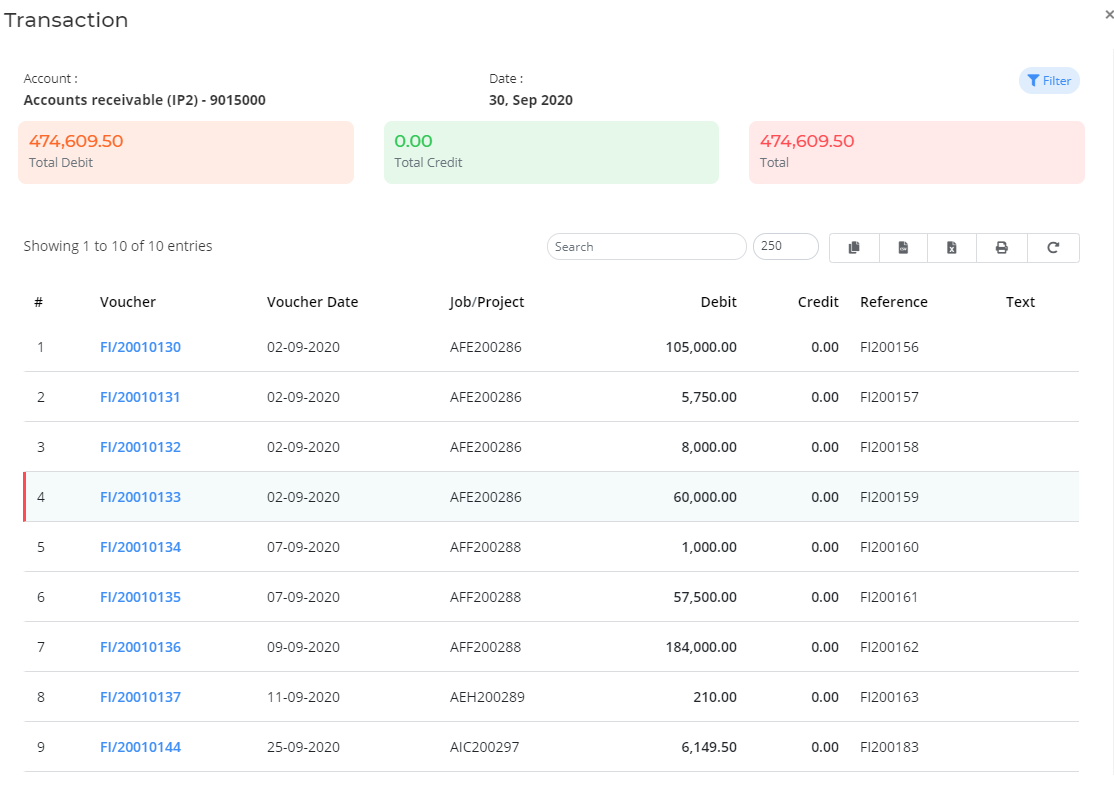
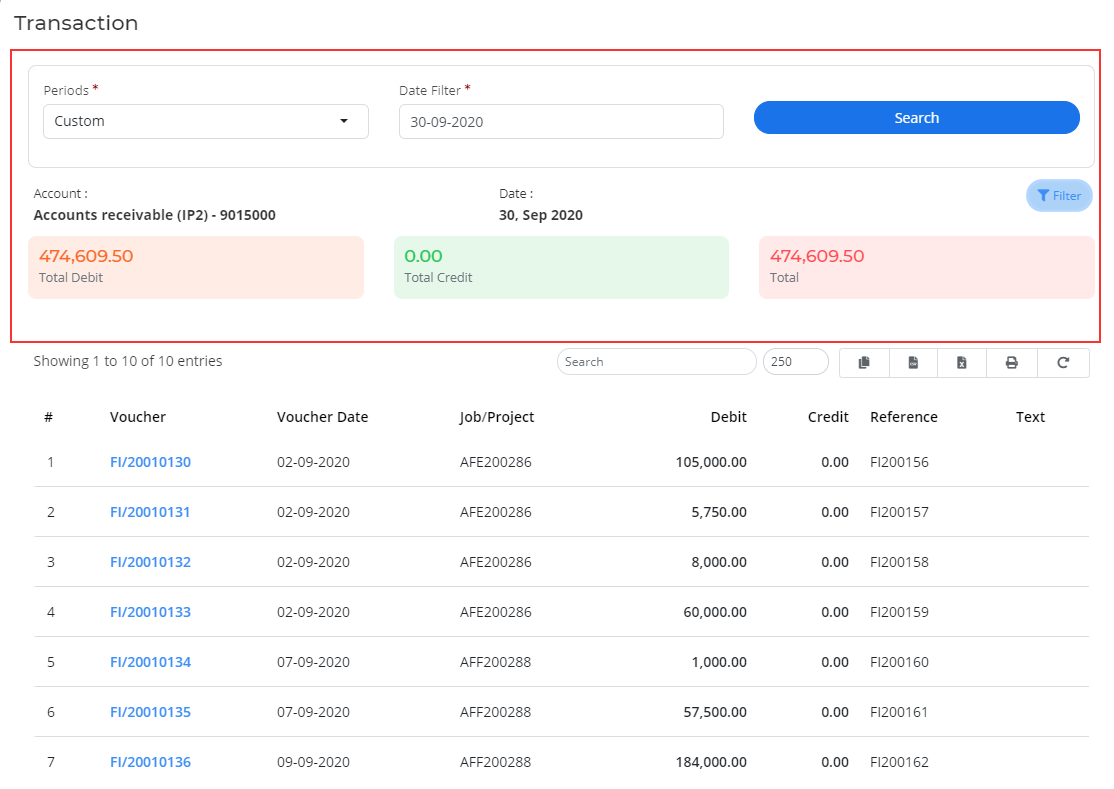
Pop up window offers a special filter where you can get more precise data by applying the filter.
Pop up window gives you the details of the account selected such as account no and current date.
Clicking on the voucher number available on the popup window gives you the view of Voucher in a new tab.
The total amount, credit and debit of the respective account is given in the middle section of the Pop Up window.
Customer Balance Summary
Customer Balance Summary gives you the synopsis of Customer Balance.
It shows the credit and debit of a customer based on the filters applied.
Click on the Filter Button available to get the view of the filter.
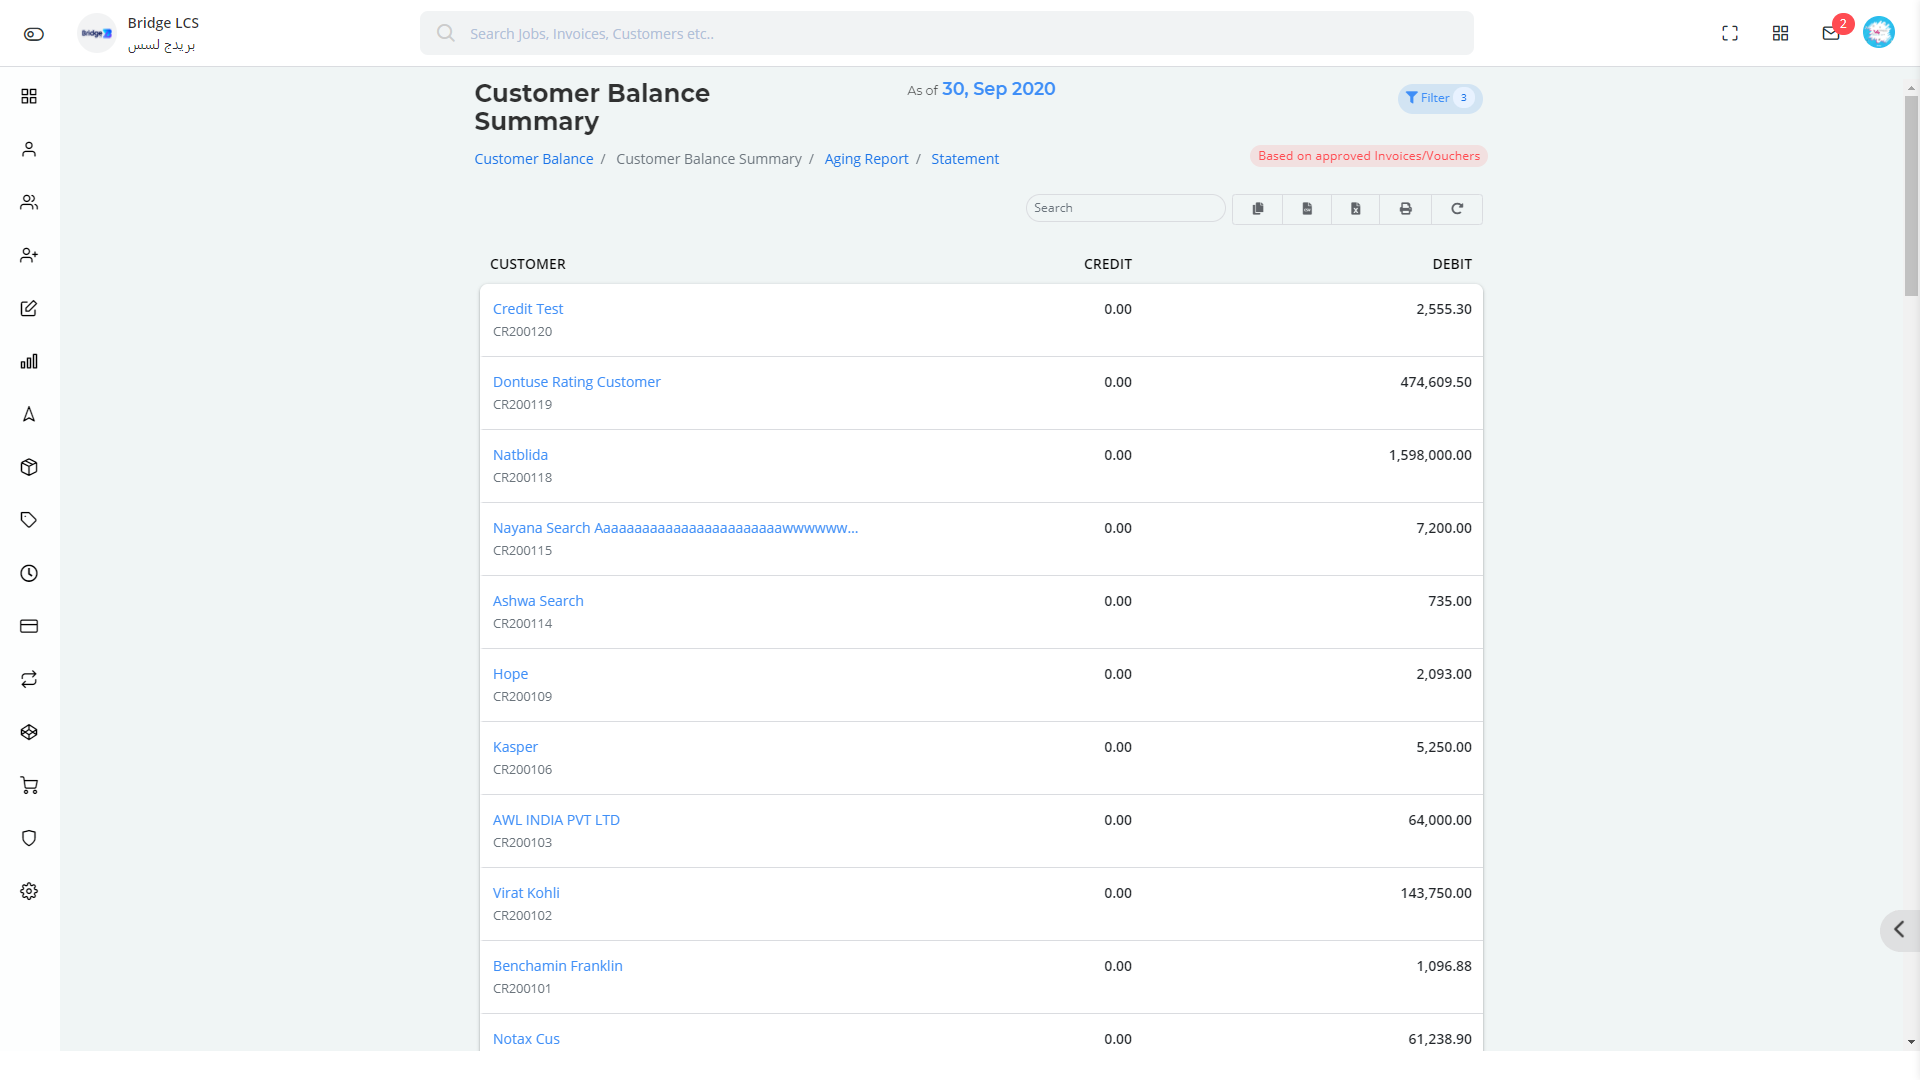
Clicking on the customer name / anywhere in the column enables a pop up window where the list of invoices associated with the customers are furnished .
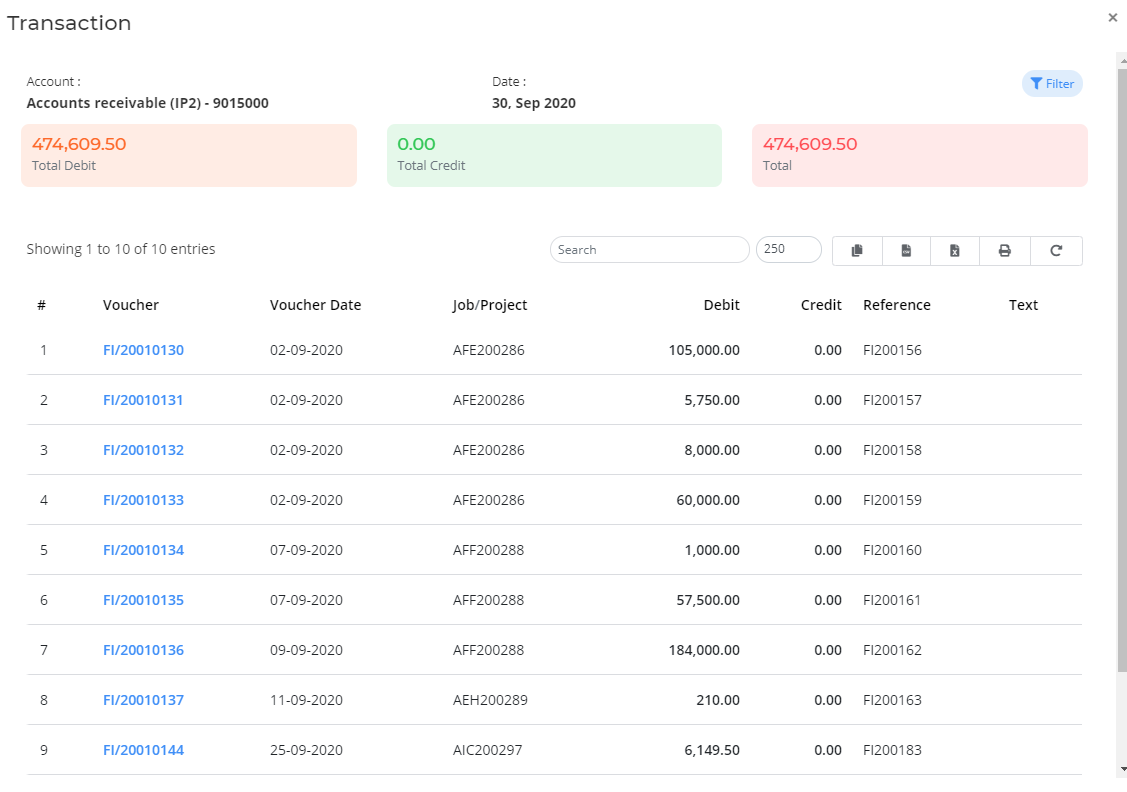
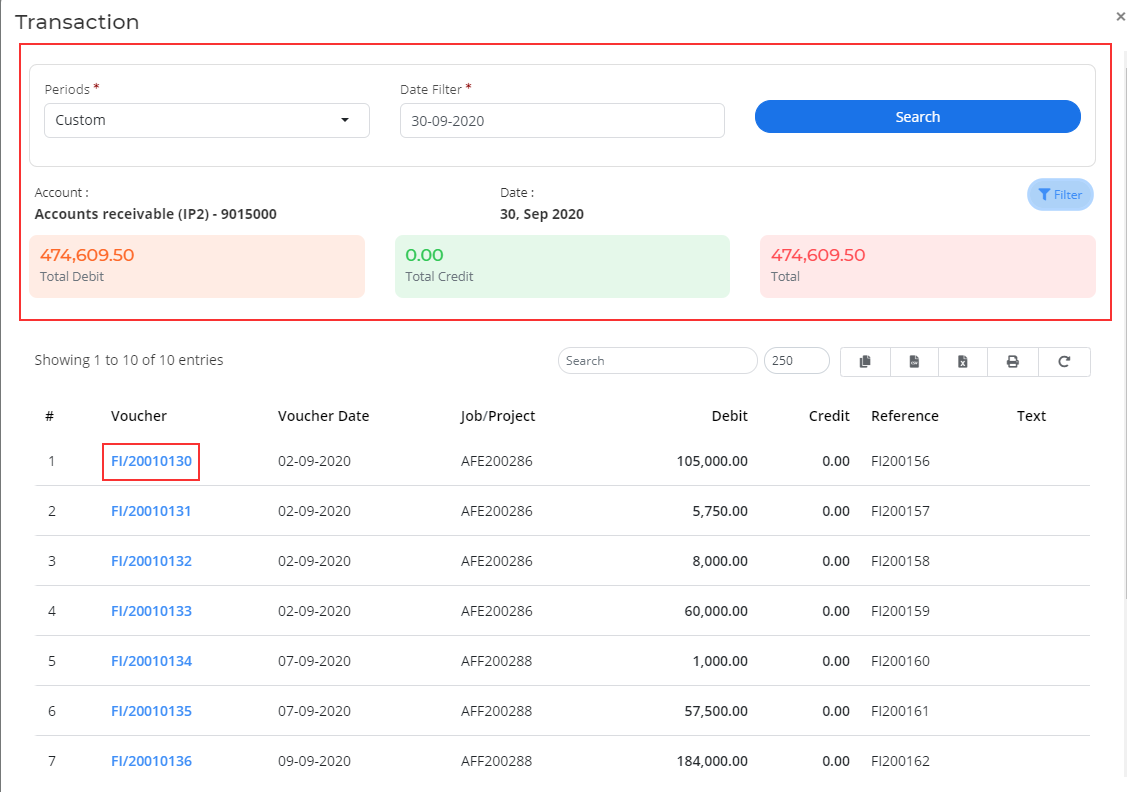
Pop up window offers a special filter where you can get more precise data by applying the filter.
Pop up window gives you the details of the account selected such as account no and current date.
Clicking on the voucher number available on the popup window gives you the view of Voucher in a new tab.
The total amount, credit and debit of the respective account is given in the middle section of the Pop Up window.
Ageing Report
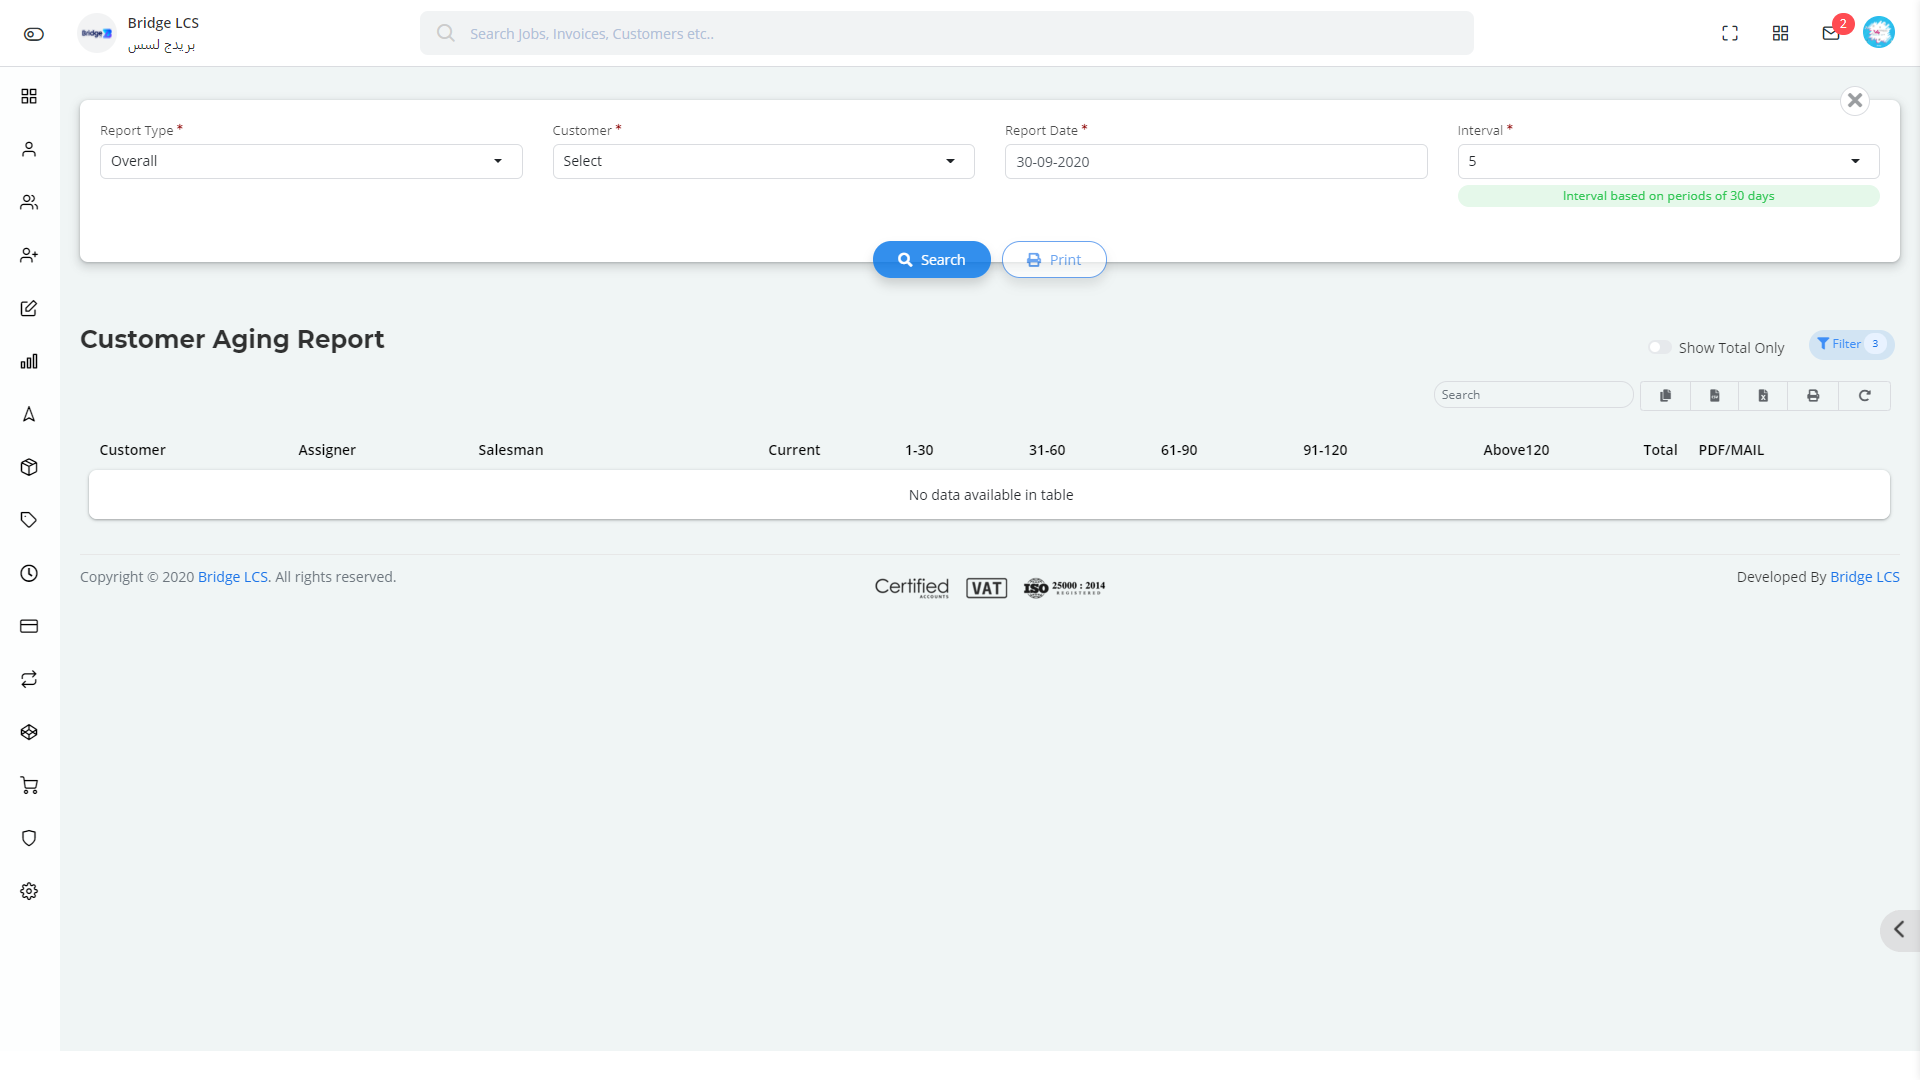
Ageing Report notifies you the age of customer i.e. How long the customer is doing business with us.
Ageing Report redirects the user to Customer --> Ageing Report. The detailed explanation is provided in the Customer Module.
Customer Statement
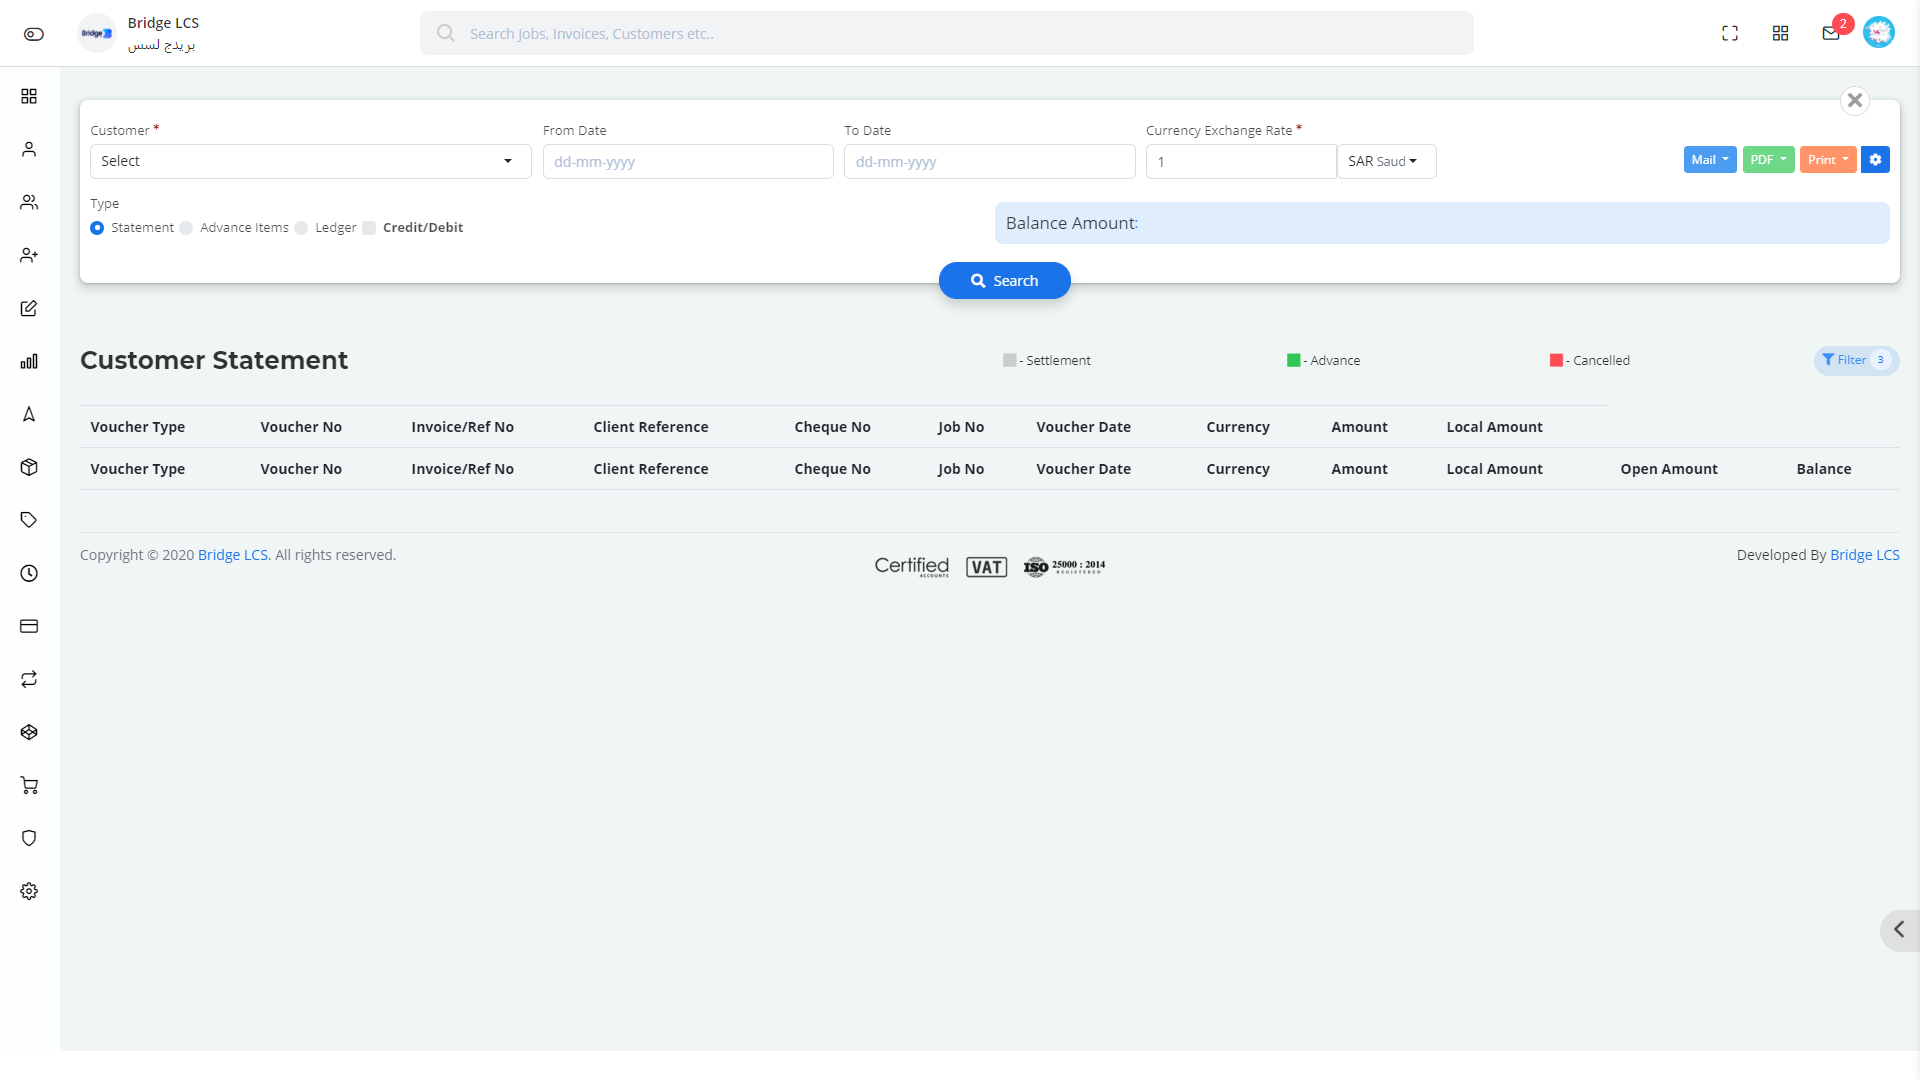
Customer Statement provides you with the consolidated report of transactions that happened.
This redirects to Customer --> Customer Statement . The detailed functioning can be referred to at the customer module.
Payables
Payables are the liabilities of the user. This has the following sub sections,
- Supplier Balance
- Supplier Balance Summary
- Ageing Report
- Statement
Supplier Balance
Supplier Balance deals with the total transactions happened against the supplier invoice and the excess payment / debit along with the closing balance .
The data are filtered based on the following ,
- Supplier(*)
- Period(*)
- Date (*)
Once the required filters are applied, Click on the Search button to proceed.
Print button helps to print the data available on the page.
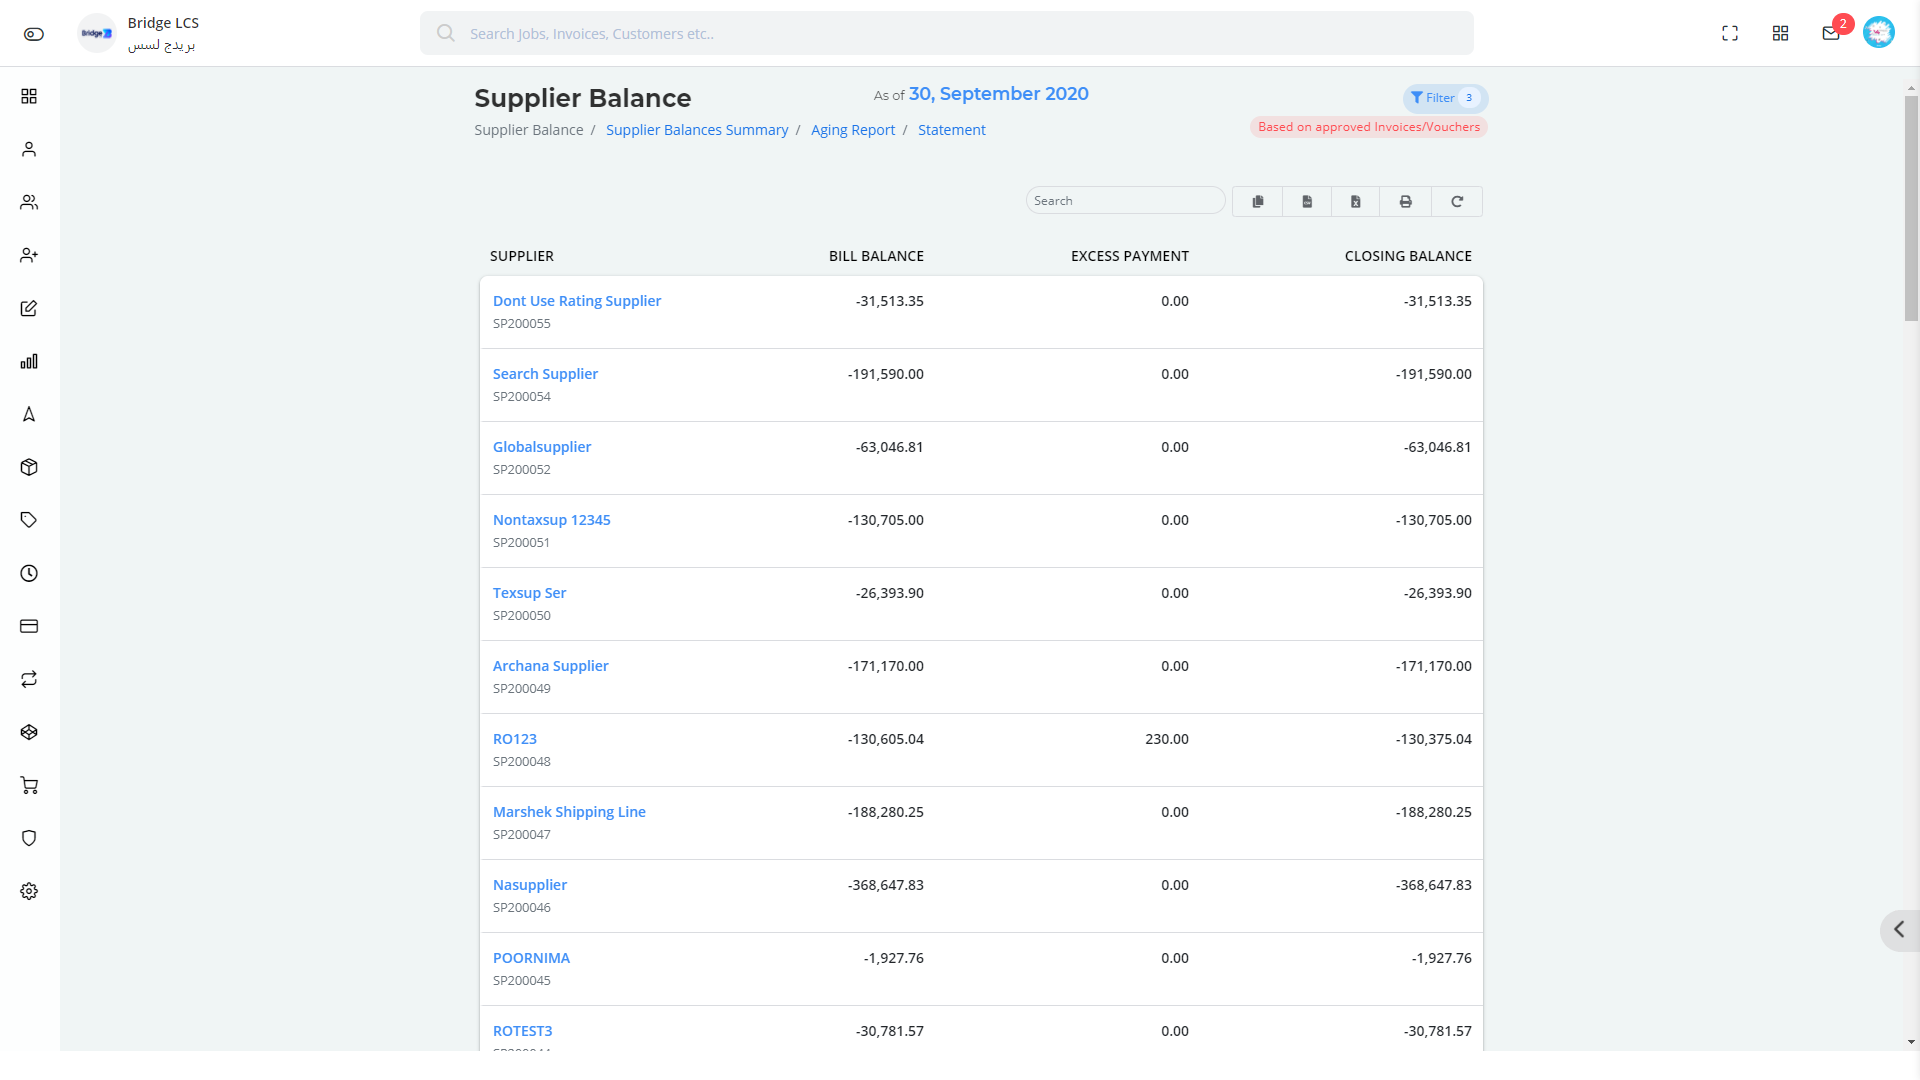
It furnishes the list of Suppliers along with the invoice balance / Bill Balance , debit / excess Payment and closing balance.
The Period Applied / Date of Data displayed is given at the center of the page.
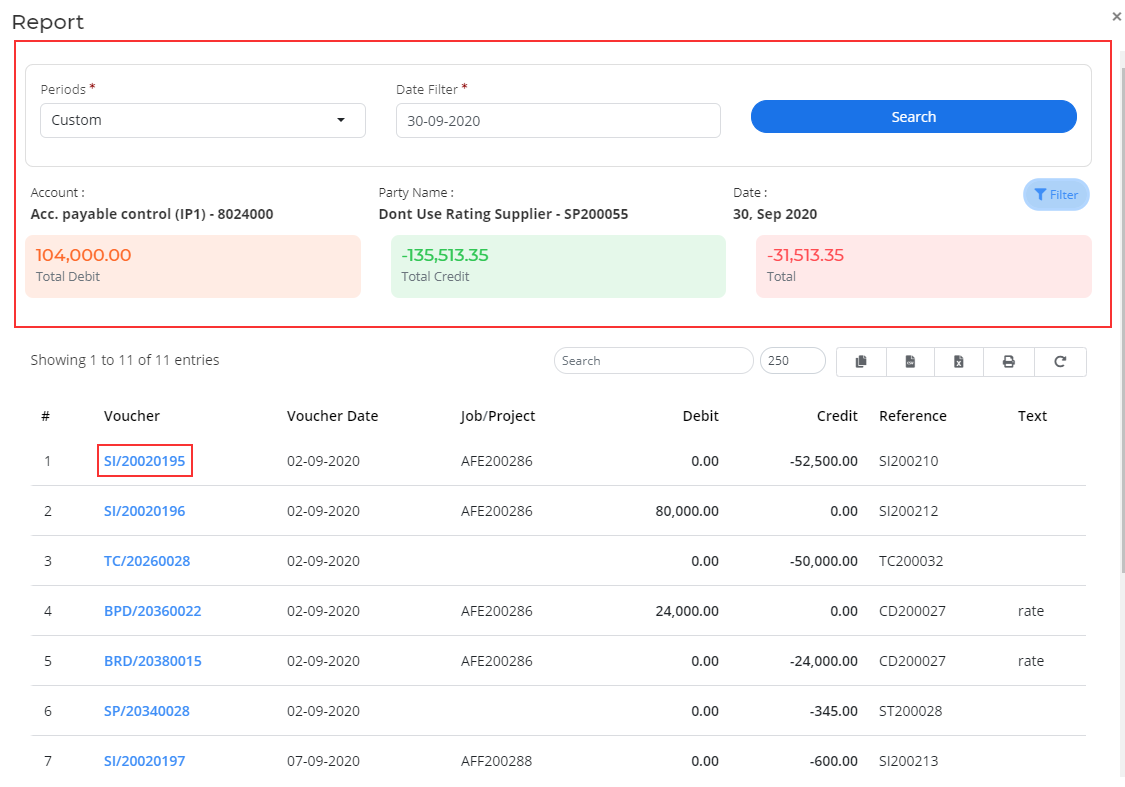
Clicking on the supplier name / anywhere in the column enables a pop up window where the list of invoices associated with the suppliers are furnished .
Pop up window offers a special filter where you can get more precise data by applying the filter.
Pop up window gives you the details of the account selected such as account no, Supplier Name and current date.
Clicking on the voucher number available on the popup window gives you the view of Voucher in a new tab.
The total amount, credit and debit of the respective account is given in the middle section of the Pop Up window.
Supplier Balance Summary
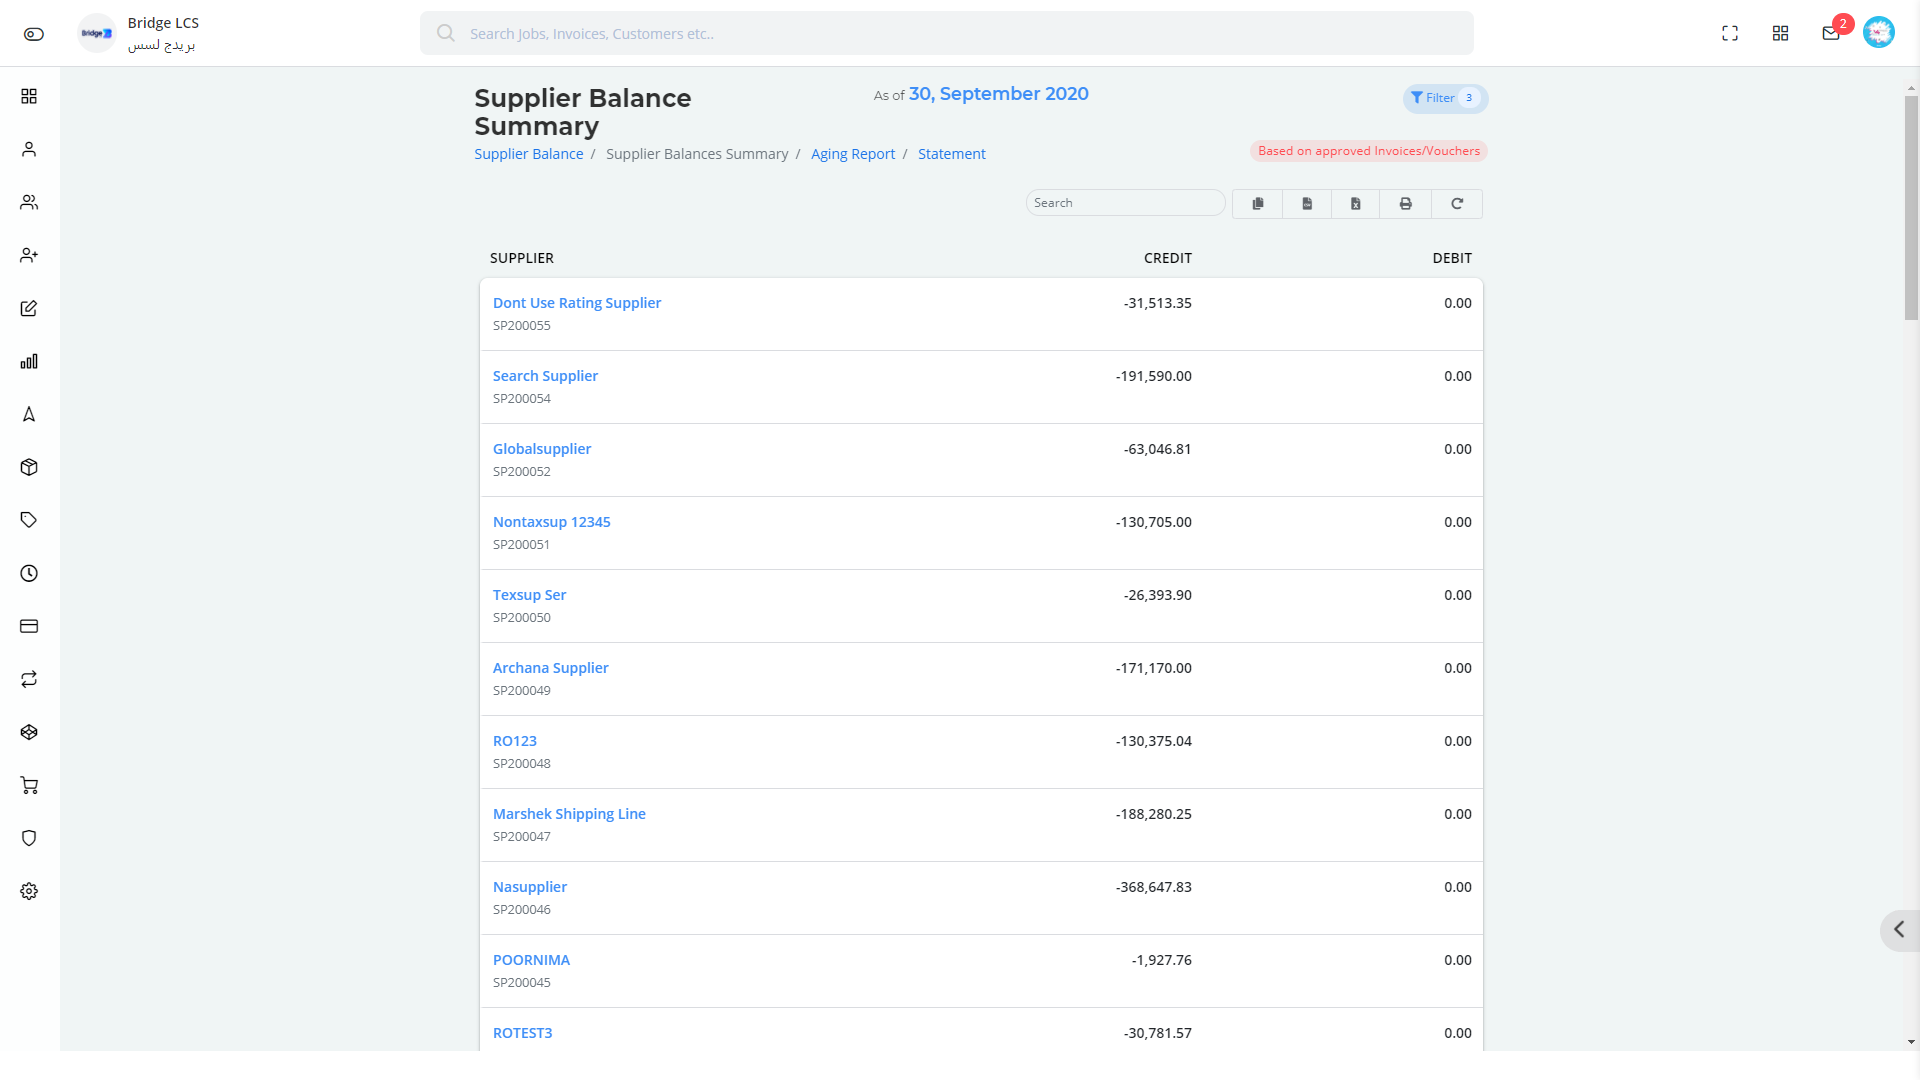
Supplier Balance Summary gives you the synopsis of Supplier Balance. It shows the credit and debit of a supplier based on the filters applied.
Click on the Filter Button available to get the view of the filter.
Clicking on the Supplier Name / anywhere in the column enables a pop up window where the list of invoices / Vouchers associated with the Suppliers are furnished .
The Period Applied / Date of Data displayed is given at the center of the page.
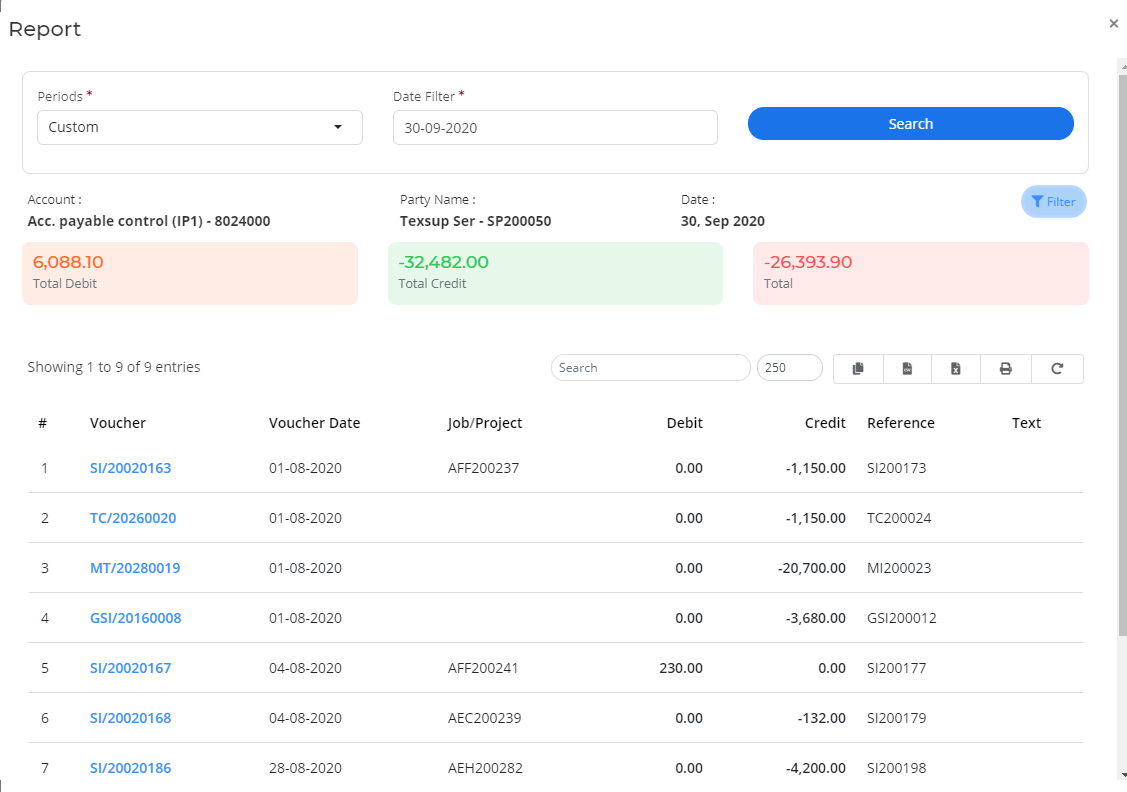
Clicking on the Supplier Name / anywhere in the column enables a pop up window where the list of invoices / Vouchers associated with the Suppliers are furnished .
Pop up window offers a special filter where you can get more precise data by applying the filter.
Pop up window gives you the details of the account selected such as account no, Supplier Name and current date.
Clicking on the voucher number available on the popup window gives you the view of Voucher in a new tab.
The total amount, credit and debit of the respective account is given in the middle section of the Pop Up window.
Ageing Report
Ageing Report notifies you the age of Supplier i.e. How long the Supplier is associated with us.
Ageing Report redirects the user to Supplier --> Ageing Report. The detailed explanation is provided in the Supplier Module.
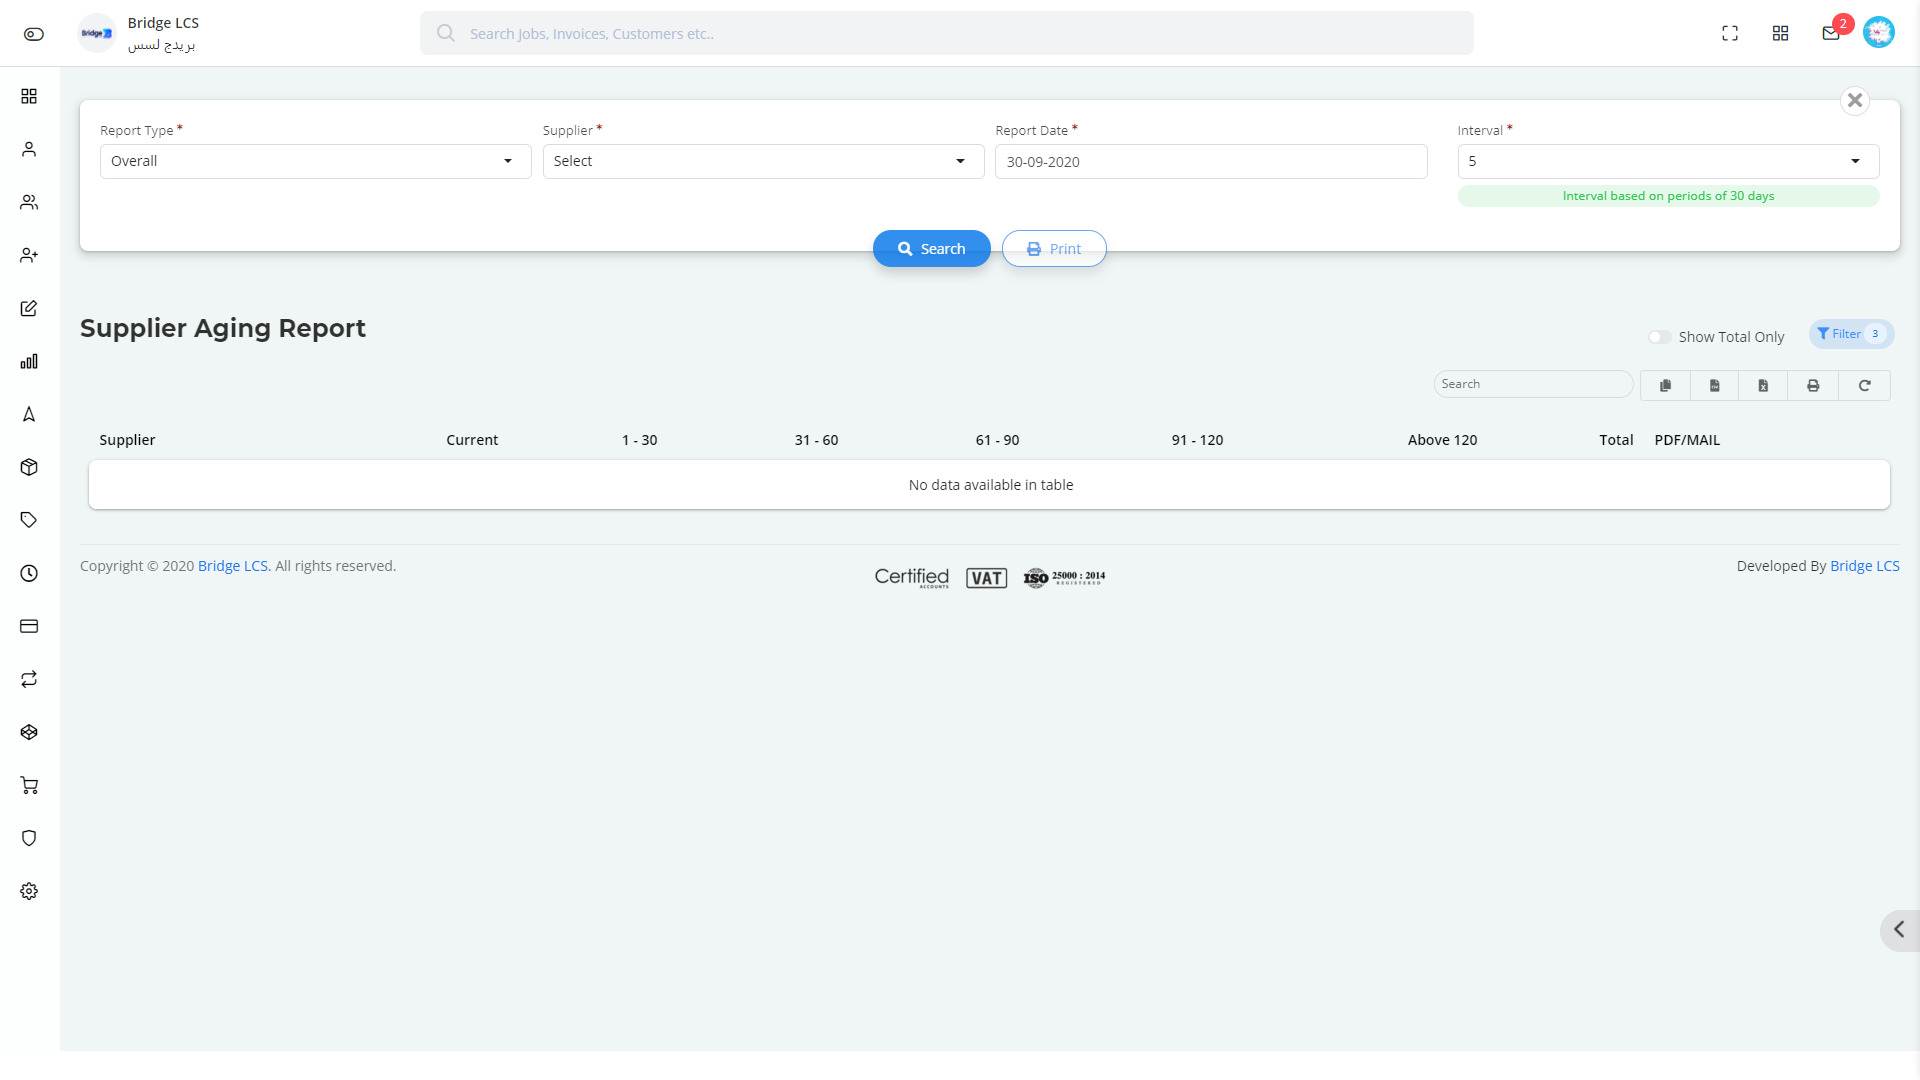
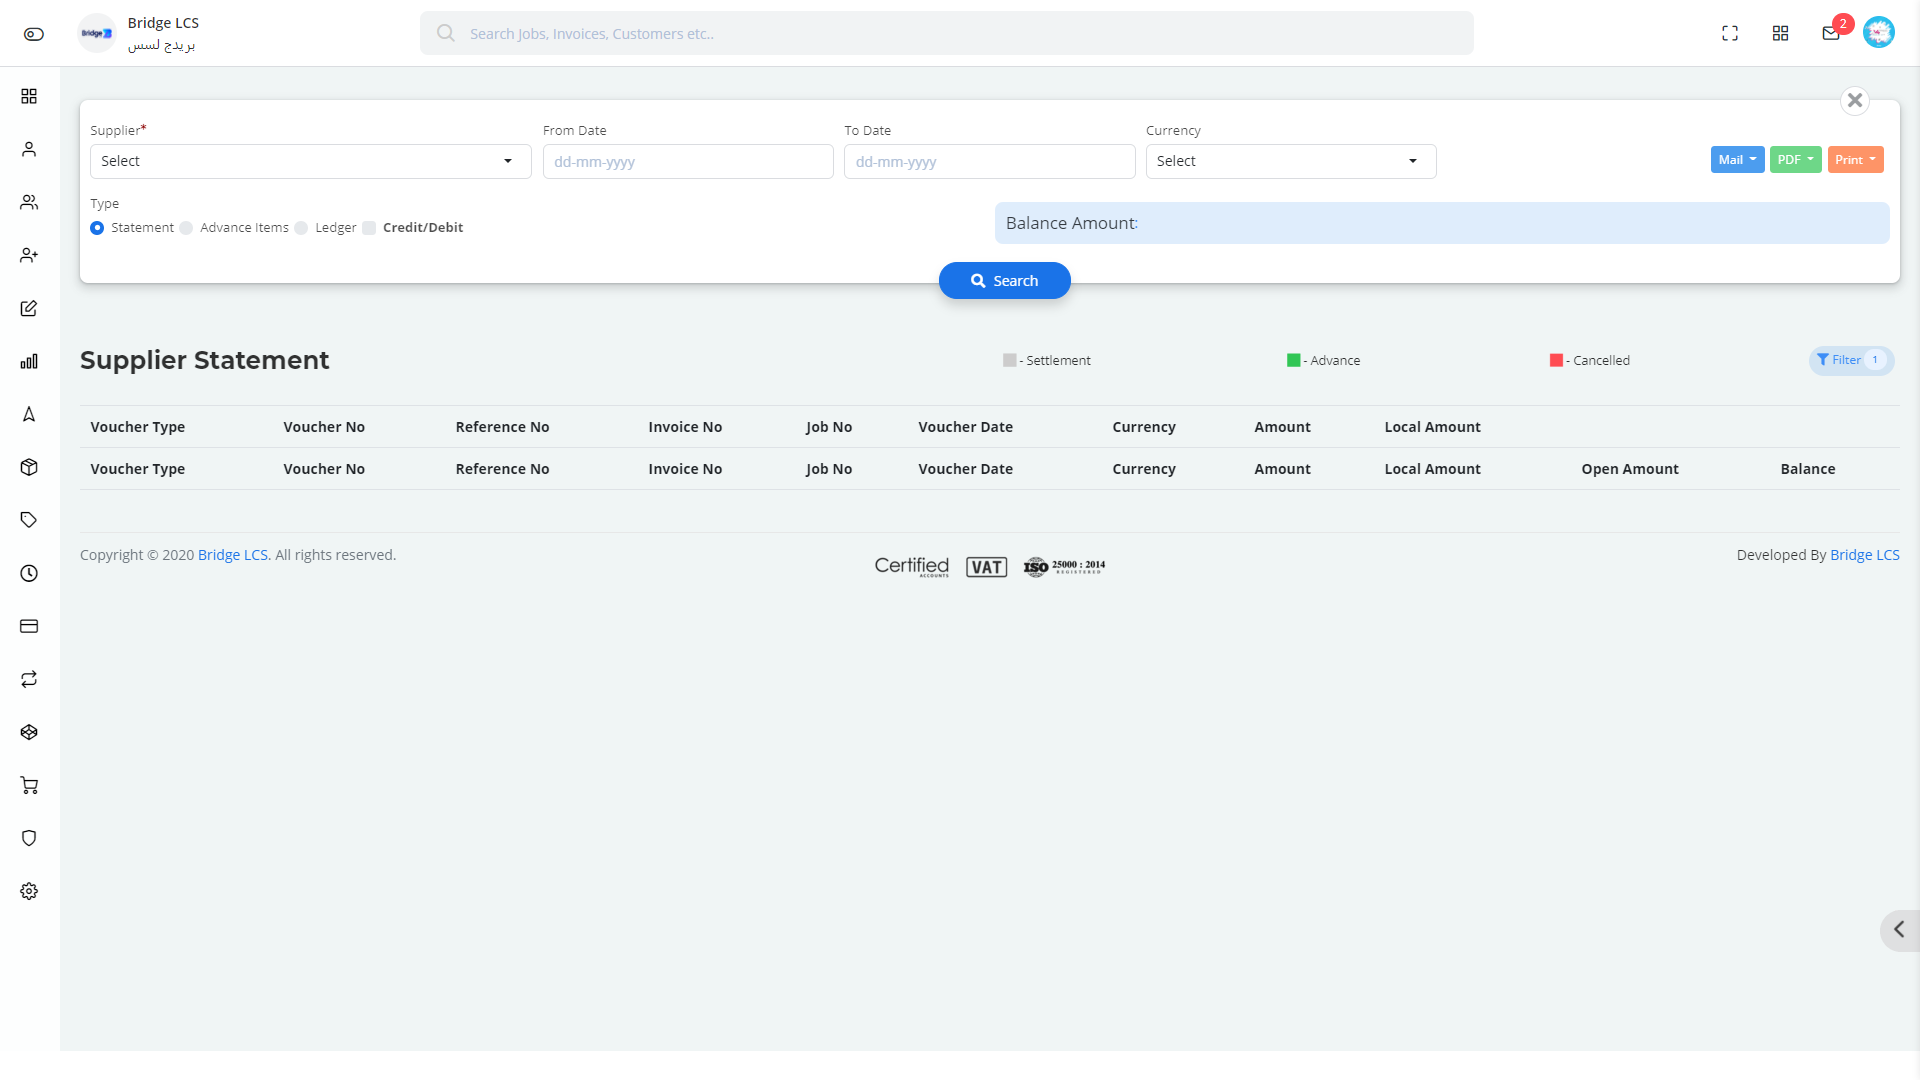
Supplier Statement
Supplier Statement provides you with the consolidated report of transactions that happened.
This redirects the user to Supplier --> Customer Statement . The detailed functioning can be referred to at the Supplier module.
Employee
Employee section has the following sub segments,
- Employee Ledger
- Employee Statement
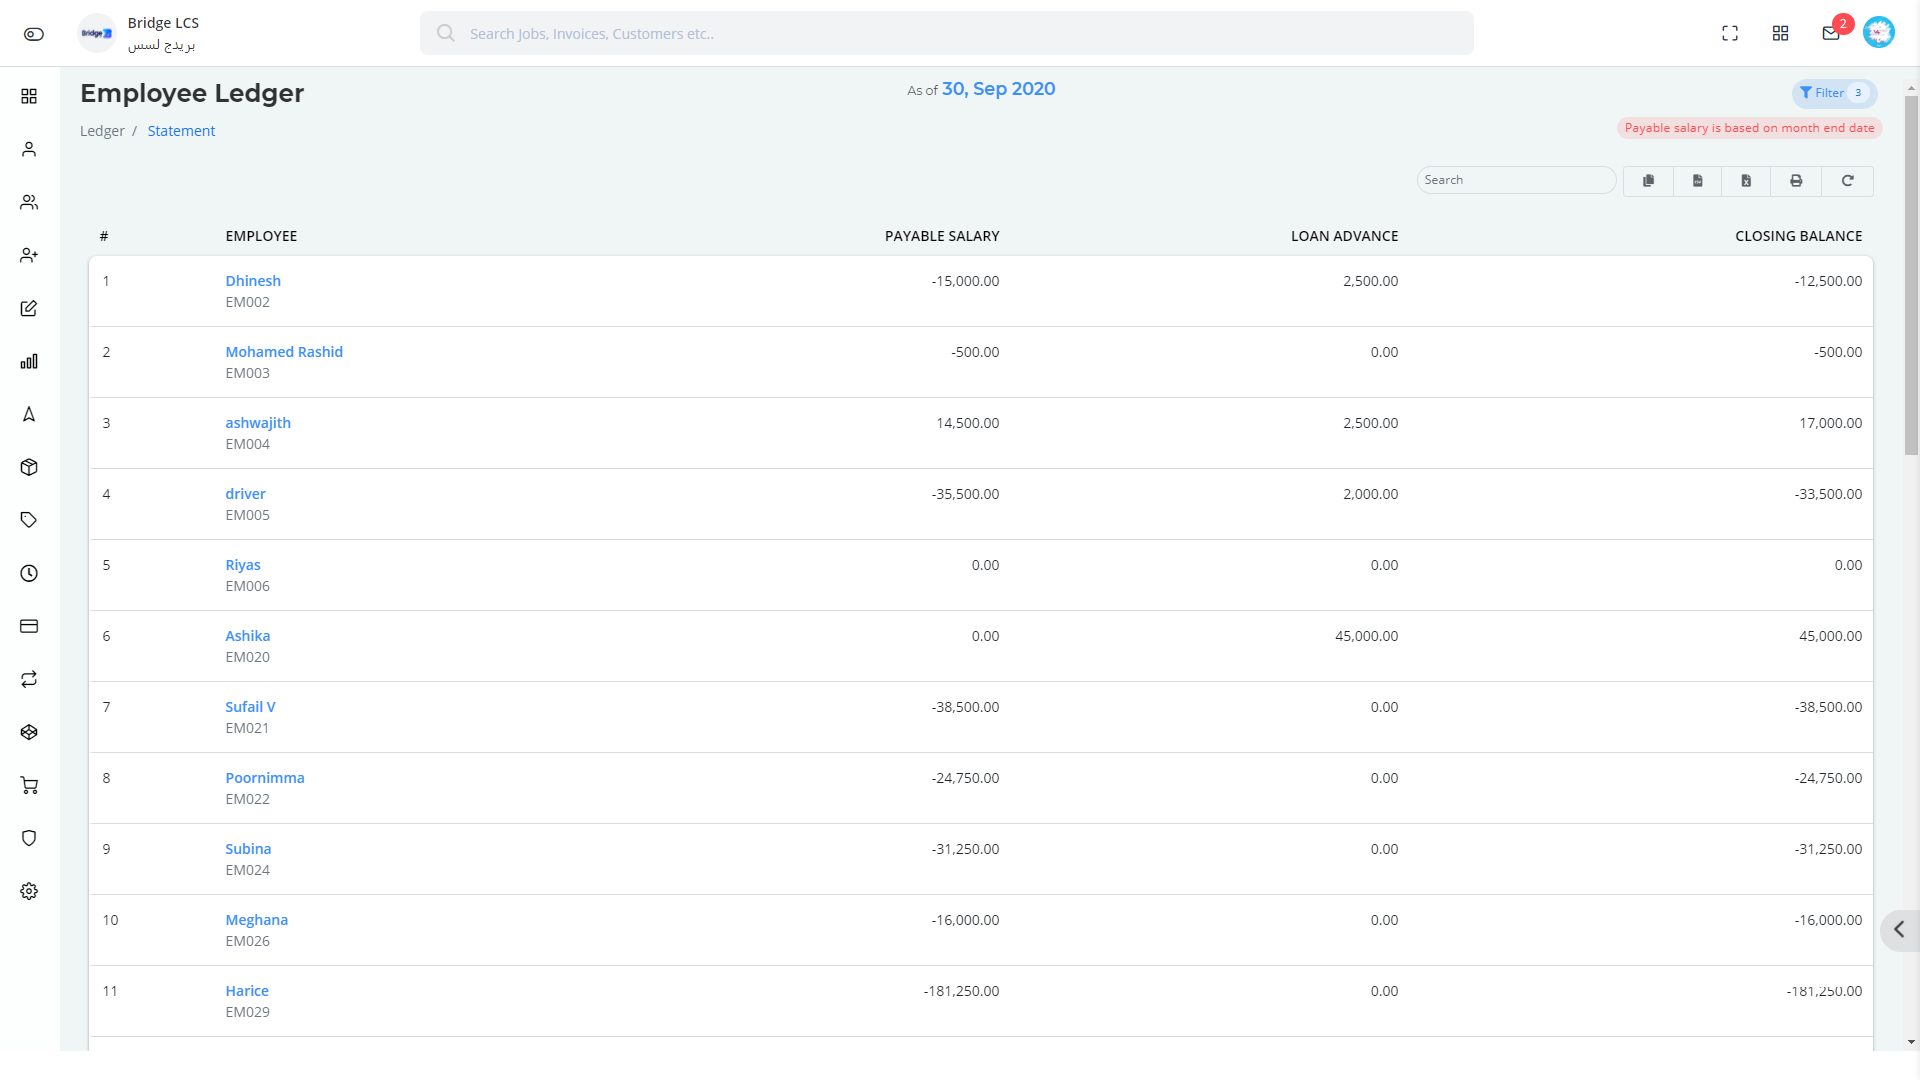
Employee Ledger
Employee Ledger portrays the list of data which explains the payable salary against loan along with closing balance.
In order to select the Employee , Click on the Filter Button Available at the right Corner. A separate section will be introduced where you can select the list of Employees along with the period and report date for a detailed report.
Print button available next to search prints the whole list of data listed.
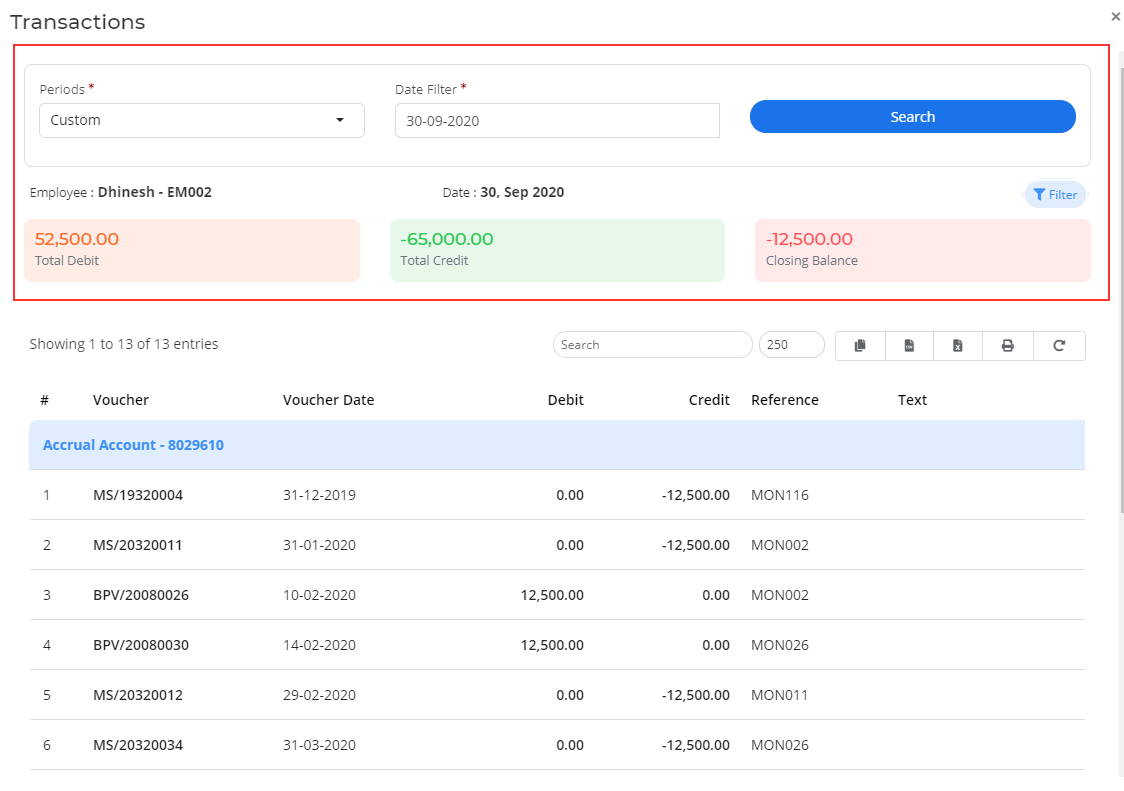
Double Clicking on the employee name gives you a pop up window whether further filters can be applied to fetch the accurate data.
Click on the Filter Available on the pop up window to get a filter view and proceed with your choices.
Double Clicking on the Voucher depicts the list of transactions happened in that particular account.
Employee Statement
Refer Employee Statement from Payroll --> Employee Statement.
